
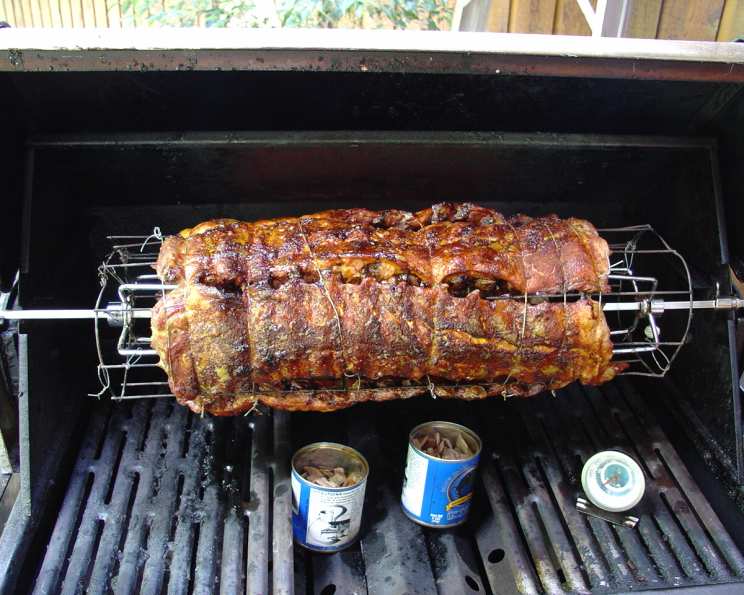
The Ribcage Baby Back Ribs: Rotisserie Perfection
Some of my fondest childhood memories revolve around summer evenings, the smell of charcoal filling the air, and my dad’s legendary ribs. He always aimed for fall-off-the-bone tenderness, but I remember one attempt in particular where, after hours of slow-cooking, the ribs still came out tough as leather. We laughed it off, of course, but that night sparked a culinary quest in me – a burning desire to master the art of perfect ribs. Years later, while experimenting with a rotisserie grill, a vision struck me: a “ribcage,” where the fat renders and bastes each rib continuously, resulting in unparalleled flavour and moisture. This isn’t just a recipe; it’s a culinary revelation.
Recipe Overview
- Prep Time: 30 minutes
- Cook Time: 4-5 hours
- Total Time: 4.5-5.5 hours
- Servings: 4-5 ribs per cage (typically enough for 8-10 people)
- Yield: 1 Ribcage
- Dietary Type: Varies based on rub & sauce; generally Gluten-Free, Dairy-Free if dry rub and dry served.
Ingredients
- 4-5 racks of pork baby back ribs
- 16-20 teaspoons dry rub seasoning (recommended: Texas Beer-B-Que rub)
- Canned wood chips (apple, oak, or hickory recommended)
- Barbecue sauce of your choice (optional, for basting)
- Butcher’s twine
- Fencing wire
Equipment Needed
- Gas grill with rotisserie
- Rotisserie spit
- Wire brush
- Sharp knife
- Paper towels
- Wrench (for propping the lid, optional)
- Thermometer
Instructions
-
Prepare the Ribs: Begin by removing the tough membrane from the back of each rack of ribs. Using a sharp knife, carefully loosen a corner of the membrane over a small end bone. Grip the loosened portion firmly with a paper towel and pull it away from the ribs in one swift motion. The paper towel provides the necessary grip to peel the membrane off cleanly.
-
Season the Ribs: Generously rub approximately 2 teaspoons of dry rub seasoning on each side of each rack of ribs. Ensure every surface is evenly coated for maximum flavour penetration. The Texas Beer-B-Que rub is highly recommended for its complex and delicious flavour profile.
-
Build the Ribcage: This is the heart of the method. Create a coil from fencing wire roughly 11 inches in diameter and as long as your grill’s back burner. Secure the coil into a circular shape with wire twist-ties. Thread the rotisserie spit through the centre of the coil. Fashion a “spider’s nest” of wires on each end of the coil to keep the coil centred on the spit. This framework will hold the ribs.
-
Attach the Ribs: Using butcher’s twine, tie the seasoned ribs securely to the ribcage. Employ 5 or 6 pieces of string per rack, depending on their length, to ensure they remain firmly in place during the cooking process. Typically, you can fit 4-5 racks onto the cage. Distribute the weight evenly for optimal rotation.
-
Prepare the Grill: Light your grill’s bottom burners on high and the back burner on low. This initial burn-off will eliminate any residue from previous grilling sessions. After a few minutes, use a wire brush to thoroughly clean the grill grates.
-
Smoke Infusion: Remove approximately half of the bottom grill grates and set them aside. Add canned wood chips (apple, oak, or hickory are excellent choices) directly onto the exposed coals. Place a thermometer on the remaining bottom grill grate to monitor the temperature inside the grill.
-
Establish Smoking Conditions: Close the grill lid and wait for the wood chips to begin smoking profusely. The smoke is crucial for imparting that signature smoky flavour to the ribs.
-
Rotisserie Placement: Carefully place the ribcage-mounted spit onto the rotisserie mechanism of your grill. Half-close the lid, leaving a small gap (a wrench can be used as a spacer).
-
Temperature Regulation: Turn off the bottom burners and activate the rotisserie motor. Aim to maintain a consistent grill temperature of approximately 230°F (110°C). Achieve this by adjusting the opening of the lid and the temperature setting of the back burner (low to medium-low).
-
The Long Cook: Allow the ribcage to rotate slowly for 4-5 hours. During this extended cooking time, the fat will render, basting the ribs continuously and creating incredibly tender and flavorful meat.
-
Check for Doneness: The ribs are ready when the meat has visibly shrunk away from the bone and they are “drop-dead” tender – easily pierced with a fork.
-
Remove and Serve: Carefully cut the cooked ribs free from the ribcage using kitchen shears or a sharp knife.
-
Sauce (Optional): If you prefer “wet” ribs, you can either sauce them individually on your plate or begin basting them with your favourite barbecue sauce 30 minutes before removing them from the grill, applying sauce every 10 minutes until they are finished.
Expert Tips & Tricks
- Membrane Removal is Key: Don’t skip the membrane removal. It prevents the rub from penetrating the meat properly and creates a tough, unpleasant texture.
- Dry Rub Application: Apply the dry rub at least an hour before cooking, or even overnight, for enhanced flavour penetration.
- Temperature Control: Maintaining a consistent temperature is paramount. Invest in a good grill thermometer and monitor it closely. Fluctuations in temperature can affect the cooking time and texture of the ribs.
- Wood Chip Management: Replenish the wood chips as needed to maintain a steady stream of smoke throughout the cooking process. Soaking the chips in water for 30 minutes before adding them to the grill can help them smoke longer.
- Doneness Test: The “bend test” is another way to check for doneness. Pick up the ribs with tongs at the midpoint; they should bend easily and almost break.
- Resting: After removing the ribs from the grill, let them rest for 10-15 minutes before cutting. This allows the juices to redistribute, resulting in even more succulent meat.
Serving & Storage Suggestions
Serve the Ribcage Baby Back Ribs hot off the grill, accompanied by your favourite barbecue sides such as coleslaw, corn on the cob, potato salad, or baked beans.
Leftover ribs can be stored in an airtight container in the refrigerator for up to 3-4 days. To reheat, wrap the ribs in foil with a splash of water or broth and bake in a preheated oven at 250°F (120°C) until warmed through, about 20-30 minutes. Alternatively, you can reheat them in the microwave, but they may become slightly less tender. For longer storage, ribs can be frozen for up to 2-3 months. Wrap them tightly in plastic wrap and then foil to prevent freezer burn.
Nutritional Information
| Nutrient | Amount per Serving | % Daily Value* |
|---|---|---|
| Calories | 650 kcal | 33% |
| Total Fat | 45g | 69% |
| Saturated Fat | 15g | 75% |
| Cholesterol | 200mg | 67% |
| Sodium | 500mg | 22% |
| Total Carbohydrate | 10g | 4% |
| Dietary Fiber | 2g | 8% |
| Sugars | 5g | – |
| Protein | 50g | 100% |
*Percent Daily Values are based on a 2,000 calorie diet.
Variations & Substitutions
- Spice Level: Adjust the amount of dry rub seasoning to control the spice level. For a milder flavour, use a rub with less chili powder.
- Wood Chip Variety: Experiment with different types of wood chips to create unique smoky flavour profiles. Cherry wood adds a subtle sweetness, while mesquite provides a strong, earthy flavour.
- Rib Type: While this recipe is designed for baby back ribs, it can also be adapted for spare ribs. Spare ribs are typically larger and require a longer cooking time.
- Sauce Options: Explore different barbecue sauce styles to find your favourite. Options include Kansas City-style (sweet and tangy), Texas-style (bold and smoky), and Carolina-style (vinegar-based).
- Marinade: For an extra layer of flavour, marinate the ribs overnight in a mixture of apple cider vinegar, Worcestershire sauce, garlic, and herbs before applying the dry rub.
FAQs (Frequently Asked Questions)
Q: Can I cook these ribs in the oven if I don’t have a rotisserie grill?
A: While the rotisserie is ideal, you can bake the ribs at 250°F (120°C) for 3-4 hours, wrapping them in foil for the first 2 hours to retain moisture. Remove the foil for the last hour to allow them to develop a bark.
Q: How do I prevent the ribs from drying out during the long cooking time?
A: Maintaining a consistent temperature and ensuring sufficient humidity in the grill are key. Using a water pan or spritzing the ribs with apple juice or broth every hour can help prevent them from drying out.
Q: What if my grill temperature fluctuates too much?
A: Use a reliable grill thermometer and adjust the vents and burner settings as needed to maintain a stable temperature. If necessary, you can also use a ceramic heat deflector to help even out the heat distribution.
Q: Can I use a different type of wood chips?
A: Absolutely! The type of wood chips you use will significantly impact the flavour of the ribs. Experiment with different varieties to find your preference.
Q: How do I know when the ribs are done?
A: The meat should have pulled back from the bones, and the ribs should be very tender when pierced with a fork. They should also bend easily when lifted with tongs.
Final Thoughts
The Ribcage Baby Back Ribs are more than just a meal; they’re an experience. This method, honed over years of grilling adventures, guarantees tender, flavourful ribs every single time. Don’t be intimidated by the “ribcage” contraption – it’s simpler than it looks and the results are worth the effort. Gather your friends and family, fire up the grill, and prepare to be amazed. And if you tweak this recipe or pair it with an amazing side dish, please let me know in the comments. Happy grilling!