
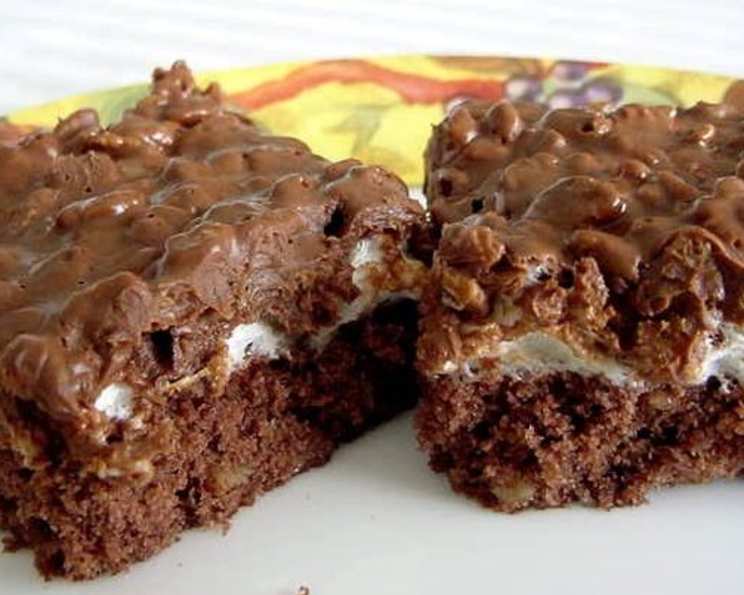
Rice Krispies Chocolate Dream Bars: A Symphony of Textures and Flavors
The memory is as vivid as the first bite: a church potluck, a table laden with every conceivable dish, and nestled amongst them, a pan of these magical Rice Krispies Chocolate Dream Bars. As a child, I was drawn to the layers – the fudgy base, the gooey marshmallow middle, and that irresistible chocolate-peanut butter topping studded with crispy rice cereal. Each square was a perfect symphony of textures and flavors, a miniature work of art that vanished far too quickly, leaving me yearning for another. These bars weren’t just dessert; they were a symbol of community, warmth, and shared joy.
Recipe Overview
- Prep Time: 20 minutes
- Cook Time: 23 minutes
- Total Time: 2 hours 23 minutes (includes cooling/refrigeration)
- Yields: 48 2×1 inch bars
- Dietary Type: Not Gluten-Free
Ingredients
Bottom Layer:
- ½ cup softened butter or margarine
- ¾ cup sugar
- 1 teaspoon vanilla extract
- 2 large eggs
- ¾ cup flour
- 2 tablespoons cocoa powder
- ¼ teaspoon baking powder
- ⅛ teaspoon salt (a pinch)
- ½ cup chopped walnuts or pecans
Middle Layer:
- 2 cups miniature marshmallows
Top Layer:
- 1 cup semi-sweet chocolate chips
- 1 cup peanut butter
- 2 cups Rice Krispies
Equipment Needed
- Mixing Bowl
- Electric Mixer (optional but recommended)
- Measuring cups and spoons
- 13 x 9 inch baking pan
- Small saucepan
- Spatula
- Oven
Instructions
-
Prepare the Bottom Layer: Preheat your oven to 350°F (175°C). Grease a 13 x 9 inch baking pan thoroughly. This will prevent sticking and make removal much easier.
-
Cream the Butter and Sugar: In a mixing bowl, cream together the softened butter (or margarine) and sugar until the mixture is light and fluffy. This step is crucial for achieving the right texture in the base layer. An electric mixer can speed this up, but a good old-fashioned whisk will work just fine.
-
Add Vanilla and Eggs: Add the vanilla extract and eggs, one at a time, beating well after each addition. This ensures each ingredient is fully incorporated and contributes to the batter’s overall consistency.
-
Combine Dry Ingredients: In a separate bowl, whisk together the flour, cocoa powder, baking powder, salt, and chopped nuts (walnuts or pecans). This prevents lumps and ensures even distribution of these ingredients throughout the batter.
-
Combine Wet and Dry Ingredients: Gradually stir the dry ingredient mixture into the egg mixture until just well combined. Be careful not to overmix, as this can lead to a tough base.
-
Spread and Bake the Bottom Layer: Spread the batter evenly in the bottom of the prepared greased pan. Bake at 350°F (175°C) for 15-20 minutes, or until a toothpick inserted into the center comes out clean.
-
Add Marshmallow Layer: Remove the pan from the oven and immediately sprinkle the miniature marshmallows evenly over the baked bottom layer.
-
Melt the Marshmallows: Return the pan to the oven and bake for an additional 3 minutes, or until the marshmallows are slightly puffed and softened. Watch carefully to prevent burning.
-
Cool Completely: Remove from the oven and let the marshmallow layer cool completely. This is essential for the top layer to adhere properly and prevent melting.
-
Prepare the Chocolate Peanut Butter Topping: In a small saucepan, combine the semi-sweet chocolate chips and peanut butter.
-
Melt the Topping Ingredients: Cook over low heat, stirring constantly, until the chocolate and peanut butter are completely melted and smooth. Be patient and stir frequently to prevent scorching.
-
Incorporate the Rice Krispies: Remove the saucepan from the heat and stir in the Rice Krispies until they are evenly coated with the chocolate-peanut butter mixture.
-
Spread the Topping: Spread the Rice Krispies mixture evenly on top of the cooled marshmallow layer.
-
Refrigerate: Refrigerate the pan for at least 2 hours, or until the bars are firm. This will allow the topping to set and make the bars easier to cut.
-
Cut and Serve: Once firm, cut the bars into 2×1 inch squares and serve.
Expert Tips & Tricks
- Softening Butter: For truly creamy bars, ensure your butter is properly softened but not melted. Letting it sit at room temperature for about 30 minutes usually does the trick.
- Nut Alternatives: Feel free to experiment with different nuts! Almonds, macadamia nuts, or even crushed pretzels can add a unique twist.
- Preventing Sticking: Line your baking pan with parchment paper, leaving an overhang on the sides. This will make removing the bars a breeze.
- Marshmallow Variations: Try using flavored marshmallows for a fun, colorful twist.
- Even Melting: To prevent the chocolate and peanut butter from burning, use a double boiler or a heat-safe bowl set over a simmering pot of water.
Serving & Storage Suggestions
These Rice Krispies Chocolate Dream Bars are best served chilled or at room temperature. They make a perfect addition to any dessert platter, potluck gathering, or simply as a sweet treat to enjoy at home.
- Storage: Store leftover bars in an airtight container in the refrigerator for up to 5 days.
- Freezing: For longer storage, wrap individual bars tightly in plastic wrap and then place them in a freezer-safe container. They can be frozen for up to 2 months. Thaw in the refrigerator before serving.
- Reheating: While not necessary, you can warm a bar in the microwave for a few seconds to soften it slightly.
Nutritional Information
| Nutrient | Amount per Serving | % Daily Value |
|---|---|---|
| Calories | 107.4 kcal | N/A |
| Calories from Fat | 60 kcal | 56% |
| Total Fat | 6.7 g | 10% |
| Saturated Fat | 2.6 g | 12% |
| Cholesterol | 12.8 mg | 4% |
| Sodium | 61.2 mg | 2% |
| Total Carbohydrate | 10.9 g | 3% |
| Dietary Fiber | 0.8 g | 3% |
| Sugars | 6.9 g | 27% |
| Protein | 2.3 g | 4% |
Variations & Substitutions
- Gluten-Free: Substitute the all-purpose flour with a gluten-free flour blend. Ensure your Rice Krispies are also certified gluten-free, as some brands may contain malt flavoring derived from barley.
- Vegan: Use vegan butter, a flax egg (1 tbsp ground flaxseed mixed with 3 tbsp water), vegan chocolate chips, and a vegan peanut butter alternative. Replace the marshmallows with a vegan marshmallow substitute.
- Different Chip Flavors: Experiment with different chocolate chips! Dark chocolate, milk chocolate, white chocolate, or even butterscotch chips can create a unique flavor profile.
- Nut-Free: Omit the nuts from the bottom layer or substitute them with sunflower seeds or pumpkin seeds.
- Spiced Version: Add a pinch of cinnamon or nutmeg to the bottom layer for a warm, comforting flavor.
FAQs (Frequently Asked Questions)
Q: Can I use a different size pan?
A: Yes, you can use an 8×8 inch pan for thicker bars, but you may need to adjust the baking time slightly. Keep a close eye on them.
Q: My marshmallows are burning! What should I do?
A: Reduce the oven temperature slightly and/or shorten the baking time. You can also tent the pan with foil to prevent excessive browning.
Q: Can I make these ahead of time?
A: Absolutely! These bars are perfect for making ahead of time. Simply store them in the refrigerator until ready to serve.
Q: My topping is too thick to spread. What can I do?
A: Add a tablespoon of milk or cream to the chocolate-peanut butter mixture and stir until it thins out slightly.
Q: Can I add sprinkles to the top?
A: Of course! Add sprinkles to the top of the bars immediately after spreading the topping for a festive touch.
Final Thoughts
These Rice Krispies Chocolate Dream Bars are more than just a recipe; they’re a trip down memory lane, a taste of home, and a celebration of simple pleasures. Whether you’re baking them for a special occasion or simply craving a sweet treat, I encourage you to give this recipe a try. Don’t be afraid to experiment with variations and make them your own. And most importantly, share them with loved ones and spread the joy! Pair these bars with a cold glass of milk, a scoop of vanilla ice cream, or even a cup of hot coffee for the ultimate indulgence. Happy baking!