
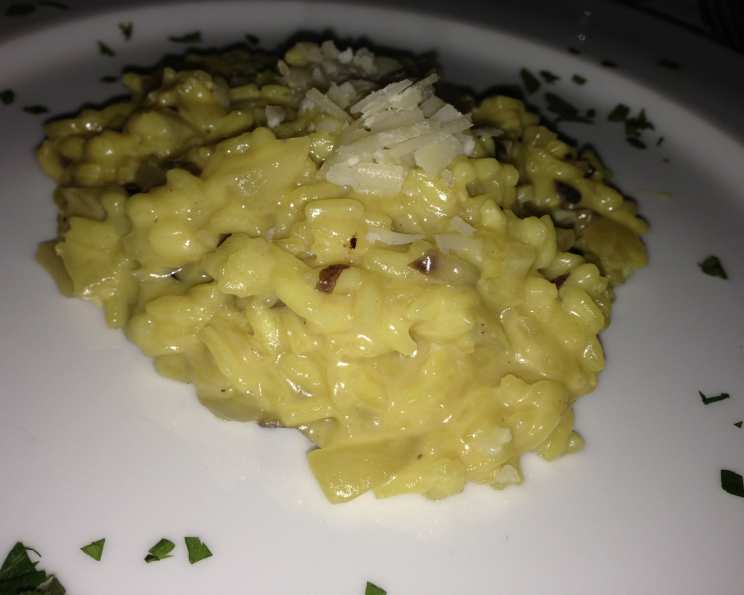
Mastering the Art of Simple Parmesan Risotto
The first time I truly understood the magic of risotto was during a rainy autumn evening in Tuscany. Tucked away in a tiny family-run trattoria, I watched Nonna Emilia, with her hands that seemed to know every secret of Italian cuisine, coax creamy perfection from humble grains of rice. The simple act of slowly adding broth, stirring with unwavering focus, transformed into an almost meditative experience. From that moment, risotto became more than just a dish to me; it became a symbol of patience, care, and the profound beauty of simple ingredients cooked with love.
Recipe Overview
- Prep Time: 15 minutes
- Cook Time: 45 minutes
- Total Time: 1 hour
- Servings: 4-6
- Yield: About 6 cups
- Dietary Type: Vegetarian (can be made gluten-free)
Ingredients
- 1 medium yellow onion
- 4 tablespoons butter
- 5 cups chicken broth (canned or homemade)
- 2 cups Arborio rice
- Salt and pepper, to taste
- ¾ cup freshly grated Parmesan cheese
Ingredient Notes:
- Arborio rice is key for risotto’s signature creaminess. Look for it in most supermarkets or specialty food stores.
- For a vegetarian risotto, ensure your chicken broth is vegetable broth.
- Freshly grated Parmesan makes a world of difference. Avoid the pre-shredded variety for the best flavor and melting quality.
Equipment Needed
- 4-to-5-quart saucepan
- Separate saucepan for broth
- Ladle
- Wooden spoon
Instructions
-
Prepare the Onion: Begin by peeling and finely chopping the yellow onion. Aim for a consistent dice for even cooking.
-
Sauté the Onion: In a 4-to-5-quart saucepan, melt the 4 tablespoons of butter over medium heat, stirring regularly to prevent burning. Add the chopped onion and cook, continuing to stir frequently, until it becomes soft and translucent. This should take about 5-7 minutes. Be vigilant – reduce the heat if the onion starts to brown. The goal is to sweat the onions, not caramelize them at this stage.
-
Warm the Broth: While the onion is cooking, pour the 5 cups of chicken broth into a separate saucepan. Set the saucepan over medium heat and bring the broth to a gentle simmer. Then adjust the heat as needed to maintain this simmer throughout the risotto-making process. Keeping the broth hot is crucial for even cooking of the rice.
-
Toast the Rice: Once the onion is softened, add the 2 cups of Arborio rice to the saucepan. Cook over medium heat, stirring constantly with a wooden spoon, for about 3 minutes. This toasting process is essential. It warms the grains and slightly hardens their exterior, which helps them absorb liquid slowly and evenly without becoming mushy. Adjust the heat as needed – if the rice is cooked at too high a heat, it will turn brown and take on an undesirable flavor.
-
Begin Adding Broth: Using a ladle, scoop up about ½ to ¾ cup of the simmering chicken broth. Pour it into the pan with the rice, stirring constantly with a spoon. After this first addition of broth, the rice mixture will look a bit soupy. Don’t worry; this is exactly how it should be!
-
The Art of Stirring: As the rice begins to cook, stir it constantly, making sure that you scrape along the bottom of the pan so that it does not stick. You should see small bubbles popping up in the liquid from time to time. If it bubbles more vigorously than this, reduce the heat to medium-low. Consistent stirring releases the starches in the rice, creating the creamy texture that is characteristic of a good risotto.
-
Continue Adding Broth Gradually: When most of the liquid from the first addition is absorbed into the rice and the rice begins to look a bit dry, add another ladle (½ to ¾ cup) of broth to the pan and stir constantly, as before. Repeat this process – adding broth in batches and stirring continuously – until you have used most of the broth (this will probably take about 20 minutes).
-
Check for Doneness: After about 20 minutes, it’s time to test whether the risotto is cooked. Spoon up a grain of rice and bite into it – it should be tender but still slightly firm to the bite (al dente), without being too mushy. If it is still crunchy and tastes a bit starchy, you will need to continue adding liquid and cooking further.
-
Adjust Liquid as Needed: If it looks as if you will run out of chicken broth and your rice is still not cooked, don’t be alarmed. Because of variations in individual stoves and cooking temperatures, you may need more liquid than called for in the recipe. Simply heat up another cup or two of chicken broth. If you run out of broth entirely, you can substitute with hot water.
-
Achieving Creamy Perfection: When the rice is tender and the risotto has a creamy consistency, almost like thick oatmeal, it is done. The grains should still hold their shape, but they should be enveloped in a luscious, starchy sauce.
-
Season and Finish: Add salt and pepper to the risotto, about ¼ teaspoon at a time, until it seems well-seasoned to you. Stir well. Add the ¾ cup of grated Parmesan cheese and stir until the cheese is fully melted and incorporated, adding another layer of creaminess and richness.
-
Serve Immediately: Serve the risotto immediately in warm bowls. Have extra grated Parmesan on hand for those who want to add more. Risotto is best enjoyed right away, as it can become less creamy as it cools.
Expert Tips & Tricks
- Use a Wide Pan: A wider pan allows for more surface area, which helps the rice cook more evenly and speeds up the evaporation of the broth.
- Don’t Overcrowd the Pan: If you’re making a larger batch of risotto, consider using two pans to avoid overcrowding, which can lead to uneven cooking.
- Wine Addition (Optional): For an extra layer of flavor, add ½ cup of dry white wine (such as Sauvignon Blanc or Pinot Grigio) to the pan after toasting the rice. Let the wine evaporate completely before adding the broth.
- Broth Quality Matters: The flavor of your broth will significantly impact the flavor of your risotto. Use a high-quality broth, either homemade or store-bought, for the best results.
- Stirring Technique: Consistent stirring is crucial, but you don’t need to stir constantly. Focus on scraping the bottom of the pan to prevent sticking and ensure even cooking.
- Fixing Overcooked Risotto: If you accidentally overcook the risotto and it becomes too mushy, try adding a splash of lemon juice or white wine vinegar to brighten the flavors and cut through the starchiness.
Serving & Storage Suggestions
Serve the risotto immediately in warmed bowls. Garnish with a sprinkle of freshly grated Parmesan cheese and a drizzle of extra virgin olive oil, if desired. A sprig of fresh parsley or thyme adds a touch of color and aroma.
Leftover risotto can be stored in an airtight container in the refrigerator for up to 2 days. To reheat, add a splash of broth or water to the risotto and gently warm it over low heat, stirring frequently until heated through. You can also microwave it in short intervals, stirring in between, to prevent it from drying out. Note that reheated risotto will not be as creamy as freshly made risotto, but it will still be delicious.
Nutritional Information
| Nutrient | Amount per Serving | % Daily Value |
|---|---|---|
| Calories | 420 kcal | 21% |
| Total Fat | 15g | 23% |
| Saturated Fat | 9g | 45% |
| Cholesterol | 35mg | 12% |
| Sodium | 800mg | 33% |
| Total Carbohydrate | 55g | 18% |
| Dietary Fiber | 2g | 8% |
| Sugars | 3g | – |
| Protein | 12g | 24% |
Note: Nutritional information is an estimate and may vary based on specific ingredients and portion sizes.
Variations & Substitutions
- Mushroom Risotto: Sauté sliced mushrooms (such as cremini, shiitake, or portobello) with the onion for a delicious earthy flavor.
- Shrimp Risotto: Add cooked shrimp to the risotto during the last few minutes of cooking.
- Asparagus Risotto: Add blanched asparagus tips to the risotto during the last few minutes of cooking.
- Lemon Risotto: Add lemon zest and juice to the risotto during the last few minutes of cooking for a bright, citrusy flavor.
- Saffron Risotto (Risotto alla Milanese): Infuse the broth with saffron threads for a vibrant yellow color and a delicate floral aroma.
- Vegan Risotto: Use vegetable broth and nutritional yeast instead of Parmesan cheese. You can also use olive oil instead of butter.
FAQs (Frequently Asked Questions)
Q: What is Arborio rice and why is it important for risotto?
A: Arborio rice is a short-grain Italian rice variety with a high starch content. This starch is what gives risotto its creamy texture.
Q: Can I use a different type of rice?
A: While Arborio is the most traditional, you can use other short-grain rice varieties like Carnaroli or Vialone Nano. Avoid using long-grain rice, as it won’t produce the same creamy texture.
Q: How do I know when the risotto is done?
A: The rice should be tender but still slightly firm to the bite (al dente). The risotto should have a creamy, almost saucy consistency.
Q: Can I make risotto ahead of time?
A: Risotto is best enjoyed fresh, but you can prepare it partially ahead of time. Cook the risotto until it is slightly underdone, then spread it out on a baking sheet to cool quickly. Store it in the refrigerator and finish cooking it just before serving.
Q: Why is constant stirring so important?
A: Constant stirring releases the starches in the rice, creating the creamy texture that is characteristic of a good risotto. It also prevents the rice from sticking to the bottom of the pan and burning.
Final Thoughts
Now that you’re armed with this simple yet elegant recipe, I encourage you to step into your kitchen and create your own culinary masterpiece. Don’t be intimidated by the process – embrace the mindful stirring, the gentle simmering, and the transformation of simple ingredients into something truly special. Serve this risotto with a crisp glass of Pinot Grigio, and savor the taste of Italy in your own home. And most importantly, please share your creations and feedback! I’m eager to hear about your risotto adventures. Buon appetito!