
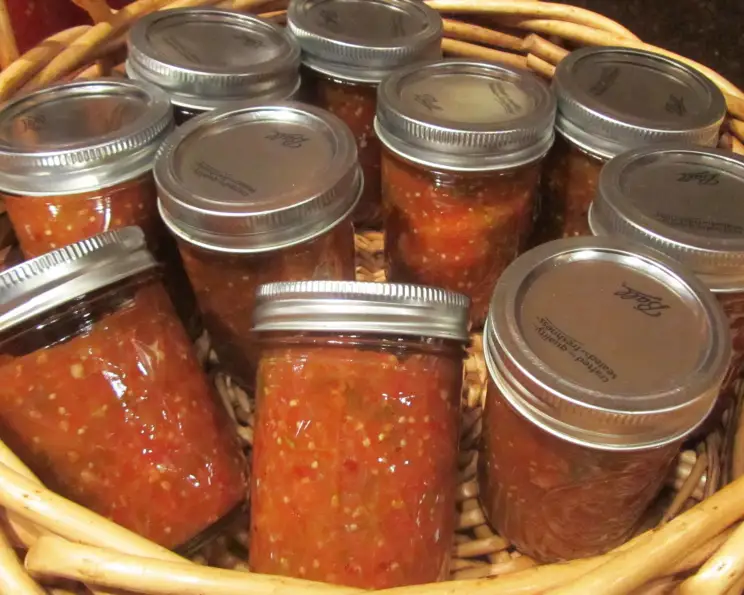
Roasted Tomatillo, Tomato N Chile Salsa: A Taste of Summer’s Bounty
I remember one scorching August afternoon, my grandmother, her face flushed with the heat of the kitchen, standing over a massive pot bubbling with the most incredible aroma. It was a symphony of roasted vegetables, smoky chiles, and bright lime—the unmistakable scent of her famous salsa. She would let me sneak a taste, the vibrant flavors exploding on my tongue, a perfect blend of sweet, tangy, and spicy. This recipe is an homage to those summer days, a celebration of fresh ingredients and the love that goes into sharing homemade goodness.
Recipe Overview
- Prep Time: 20 minutes
- Cook Time: 35 minutes
- Total Time: 1 hour 5 minutes (plus cooling and processing time)
- Yield: Approximately 10 (8-ounce) jars
- Dietary Type: Vegan, Gluten-Free
Ingredients
- 2 lbs tomatillos, papery husks and stems removed, rinsed (halve the larger tomatillos)
- 2 lbs tomatoes, cut in half
- ½ lb onion, peeled and cut into 1-inch chunks (8 ounces)
- 2 chipotle chiles in adobo
- 2 tablespoons adobo sauce
- 2 ounces jalapeno chilies (your choice of heat, seeded if you don’t want it too hot, cut in half) or 2 ounces serrano chilies (your choice of heat, seeded if you don’t want it too hot, cut in half)
- 1 bulb of garlic, separate the cloves
- 1 cup roughly chopped fresh cilantro
- ½ cup fresh lime juice
- ½ cup vinegar, 5% acidity
- 2 teaspoons sugar
- 2 teaspoons pickling salt (to taste)
- 1 teaspoon ground cumin
Equipment Needed
- Two large rimmed baking sheets
- Blender
- Large pot
- Canning jars (10 8-ounce jars) with lids and bands
- Jar lifter
- Large pot for water bath canning
Instructions
- Begin by sterilizing your jars. Keep the sterilized jars in hot water or in a warm dishwasher while you prepare the salsa ingredients. This helps prevent the jars from cracking when filled with the hot salsa.
- Preheat your oven to 400°F (200°C).
- Arrange the tomatillos, tomatoes, onions, fresh chiles (jalapeno or serrano), and garlic cloves in a single layer on two large rimmed baking sheets. Overcrowding the baking sheets will steam the vegetables instead of roasting them, so use two sheets if necessary.
- Roast the vegetables for 25-35 minutes, or until they are charred in spots. The tomatillos and tomatoes will be soft, collapsed, and leaking juices. This charring is key to developing the deep, complex flavors of the salsa.
- Remove the baking sheets from the oven and allow the roasted vegetables to cool slightly before handling them. This prevents burns and makes the blending process easier.
- Peel the garlic cloves. They should slip out of their skins easily after roasting.
- In a blender, combine the peeled garlic, cilantro, roasted vegetables, chipotle chiles in adobo, and adobo sauce.
- Blend the mixture to your desired consistency. You can blend it to a chunky salsa or a smoother puree, depending on your preference. I personally enjoy a slightly chunky texture.
- Pour the blended salsa into a large pot.
- Add the lime juice, vinegar, sugar, salt, and cumin to the pot. The lime juice and vinegar are crucial for achieving the proper pH level, ensuring the safety of the canned salsa. Don’t skip these steps!
- Bring the salsa to a boil over medium-high heat, then reduce the heat to low and simmer for 10 minutes. This allows the flavors to meld together and thickens the salsa slightly.
- Ladle the hot salsa into the sterilized jars, leaving ½ inch of headspace (the space between the top of the salsa and the rim of the jar). Use a canning funnel for easier and cleaner filling.
- Remove any air bubbles trapped in the jars by gently tapping the jars on the counter or using a non-metallic utensil to run along the inside of the jar.
- After removing air bubbles, re-measure the headspace. If needed, add more salsa to meet the recommended ½ inch headspace.
- Wipe the rim of each jar with a clean, damp cloth to remove any spills or residue. This ensures a good seal.
- Center the lid on the jar and apply the band, tightening it until it is fingertip tight. This means it’s snug but not overly tight, allowing air to escape during processing.
- Repeat the filling, headspace checking, wiping, and sealing process with the remaining jars.
- Place the filled jars into a hot water bath, ensuring that the water covers the jars by at least 1 inch. Use a jar lifter to safely lower and remove the jars.
- Bring the water to a boil, and boil for 15 minutes to process (at sea level), and an additional minute per 1,000 ft above sea level. (For example, at 5280 ft, boil for 21 minutes). Processing time is critical for ensuring a safe and shelf-stable product.
- Carefully remove the jars from the water bath using the jar lifter and place them on a folded towel, leaving them undisturbed for 12 hours. Avoid tilting the jars.
- After an hour, check to see if the jars have sealed by pressing down on the middle of the jar lid. If the lid doesn’t flex or move when pressed, it has sealed properly. If it can be pressed down, it hasn’t sealed and should be refrigerated immediately.
- Store the sealed jars in a cool, dark area for up to a year.
Expert Tips & Tricks
- For a deeper, smokier flavor, consider using a grill to char the vegetables instead of roasting them in the oven.
- If you prefer a sweeter salsa, add a touch more sugar to balance the acidity.
- To control the heat level, adjust the amount of jalapeno or serrano chilies used, and be sure to remove the seeds and membranes for a milder salsa.
- Don’t discard the delicious roasted vegetable juices! Add them back into the blender for extra flavor and liquid.
- If your salsa is too thick after blending, add a splash of water or tomato juice to thin it out.
- For a richer flavor, add a tablespoon of tomato paste to the pot while simmering.
Serving & Storage Suggestions
This Roasted Tomatillo, Tomato N Chile Salsa is incredibly versatile. Serve it as a dip with tortilla chips, top grilled chicken or fish, or use it as a flavorful addition to tacos, burritos, or quesadillas. It’s also fantastic as a base for chili or enchilada sauce.
Once opened, store refrigerated jars for up to 2 weeks. Unopened jars can be stored in a cool, dark place for up to a year. Be sure to check the seal before consuming.
Nutritional Information
| Nutrient | Amount per Serving | % Daily Value |
|---|---|---|
| Calories | 71 kcal | – |
| Total Fat | 1 g | 1% |
| Saturated Fat | 0 g | 0% |
| Cholesterol | 0 mg | 0% |
| Sodium | 474 mg | 20% |
| Total Carbohydrate | 15 g | 5% |
| Dietary Fiber | 4 g | 14% |
| Sugars | 8 g | – |
| Protein | 2 g | – |
Note: Nutritional information is an estimate and may vary based on specific ingredients and preparation methods.
Variations & Substitutions
- Spicier Salsa: Use habanero peppers instead of or in addition to jalapenos or serranos for an intense kick.
- Sweeter Salsa: Add a roasted red bell pepper to the vegetable mixture for a touch of sweetness and color.
- Smoked Salsa: Add a pinch of smoked paprika to the simmering salsa for a smoky depth of flavor.
- Fruit Salsa: Incorporate roasted pineapple or mango for a tropical twist.
- Herb Variations: Experiment with different herbs such as oregano, thyme, or epazote for unique flavor profiles.
FAQs (Frequently Asked Questions)
Q: Why is lime juice and vinegar necessary in this recipe?
A: Lime juice and vinegar are essential for achieving a safe pH level (4.6 or lower) for canning. This acidity prevents the growth of harmful bacteria, ensuring the salsa is shelf-stable.
Q: Can I use dried chiles instead of fresh ones?
A: Yes, you can substitute dried chiles, but rehydrate them in hot water before roasting to prevent them from burning.
Q: Do I have to use a water bath to preserve this salsa?
A: Yes, for safe long-term storage at room temperature, water bath canning is crucial. If you prefer not to can, you can store the salsa in the refrigerator for up to two weeks or freeze it for longer storage.
Q: How do I know if my jars have sealed properly?
A: The most reliable way to check for a proper seal is to press down on the center of the lid. If the lid doesn’t flex or move when pressed, it has sealed. You may also hear a “popping” sound as the jars cool, indicating a successful seal.
Q: Can I adjust the amount of salt in the recipe?
A: Yes, you can adjust the amount of salt to your taste preference, but be mindful that salt also acts as a preservative.
Final Thoughts
This Roasted Tomatillo, Tomato N Chile Salsa is more than just a recipe; it’s a taste of summer, a celebration of fresh ingredients, and a way to share love with family and friends. I encourage you to try this recipe and experience the joy of creating something delicious and homemade. Don’t be afraid to experiment with different variations and flavors to make it your own. Share your creations and feedback – I can’t wait to hear about your salsa adventures! This salsa pairs perfectly with grilled meats, quesadillas, or simply enjoyed with crispy tortilla chips. Enjoy!