
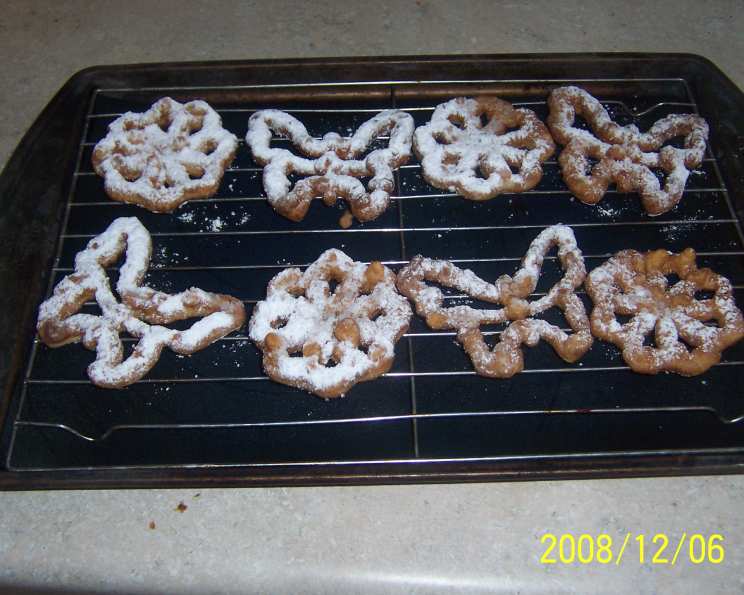
Rosettes: Delicate Fried Delights
The scent of hot oil and sweet pastry always takes me back to my childhood. I remember standing on a stool next to my grandmother, her hands dusted with flour, as she carefully dipped the rosette iron into the batter. The sizzle as it hit the hot oil, the delicate lace-like patterns emerging – it was pure magic. We’d pile them high on a platter, a dusting of powdered sugar transforming them into edible snowflakes. It’s a tradition I cherish and love to share.
Recipe Overview
- Prep Time: 15 minutes
- Cook Time: 25 minutes
- Total Time: 40 minutes
- Servings: Varies
- Yield: Approximately 2-3 dozen, depending on size
- Dietary Type: Not specified
Ingredients
- 1 large egg
- 1/2 teaspoon salt
- 1 tablespoon sugar
- 1 cup milk
- 1 cup flour
- Oil, for deep frying (vegetable, canola, or peanut oil work well)
- Icing sugar, for dusting
Equipment Needed
- Rosette iron with desired attachments
- Deep frying pot or pan
- Fork
- Paper towels
- Tongs or slotted spoon
- Shallow dish for batter
- Thermometer (optional, for monitoring oil temperature)
Instructions
-
Begin by heating your oil in a deep pot or pan over medium-high heat. The ideal temperature is around 375°F (190°C). Use a thermometer to monitor the temperature for consistent results. If you don’t have a thermometer, you can test the oil by dropping a small piece of batter into it. If it sizzles and turns golden brown in about 30 seconds, the oil is ready.
-
While the oil is heating, prepare the batter. In a mixing bowl, whisk together the egg, salt, and sugar until lightly combined.
-
Gradually add the milk, whisking continuously to avoid lumps.
-
Add the flour to the wet ingredients, whisking until the batter is smooth and free of lumps. The batter should be thin enough to easily coat the rosette iron.
-
Now, heat the rosette iron. This is crucial for the batter to adhere properly. Submerge the iron completely in the hot oil for about a minute or two. This ensures it’s thoroughly heated. Remove the iron from the oil and shake off any excess oil.
-
Dip the heated iron into the batter, but only dip it about ¾ of the way up. Avoid letting the batter go over the top of the iron, as this will make it difficult to release the rosette later.
-
Immediately transfer the batter-coated iron back into the hot oil. The batter should begin to sizzle and cook almost immediately.
-
In about 30 seconds (this may vary depending on your oil temperature), gently pry the rosette off the iron using a fork. Be patient; it should release easily once it’s cooked enough. If it sticks, continue frying for a few more seconds.
-
Continue to fry the rosette until it is light golden brown on both sides, about 1-2 minutes per side.
-
Remove the rosette from the oil using tongs or a slotted spoon and place it on a plate lined with paper towels to drain excess oil.
-
Repeat the process with the remaining batter, reheating the iron in the oil before each dip.
-
Once the rosettes have cooled slightly, dust them generously with icing sugar.
Expert Tips & Tricks
-
Temperature is key: Maintaining the correct oil temperature is essential for crispy rosettes. If the oil is not hot enough, the rosettes will absorb too much oil and become soggy. If it’s too hot, they will brown too quickly on the outside and remain uncooked inside.
-
Iron Care: Keep your rosette iron clean and free of burnt batter. Use a small brush or toothpick to remove any stuck-on pieces.
-
Batter Consistency: If your batter seems too thick, add a tablespoon of milk at a time until it reaches the desired consistency.
-
Releasing the Rosette: If the rosette is sticking to the iron, gently wiggle the fork around the edges to loosen it. Avoid forcing it, as this can break the delicate pastry.
-
Crispness Boost: For extra-crispy rosettes, add a tablespoon of vodka or other clear alcohol to the batter. The alcohol evaporates during frying, leaving behind a lighter, crispier texture.
-
Flavor Infusion: Experiment with different extracts in the batter. A touch of vanilla, almond, or lemon extract can add a delightful aroma and flavor.
Serving & Storage Suggestions
Rosettes are best served fresh and warm, lightly dusted with icing sugar. They make a beautiful addition to a dessert platter, are perfect for afternoon tea, or can be enjoyed as a simple sweet treat any time of day.
Store leftover rosettes in an airtight container at room temperature. They will stay crispy for about 2-3 days. If they become slightly soft, you can reheat them in a preheated oven at 350°F (175°C) for a few minutes to crisp them up again. Freezing is not recommended, as it can affect the texture.
Nutritional Information
Note: Nutritional information is an estimate and may vary based on specific ingredients and portion sizes.
| Nutrient | Amount per Serving | % Daily Value |
|---|---|---|
| Calories | 80 kcal | 4% |
| Total Fat | 4g | 6% |
| Saturated Fat | 1g | 5% |
| Cholesterol | 20mg | 7% |
| Sodium | 60mg | 3% |
| Total Carbohydrate | 8g | 3% |
| Dietary Fiber | 0g | 0% |
| Sugars | 2g | 4% |
| Protein | 1g | 2% |
Variations & Substitutions
-
Gluten-Free: Substitute the all-purpose flour with a gluten-free flour blend. Ensure the blend contains xanthan gum for proper binding.
-
Dairy-Free: Replace the milk with a plant-based milk alternative such as almond milk, soy milk, or oat milk.
-
Spicy Rosettes: For a savory twist, reduce the sugar to 1 teaspoon and add a pinch of cayenne pepper or chili powder to the batter. You can also add finely chopped herbs such as cilantro or parsley.
-
Citrus Zest: Add the zest of a lemon, orange, or lime to the batter for a bright and refreshing flavor.
-
Chocolate Rosettes: Add 1-2 tablespoons of cocoa powder to the batter for a chocolatey treat.
FAQs (Frequently Asked Questions)
Q: Why are my rosettes soggy?
A: Soggy rosettes are usually caused by oil that is not hot enough. Make sure your oil is at the correct temperature (around 375°F or 190°C) before frying.
Q: Why is the batter not sticking to the iron?
A: This can happen if the iron is not hot enough or if it is not clean. Ensure the iron is thoroughly heated in the oil before dipping it in the batter and that any burnt batter is removed.
Q: How do I prevent the rosettes from breaking when I remove them from the iron?
A: Be gentle when prying the rosettes off the iron. If they are sticking, continue frying for a few more seconds until they release easily.
Q: Can I make the batter ahead of time?
A: Yes, you can prepare the batter a few hours in advance. Store it in the refrigerator and whisk it again before using.
Q: Can I use different shapes of rosette irons?
A: Absolutely! Rosette irons come in a variety of shapes and sizes. Experiment with different attachments to create unique and festive rosettes.
Final Thoughts
Making rosettes is more than just baking; it’s about creating memories and sharing a tradition. Don’t be intimidated if your first few attempts aren’t perfect – practice makes perfect! I encourage you to gather your family and friends, put on some music, and enjoy the process of creating these delicate and delicious treats. I would love to hear about your rosette-making experiences, so feel free to share your tips, tricks, and variations. These go wonderfully with a cup of hot chocolate or a scoop of vanilla ice cream. Happy cooking!