
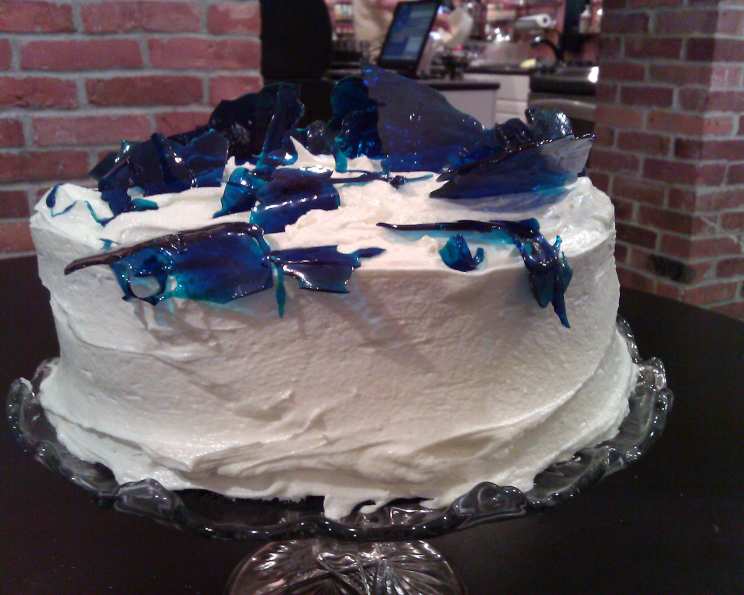
Royal Blue Velvet Cake: A Culinary Masterpiece
I’ll never forget the first time I saw a truly stunning blue cake. It was at a friend’s wedding, and amidst the sea of pastel confections, this vibrant blue creation stood out like a sapphire. The baker, a family friend, confided that she had to search high and low for just the right food coloring to achieve that perfect hue. It left a lasting impression; ever since, I’ve been determined to master the art of creating visually striking and delicious colorful desserts. This Royal Blue Velvet Cake is my ode to that beautiful cake, bringing a touch of regal elegance to any occasion.
Recipe Overview
- Prep Time: 45 minutes
- Cook Time: 27 minutes
- Total Time: 1 hour 12 minutes (plus cooling and “sitting” time)
- Servings: 16
- Yield: One 3-layer cake
- Dietary Type: Not specified; contains gluten, dairy, and eggs.
Ingredients
For the Cake:
- 1 (16 1/4 ounce) box white cake mix (Betty Crocker SuperMoist)
- 1 1/4 cups buttermilk
- 1/3 cup vegetable oil
- 3 eggs
- 1 tablespoon unsweetened baking cocoa
- 2 teaspoons royal blue paste food coloring
- 1 toothpickful violet paste food coloring
For the Frosting:
- 1 (7 ounce) jar marshmallow creme
- 1 cup butter or 1 cup margarine, softened
- 2 1/2 cups powdered sugar
- 1/8 teaspoon salt
For the Candy Garnish (Optional):
- Cooking spray
- 1 cup sugar
- 1/2 cup corn syrup
- 1/4 cup water
- Blue food coloring
Equipment Needed
- Three 8-inch round cake pans
- Electric mixer
- Large mixing bowl
- Microwave-safe bowl
- Cake plate
- Cookie sheet
- Foil
- 2-quart saucepan
Instructions
-
Preheat your oven to 325°F (160°C). Proper temperature is critical for even baking.
-
Prepare three 8-inch round cake pans by thoroughly greasing and lightly flouring the bottoms and sides. Alternatively, you can use a baking spray that already contains flour, which simplifies the process. This ensures the cakes release easily after baking.
-
In a large mixing bowl, combine the white cake mix, buttermilk, vegetable oil, eggs, unsweetened baking cocoa, royal blue paste food coloring, and a toothpickful of violet paste food coloring.
-
Using an electric mixer, begin beating the ingredients on low speed for about 30 seconds to combine them. Then, increase the speed to medium and beat for 2 minutes, scraping the bowl occasionally to ensure all ingredients are fully incorporated.
-
Evenly divide the cake batter among the three prepared cake pans. Use a kitchen scale for perfect precision or simply eyeball it, ensuring each pan receives roughly the same amount.
-
Bake for 22 to 27 minutes, or until the top of the cake springs back when lightly touched in the center. A toothpick inserted into the center should come out clean, or with just a few moist crumbs clinging to it.
-
Let the cakes cool in the pans for 15 minutes. This allows them to set slightly and prevents them from breaking when you remove them.
-
Carefully remove the cakes from the pans and place them on a wire rack to cool completely. Ensure they are completely cool before frosting to prevent the frosting from melting.
-
While the cakes are cooling, prepare the frosting. In a large microwaveable bowl, add the marshmallow creme.
-
Microwave the marshmallow creme uncovered on High for 15 to 20 seconds to soften it. This will make it easier to mix with the other ingredients.
-
Add the softened butter (or margarine) to the marshmallow creme.
-
Beat with an electric mixer on medium speed until smooth and well combined.
-
Gradually beat in the powdered sugar and salt until the frosting is smooth and creamy. Scrape the bowl as needed to ensure even mixing.
-
If needed, trim the tops of two of the cake layers to flatten them before assembling the cake. This will help create a more uniform and stable cake.
-
Place one cake layer, top side down, on a cake plate or serving dish. Spread with 1/3 cup of the prepared frosting.
-
Top with the second cake layer, top side down. Spread it with another 1/3 cup of frosting.
-
Place the final, untrimmed cake layer on top, this time with the top side up.
-
Frost the sides and top of the cake with the remaining frosting.
-
Cover the cake loosely and store it in the refrigerator. It is recommended to make the cake well in advance, as it needs time to “sit” to allow the frosting to set and prevent the cake layers from separating.
For the Optional Candy Garnish:
-
Line a cookie sheet with foil and spray it with cooking spray.
-
In a 2-quart saucepan, combine the sugar, corn syrup, and water. Stir together over medium heat until the sugar dissolves.
-
Heat the mixture to boiling. Without stirring, continue heating until the temperature reaches 300°F to 310°F (149°C to 154°C), or until a small amount of syrup dropped into cold water forms hard, brittle threads. Use a candy thermometer for accuracy.
-
Remove the saucepan from the heat and stir in the desired amount of blue food coloring.
-
Carefully pour the hot candy mixture onto the prepared cookie sheet in a random design.
-
Let the candy cool completely. Once cooled, break it into pieces.
-
Garnish the cake with the candy pieces as desired.
Expert Tips & Tricks
- Royal Blue Color: To achieve the royal blue velvet color, remember the toothpickful of violet paste food color; if forgotten, the cake will bake up turquoise in color.
- Food Coloring: Paste food color will create the royal blue velvet color; liquid or gel food color may not get you the desired results. If your grocery store doesn’t carry the food color pastes, check a crafts store in the Wilton baking section; they are also called “icing color”.
- Baking Time: Ovens vary, so keep a close eye on the cake during the last few minutes of baking.
- Even Layers: Use cake strips wrapped around the pans to help the cakes bake more evenly, preventing a dome from forming in the center.
- Frosting Consistency: If the frosting seems too thick, add a tablespoon of milk or cream at a time until you reach the desired consistency.
Serving & Storage Suggestions
Serve the Royal Blue Velvet Cake chilled or at room temperature. The cake looks stunning when garnished with the homemade candy pieces. Store leftover cake in an airtight container in the refrigerator for up to 3 days. The cake can also be frozen for longer storage; wrap it tightly in plastic wrap and then in foil before freezing. Thaw overnight in the refrigerator before serving.
Nutritional Information
| Nutrient | Amount per Serving | % Daily Value |
|---|---|---|
| Calories | 390 kcal | N/A |
| Calories from Fat | 170 kcal | N/A |
| Total Fat | 19g | N/A |
| Saturated Fat | 9g | N/A |
| Trans Fat | 0.5g | N/A |
| Cholesterol | 75mg | N/A |
| Sodium | 340mg | N/A |
| Total Carbohydrate | 53g | N/A |
| Dietary Fiber | 0g | N/A |
| Sugars | 39g | N/A |
| Protein | 3g | N/A |
| Vitamin A | N/A | 8% |
| Vitamin C | N/A | 0% |
| Calcium | N/A | 8% |
| Iron | N/A | 4% |
Nutritional information is an estimate and can vary based on specific ingredients and serving sizes.
Variations & Substitutions
- Gluten-Free: Use a gluten-free cake mix and gluten-free flour for dusting the pans.
- Dairy-Free: Substitute the buttermilk with a mixture of non-dairy milk and lemon juice (1 tablespoon lemon juice per 1 cup non-dairy milk). Use a dairy-free butter alternative in the frosting.
- Flavor Variations: Add a teaspoon of vanilla extract or almond extract to the cake batter for a different flavor profile.
- Candy Garnish Alternatives: If you prefer not to make the candy garnish, you can use blue sprinkles, edible glitter, or store-bought candy decorations.
FAQs (Frequently Asked Questions)
Q: Why is violet paste food coloring added to achieve the royal blue color?
A: The violet paste helps to neutralize any green tones that might naturally occur, ensuring a true, vibrant royal blue hue.
Q: Can I use liquid food coloring instead of paste food coloring?
A: Paste food coloring is highly recommended as liquid or gel food coloring may not provide the desired intense color without adding too much liquid to the batter, which can affect the cake’s texture.
Q: How far in advance can I make this cake?
A: The cake can be made 1-2 days in advance. The “sitting” time is important for the cake layers to meld with the frosting, preventing them from separating.
Q: What is the best way to store the candy garnish?
A: Store the candy garnish in an airtight container at room temperature to prevent it from becoming sticky.
Q: Can I use a different size cake pan?
A: You can use two 9-inch cake pans, but the baking time may need to be adjusted. Check for doneness a few minutes earlier.
Final Thoughts
This Royal Blue Velvet Cake is a showstopper, both in appearance and taste. It’s a perfect dessert for celebrations, special occasions, or whenever you want to add a touch of elegance to your table. Don’t be intimidated by the candy garnish; it’s easier than it looks! I encourage you to give this recipe a try and experience the joy of creating a truly magnificent cake. Share your creations and feedback; I’d love to see your Royal Blue Velvet masterpieces! This cake pairs wonderfully with a glass of chilled champagne or a scoop of vanilla ice cream.