
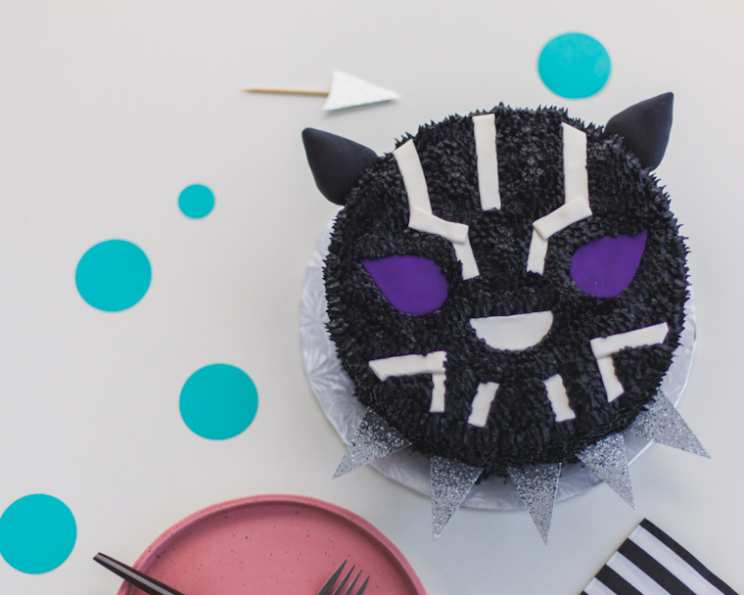
Royal Purple Black Panther Cake
I still remember the hushed excitement that filled the movie theater when the first Black Panther film premiered. The vibrant colors of Wakanda, the powerful story, and the sheer majesty of T’Challa resonated deeply. Later, trying to capture that feeling for my nephew’s birthday, I attempted this cake, a purple-hued tribute to the iconic suit. The first attempt was a bit…rustic, let’s say. But the joy on his face as he saw the shimmering, almost regal, cake? Totally worth it. Now, with a few refinements, I can confidently share this show-stopping cake that’s sure to impress.
Recipe Overview
- Prep Time: 2 hours
- Cook Time: 25 minutes
- Total Time: 24 hours 25 minutes (including chilling and buttercream darkening time)
- Servings: 12-16
- Yield: 1 8-inch cake
- Dietary Type: Not specified (can be adapted for dairy-free with substitutions)
Ingredients
For the Cake:
- 1 cup unsalted butter, room temperature
- 2 cups granulated sugar
- 4 large eggs
- 2 teaspoons pure vanilla extract
- 3 cups cake flour
- 1 tablespoon baking powder
- ½ teaspoon salt
- 1 ¼ cups whole milk
- Purple gel food coloring
For the Black Cocoa Buttercream:
- 2 cups unsalted butter, room temperature
- 3 cups icing sugar, sifted
- 1 cup black cocoa powder
- 2 teaspoons pure vanilla extract
- 2-3 tablespoons whole milk, as needed
- 3 tablespoons black gel food coloring (or more, to achieve desired darkness)
Decorating Supplies:
- White fondant
- Purple fondant
- Black fondant
- Silver glitter cardstock for decorating cake
- Tape for decorating cake
- Wooden BBQ skewers, cut to size for decorating cake
Equipment Needed
- Stand mixer with paddle attachment
- Three 8 x 2 inch round cake pans
- Parchment paper rounds
- Rubber spatula
- Medium mixing bowl
- Whisk
- Wire racks
- Offset spatula
- Cake bench scraper (optional)
- Cake board or plate
- Paring knife
- Large teardrop cookie cutters (optional)
- Piping bag
- Large multi-opening grass tip
- Alphabet stamps or letter stickers (optional, for cake flag)
Instructions
- Preheat your oven to 350 degrees Fahrenheit (175 degrees Celsius). This ensures the cakes bake evenly.
- Prepare the cake pans. Spritz three 8 x 2 inch round cake pans generously with vegetable oil. Then, line the bottoms of each pan with parchment paper rounds. This prevents sticking and ensures easy removal of the cakes.
- Cream the butter and sugar. In the bowl of a stand mixer fitted with the paddle attachment, combine the 1 cup of room-temperature unsalted butter and 2 cups of granulated sugar. Beat on high speed for two minutes until light and fluffy. This incorporates air, resulting in a tender cake.
- Incorporate the eggs and vanilla. Scrape down the sides of the bowl with a rubber spatula to ensure everything is evenly mixed. With the mixer on low speed, add 4 large eggs, one at a time, allowing each egg to fully incorporate before adding the next. Then, add 2 teaspoons of pure vanilla extract.
- Combine dry ingredients. In a medium bowl, whisk together 3 cups of cake flour, 1 tablespoon of baking powder, and ½ teaspoon of salt. Whisking ensures even distribution of the leavening agent.
- Alternate wet and dry ingredients. With the mixer on low speed, gradually add the dry ingredients to the wet ingredients in three additions, alternating with 1 ¼ cups of whole milk. Begin and end with the flour mixture. Mix until a smooth batter forms, approximately one minute total. Avoid overmixing, which can develop the gluten and result in a tough cake.
- Color the batter. Gently fold in a tablespoon or more of purple gel food coloring until you achieve your desired shade of purple. Remember that the color will deepen slightly during baking.
- Divide and bake. Divide the purple batter evenly among the prepared cake pans. Bake for 22-25 minutes, checking the cakes for doneness at 22 minutes. A toothpick inserted into the center should come out clean or with a few moist crumbs.
- Cool completely. Let the cakes cool in the pans for about 10 minutes before inverting them onto wire racks to cool completely. Ensure the cakes are completely cool before frosting to prevent the buttercream from melting.
- Prepare the black cocoa buttercream. (Note: This buttercream will darken in color if allowed to sit overnight, enhancing its rich, dark appearance. Plan accordingly!) In the bowl of a stand mixer fitted with the paddle attachment, beat 2 cups of unsalted butter on high speed until creamy.
- Combine buttercream ingredients. Scrape down the sides of the bowl. Turn the mixer off and add 3 cups of sifted icing sugar, 1 cup of black cocoa powder, 2 teaspoons of pure vanilla extract, and 1 tablespoon of whole milk. Cover the mixing bowl tightly with a damp tea towel to prevent the sugar from poofing out.
- Mix and color the buttercream. Turn the mixer back on to low speed until all ingredients are fully incorporated. Add 3 tablespoons of black gel food coloring (or more, to your desired darkness) and mix until incorporated. Increase the mixer speed to high and beat until the buttercream has approximately doubled in volume. Add more gel color and milk, a tiny amount at a time, if needed, to achieve the perfect consistency and color.
- Chill buttercream (optional for optimal color). For the deepest black, let the buttercream sit overnight to fully darken.
- Level and assemble the cake. Level your completely cooled cake layers, if necessary, using a serrated knife. Place a small dab of black buttercream on a cake board or cake plate to secure the first layer. Place the first cake layer, cut-side-up, on the board. Using an offset spatula, generously frost the first layer with black buttercream.
- Repeat frosting layers. Add the second cake layer, cut-side-down, and frost with buttercream. Add the third cake layer, cut-side-down, and then frost the entire top and sides of the cake. Use a cake bench scraper to smooth the buttercream, if desired.
- Chill the frosted cake. Place the frosted cake in the refrigerator or freezer to chill while you prepare the fondant face pieces. This makes it easier to attach the fondant.
- Prepare the fondant pieces. With completely dry and clean hands, begin assembling the fondant pieces for the Black Panther face. For the lines, use white fondant. Use pre-colored purple fondant and large teardrop cookie cutters for the eyes (or hand-cut them using a sharp paring knife). Use pre-colored black fondant for the ears, attaching them to wooden BBQ skewers cut to the appropriate size for support.
- Attach the fondant face pieces. Remove the chilled cake from the refrigerator. Carefully lay down the fondant face pieces on the cake. The chilled buttercream will make it easier to reposition the pieces if needed. Once you are happy with the placement, gently press the fondant into the buttercream to adhere.
- Pipe the buttercream details. Fill a piping bag fitted with a large multi-opening grass tip with the black buttercream. Carefully pipe around all of the fondant pieces, filling in the entire face with the textured buttercream. Pipe the sides of the cake for a cohesive look.
- Add the Black Panther ears. Gently insert the black fondant ears into the top of the cake, using the wooden skewer supports.
- Create the necklace. Using silver glitter paper and sharp scissors, cut out five triangle pieces to resemble T’Challa’s necklace. Attach each triangle to a wooden skewer cut to size and carefully insert them into the cake, ensuring the glittery paper doesn’t touch the buttercream.
- Finish with a cake flag (optional). Create a WAKANDA FOREVER cake flag using alphabet stamps or letter stickers, attaching it to a skewer.
Expert Tips & Tricks
- Room temperature ingredients are key. Using room temperature butter and eggs helps create a smooth, emulsified batter, resulting in a tender cake.
- Don’t overmix the batter. Overmixing develops the gluten in the flour, leading to a tough cake. Mix until just combined.
- For a deeper purple color, add a drop or two of blue food coloring to the purple gel.
- If your buttercream is too soft, chill it for 15-20 minutes before using. If it’s too stiff, add a tablespoon of milk at a time until you reach the desired consistency.
- A hot knife helps with leveling cakes. Run a long serrated knife under hot water, dry it quickly, and use it to trim the tops of the cooled cakes for even layers.
- Black cocoa powder intensifies the dark color. The black cocoa powder not only contributes to the dark color but also adds a subtle chocolate flavor. If you can’t find black cocoa powder, you can substitute regular cocoa powder, but the buttercream won’t be as dark.
- Protect your buttercream color. To prevent the black buttercream from staining everything, wear gloves while handling it.
Serving & Storage Suggestions
Serve the Royal Purple Black Panther Cake chilled or at room temperature. For the most dramatic presentation, consider dimming the lights and adding a spotlight to showcase the shimmering silver necklace. Leftovers should be stored in an airtight container in the refrigerator for up to 3 days. You can also freeze slices of the cake for up to 2 months. Thaw overnight in the refrigerator before serving. To refresh the cake’s moisture after refrigeration, you can lightly brush the cut edges with simple syrup.
Nutritional Information
Note: These values are estimates and may vary based on specific ingredient brands and preparation methods.
| Nutrient | Amount per Serving | % Daily Value |
|---|---|---|
| Calories | 838 kcal | 42% |
| Total Fat | 50 g | 64% |
| Saturated Fat | 31 g | 155% |
| Cholesterol | 187 mg | 62% |
| Sodium | 233 mg | 10% |
| Total Carbohydrate | 96 g | 32% |
| Dietary Fiber | 3 g | 11% |
| Sugars | 65 g | |
| Protein | 8 g | 16% |
Variations & Substitutions
- Dairy-Free Version: Substitute the butter with a vegan butter alternative, the whole milk with almond or soy milk, and ensure your fondant is dairy-free.
- Gluten-Free Version: Replace the cake flour with a gluten-free all-purpose flour blend. You may need to add a binder like xanthan gum to improve the texture.
- Flavor Variations: Add a raspberry or blackberry puree to the purple cake batter for a subtle fruity flavor that complements the purple hue. You could also infuse the milk with lavender for a floral note.
- Fondant Alternatives: If you’re not comfortable working with fondant, you can use modeling chocolate or even piped buttercream for the face details.
FAQs (Frequently Asked Questions)
Q: Why is my black buttercream turning gray?
A: It could be that you didn’t use enough black gel food coloring or the cocoa powder you used was not dark enough. Using black cocoa powder helps achieve a deeper black. Also, some butter brands can affect the final color.
Q: Can I make the cake layers ahead of time?
A: Absolutely! You can bake the cake layers up to two days in advance. Wrap them tightly in plastic wrap and store them at room temperature or in the refrigerator.
Q: How do I prevent the fondant from drying out and cracking?
A: Keep the fondant covered in plastic wrap when you’re not actively using it. If it starts to dry out, knead in a small amount of vegetable shortening.
Q: Can I use a different sized cake pan?
A: Yes, but you’ll need to adjust the baking time accordingly. Smaller pans will require a longer baking time, while larger pans will require a shorter time. Watch the cake closely and test for doneness with a toothpick.
Q: How do I get a smooth buttercream finish?
A: After frosting the cake, chill it for about 15-20 minutes. Then, dip a metal spatula or bench scraper in hot water, dry it quickly, and smooth the buttercream. Repeat as needed.
Final Thoughts
This Royal Purple Black Panther Cake is more than just a dessert; it’s a celebration of strength, heritage, and the vibrant world of Wakanda. Don’t be intimidated by the multiple steps; take your time, enjoy the process, and unleash your inner artist. I encourage you to try this recipe, make it your own, and share your creations with the world. Wakanda Forever!