
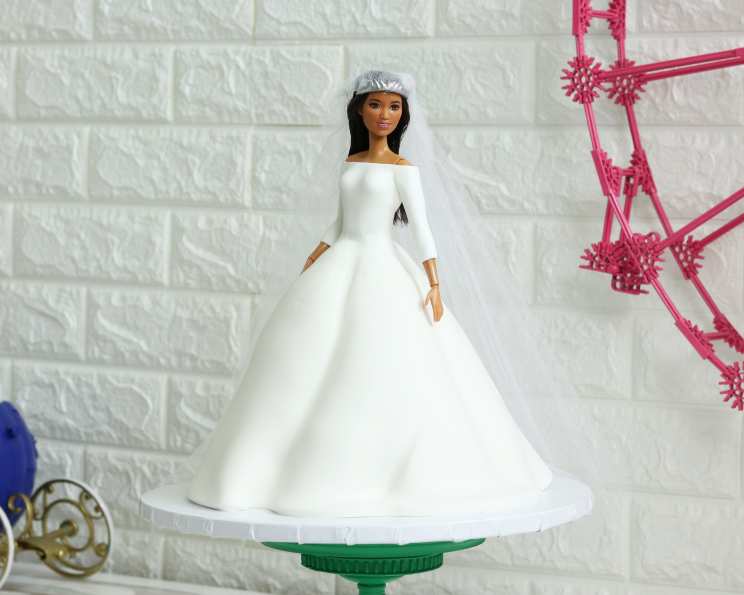
Royal Wedding Doll Cake: A Culinary Fairytale
I’ll never forget the day I saw my first doll cake. It was at a county fair, and it seemed like magic: a beautiful princess emerging from a swirling gown of frosting. As a child, I dreamt of having one of my own, and as a budding baker, I was determined to learn how to create these edible masterpieces. This Royal Wedding Doll Cake is a modern take on that classic, inspired by iconic wedding dresses, and it’s sure to bring a touch of fairytale wonder to any celebration.
Recipe Overview
- Prep Time: 30 minutes
- Cook Time: 30-35 minutes
- Total Time: 1 hour 15 minutes
- Servings: Approximately 12 slices
- Yield: 1 Doll Cake
- Dietary Type: Varies depending on cake mix and frosting used; can be adapted for vegetarian diets. Not typically vegan or gluten-free.
Ingredients
- 2 (16 ounce) cake mixes, plus required ingredients per box directions (e.g., eggs, oil, water)
- 24 ounces white fondant
- 35 ounces Classic Buttercream Frosting
Equipment Needed
- Wilton Doll Cake Pan
- Mixing Bowls
- Electric Mixer
- Serrated Knife
- Offset Spatula
- Sculpting Tools
- Rolling Pin
- Small Bowls for water/vodka
- Tulle fabric
- Doll Crown
Instructions
-
Preheat your oven according to the directions on the cake mix boxes. Prepare the cake batter according to the package instructions for both cake mixes.
-
Grease and flour the Wilton doll cake pan thoroughly. This step is crucial to prevent the cake from sticking.
-
Pour the combined cake batter into the prepared doll cake pan.
-
Bake the cake in the preheated oven for approximately 30-35 minutes, or until a wooden skewer inserted into the center comes out clean. Baking times may vary, so check for doneness frequently after 30 minutes.
-
Let the cake cool in the pan for 10-15 minutes before inverting it onto a wire rack to cool completely.
-
Once the cake is completely cool, use a serrated knife to level the cake. This involves carefully slicing off any domed top to create a flat, even surface.
-
Carefully slice the cake horizontally into three equal layers using the serrated knife. This will allow you to add frosting between the layers.
-
Cut a hole into the top layer of cake. This hole should be large enough to accommodate the Barbie doll’s legs, ensuring a snug but not overly tight fit. Test the fit with the doll before moving on.
-
Place the bottom layer of cake on your serving plate or cake stand. Spread a generous layer of buttercream frosting evenly over the surface.
-
Carefully place the second layer of cake on top of the frosted bottom layer. Spread another layer of buttercream frosting evenly over the surface.
-
Add the top layer of cake, the one with the hole. Gently press down to secure it.
-
Using the buttercream frosting and an offset spatula, level each layer with icing. Make sure the icing fills any gaps and creates a smooth, even surface on top of the cake.
-
Apply a crumb coat to the entire cake. This is a thin layer of frosting that seals in any loose crumbs. Use the offset spatula to smooth out the icing.
-
Smooth out the icing with an offset spatula, ensuring the entire cake is covered with a thin, even layer of buttercream.
-
Using the serrated knife, begin to shape the doll cake. Create the basic silhouette of the dress by carefully carving away excess cake.
-
Add grooves into the side of the cake to give the dress texture and shape. Think about the folds and drapes of a real gown.
-
Round the edges of each of the grooves with a knife to soften the look and create a more realistic effect.
-
Give the cake a second crumb coat of buttercream frosting. This will further smooth the surface and prepare it for the fondant.
-
Place the cake in the refrigerator to harden for about 30 minutes. This makes it easier to work with the fondant.
-
While the cake is chilling, prepare the Barbie doll. Remove the doll’s clothes.
-
Remove the cake from the refrigerator. Carefully insert the Barbie doll into the hole in the middle of the cake.
-
Roll out a piece of white fondant. Cover the waist of the doll with fondant, blending it seamlessly into the cake with sculpting tools. This creates the bodice of the dress.
-
Roll out more fondant. Cover the upper body of the doll with fondant to create the top of the dress, leaving the doll’s collarbone exposed for a more elegant look.
-
Blend the seam at the back of the fondant bodice with a small amount of vodka or water. This helps to create a smooth, invisible join.
-
Roll out a large piece of fondant. Cover the bottom of the dress with the fondant. This will form the main skirt of the gown.
-
Hide the fondant seam at the back of the dress in one of the back grooves. This will give the dress a more polished appearance.
-
Use sculpting tools to push the fondant into the cake grooves and create texture, mimicking the folds and details of a real dress.
-
Blend fondant at the waist of the cake with vodka. This will help to create a smooth transition between the bodice and the skirt.
-
Wrap both arms with fondant to create sleeves, leaving the wrists of the doll exposed for a delicate touch.
-
Use tulle fabric and a doll crown to create a veil. Attach the veil to the doll’s hair using pins or a small amount of frosting.
Expert Tips & Tricks
- For a smoother fondant finish, lightly dust your work surface with powdered sugar before rolling it out.
- If the fondant becomes too sticky, knead in a small amount of shortening.
- If the fondant is too dry and cracking, knead in a few drops of water or glycerin.
- Use gel food coloring to tint the fondant if desired.
- To prevent the doll from sinking into the cake, wrap her legs in plastic wrap before inserting her.
- If your buttercream is too soft, chill it in the refrigerator for a few minutes before using.
Serving & Storage Suggestions
Serve the Royal Wedding Doll Cake as a show-stopping centerpiece for birthdays, weddings, or any special occasion. Leftover cake should be stored in an airtight container in the refrigerator for up to 3 days. Fondant covered cakes are best served at room temperature to avoid the fondant becoming sticky or sweating. Do not freeze, as this can affect the texture of the cake and fondant.
Nutritional Information
Note: Nutritional information is an estimate and will vary based on specific ingredients used.
| Nutrient | Amount per Serving | % Daily Value |
|---|---|---|
| Calories | 450 kcal | 23% |
| Total Fat | 20g | 31% |
| Saturated Fat | 12g | 60% |
| Cholesterol | 50mg | 17% |
| Sodium | 250mg | 11% |
| Total Carbohydrate | 65g | 22% |
| Dietary Fiber | 1g | 4% |
| Sugars | 45g | – |
| Protein | 4g | 8% |
Variations & Substitutions
- Flavor Variations: Use different cake mix flavors, such as chocolate, strawberry, or lemon, to customize the taste of the cake.
- Frosting Alternatives: Experiment with different frosting flavors, such as cream cheese frosting or chocolate ganache.
- Fondant Colors: Use colored fondant to create a more vibrant and elaborate dress design.
- Vegan Option: Substitute the cake mix and buttercream frosting with vegan alternatives. Look for vegan fondant as well.
- Gluten-Free Option: Use gluten-free cake mix and ensure all other ingredients are gluten-free.
- Dress Design: Tailor the dress design to match a specific royal wedding dress or create your own unique design.
FAQs (Frequently Asked Questions)
Q: Can I use a different size cake pan?
A: While you can use other pans, the Wilton Doll Cake Pan is specifically designed to create the skirt shape. Using other pans may require more extensive carving.
Q: Can I make the cake ahead of time?
A: Yes, you can bake the cake layers a day or two in advance and store them tightly wrapped in the refrigerator or freezer. Frosting and fondant application is best done closer to serving.
Q: How do I prevent the fondant from cracking?
A: Keep the fondant properly hydrated by kneading it regularly and wrapping it tightly when not in use. If it starts to crack, knead in a few drops of water or glycerin.
Q: What if I don’t have sculpting tools?
A: You can use basic kitchen tools like knives, spoons, and skewers to shape the fondant.
Q: How do I attach the veil securely?
A: Use small pins or a dab of frosting to attach the tulle veil to the doll’s hair.
Final Thoughts
Creating this Royal Wedding Doll Cake is an ambitious but incredibly rewarding project. It’s a chance to combine your baking skills with your artistic flair, resulting in a stunning edible creation that will be the highlight of any celebration. Don’t be afraid to experiment with different flavors, colors, and design elements to make it truly your own. Share your creations with friends and family and let them marvel at your culinary masterpiece! Happy baking!