
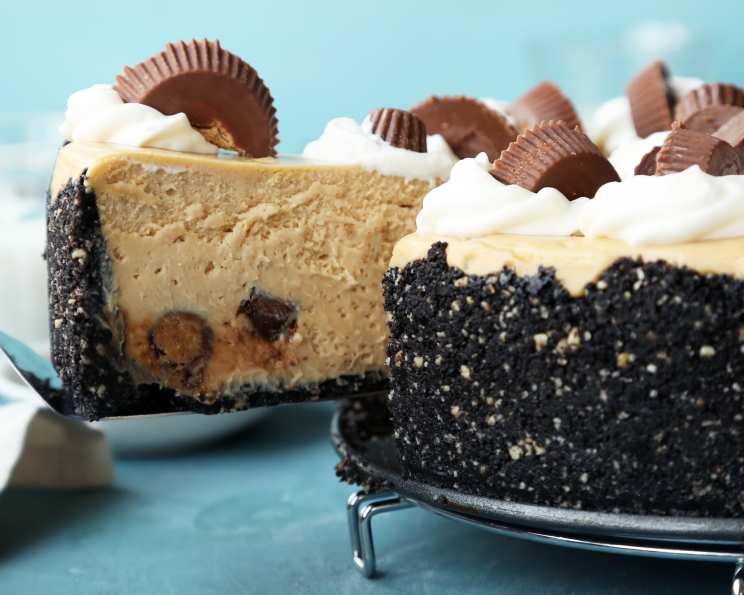
Ruggles Reese’s Peanut Butter Cup Cheesecake: A Decadent Delight
The first time I tasted a peanut butter cup cheesecake, it was at a family gathering. My aunt, always the baker, had created this magnificent swirl of chocolate and peanut butter. The room hushed as everyone took their first bite; then, a collective “mmm” filled the air. The combination of the creamy cheesecake, the rich peanut butter, and the familiar chocolatey crunch of the peanut butter cups was pure magic. It sparked a lifelong love affair with this iconic dessert combination, and I’ve been chasing that perfect bite ever since. This recipe captures that same magic, inspired by a Ruggles Grill favorite, and I’m excited to share it with you.
Recipe Overview
- Prep Time: 30 minutes
- Cook Time: 1 hour 35 minutes
- Total Time: 5 hours 5 minutes (includes chilling time)
- Servings: 10
- Yield: 1 cheesecake
- Dietary Type: Not specified
Ingredients
For The Crust:
- 4 1/2 cups crushed Oreo cookies
- 1 cup chopped roasted peanuts
- 1/2 cup butter, melted
For The Filling:
- 2 lbs cream cheese, softened
- 5 eggs, at room temperature
- 1 1/2 cups firmly packed brown sugar
- 1 cup smooth peanut butter (not natural-style)
- 1/2 cup whipping cream
- 1 teaspoon vanilla extract
- 12 Reese’s Peanut Butter cups, broken into small pieces
For The Topping:
- 3 ounces sour cream
- 1/2 cup sugar
Equipment Needed
- 10-inch springform pan
- Food processor
- Electric mixer
- Rubber spatula
- Large baking pan
- Wire rack
Instructions
- Prepare the Crust: In a food processor, grind the roasted peanuts until finely chopped. In a medium bowl, combine the crushed Oreo cookies, ground peanuts, and melted butter. Mix well until the mixture is evenly moistened.
- Press the Crust: Press the crust mixture firmly onto the bottom and up the sides of a 10-inch springform pan. Make sure the crust is compact and even.
- Beat the Cream Cheese: In the bowl of an electric mixer, beat the softened cream cheese until smooth and creamy. This is crucial for a lump-free cheesecake.
- Incorporate the Eggs: Add the eggs, one at a time, to the cream cheese mixture. Be sure to beat well after each addition to fully incorporate the egg. Room temperature eggs will incorporate more easily.
- Add the Sweeteners: Gradually add the firmly packed brown sugar and peanut butter to the cream cheese mixture. Mix until the batter is smooth and well combined.
- Blend in the Cream and Vanilla: Add the whipping cream and vanilla extract to the mixture. Mix until everything is smooth and even.
- Fold in the Peanut Butter Cups: Using a rubber spatula, gently fold in the broken Reese’s Peanut Butter cups. Distribute them evenly throughout the cheesecake filling. Avoid overmixing at this stage to keep the peanut butter cup pieces intact.
- Pour and Prepare for Baking: Pour the peanut butter cheesecake filling into the prepared Oreo cookie crust.
- Create a Water Bath: Place the springform pan inside a larger baking pan. Pour hot water into the larger pan so that the water comes about 1 inch up the sides of the springform pan. This water bath helps to ensure even baking and prevents the cheesecake from cracking.
- Bake the Cheesecake: Bake in a preheated oven at 275°F (135°C) for 1 hour and 30 minutes, or until the cheesecake is firm and lightly browned around the edges. The center should still have a slight jiggle.
- Prepare the Topping: While the cheesecake is baking, in a small bowl, combine the sour cream and sugar. Mix until smooth and well combined.
- Add the Topping and Bake Again: After the initial baking time, carefully remove the cheesecake from the oven and spread the sour cream topping evenly over the top. Return the cake to the oven for an additional 5 minutes.
- Cool Gradually: Remove the cheesecake from the oven and allow it to cool on a wire rack for one hour. This gradual cooling process helps prevent cracks from forming. Run a knife along the edge of the cake to loosen it from the pan somewhat.
- Chill the Cheesecake: Refrigerate the cheesecake for at least 4 hours, or preferably overnight, to allow it to fully set. This step is essential for the best flavor and texture.
Expert Tips & Tricks
- Room Temperature Ingredients: Ensure the cream cheese and eggs are at room temperature. This helps them blend smoothly and prevents lumps in your cheesecake.
- Don’t Overmix: Avoid overmixing the filling after adding the eggs. Overmixing can incorporate too much air and cause the cheesecake to puff up and then collapse, leading to cracks.
- Water Bath is Key: A water bath is crucial for a creamy, crack-free cheesecake. The steam from the water bath helps to bake the cheesecake gently and evenly. If you don’t have a pan large enough, wrap the springform pan tightly in aluminum foil to prevent water from seeping in.
- Check for Doneness: The cheesecake is done when the edges are set but the center still jiggles slightly. It will continue to set as it cools.
- Prevent Cracking: Besides the water bath and gradual cooling, you can also turn off the oven and let the cheesecake sit inside with the door ajar for an hour after baking. This slow cooling method further minimizes the risk of cracking.
Serving & Storage Suggestions
To serve this decadent peanut butter cup cheesecake, carefully remove it from the springform pan. A thin, flexible spatula can help release the bottom. Garnish with additional Reese’s Peanut Butter cup pieces or a drizzle of melted chocolate for an extra touch of indulgence.
Leftover cheesecake can be stored in the refrigerator for up to 5 days. Cover it tightly with plastic wrap or store it in an airtight container to prevent it from drying out. For longer storage, you can freeze the cheesecake for up to 2 months. Wrap it tightly in plastic wrap and then in foil before freezing. Thaw in the refrigerator overnight before serving.
Nutritional Information
Note: Nutritional information is an estimate and may vary based on specific ingredients used.
| Nutrient | Amount per Serving | % Daily Value |
|---|---|---|
| Calories | 1297 kcal | N/A |
| Calories from Fat | 798 g | 62% |
| Total Fat | 88.8 g | 136% |
| Saturated Fat | 37.3 g | 186% |
| Cholesterol | 238.6 mg | 79% |
| Sodium | 1111.7 mg | 46% |
| Total Carbohydrate | 110.3 g | 36% |
| Dietary Fiber | 5.5 g | 22% |
| Sugars | 80.4 g | 321% |
| Protein | 25.4 g | 50% |
Variations & Substitutions
- Gluten-Free Crust: Use gluten-free Oreo cookies or create a crust from gluten-free graham crackers.
- Dairy-Free Option: Substitute dairy-free cream cheese and whipping cream alternatives (like cashew-based or coconut cream) for a dairy-free version. Be mindful that this will affect the taste and texture.
- Peanut Butter Swirl: Reserve a portion of the peanut butter filling and swirl it into the plain cheesecake batter for a marbled effect.
- Different Candy: Substitute other chocolate-covered peanut butter candies for the Reese’s cups.
- Espresso Kick: Add a teaspoon of espresso powder to the filling for a mocha-peanut butter flavor.
FAQs (Frequently Asked Questions)
Q: Why is a water bath necessary for cheesecake?
A: A water bath provides gentle, even heat, preventing the cheesecake from cracking and creating a creamy texture. The steam helps to keep the surface moist.
Q: How can I tell if my cheesecake is done?
A: The edges of the cheesecake should be set, but the center should still have a slight jiggle. It will continue to set as it cools.
Q: What if my cheesecake cracks?
A: Cracking is often caused by temperature fluctuations. While a water bath helps, cooling it gradually in the oven can also minimize cracks. A sour cream topping can also hide minor imperfections.
Q: Can I make this cheesecake ahead of time?
A: Absolutely! Cheesecake is best when chilled for several hours, so making it a day ahead is ideal.
Q: Can I freeze this cheesecake?
A: Yes, you can freeze cheesecake. Wrap it tightly in plastic wrap and foil before freezing. Thaw it in the refrigerator overnight before serving.
Final Thoughts
This Ruggles Reese’s Peanut Butter Cup Cheesecake is a guaranteed crowd-pleaser. The rich, creamy texture combined with the irresistible flavor of peanut butter and chocolate makes it a truly unforgettable dessert. Don’t be intimidated by the seemingly lengthy instructions – the process is straightforward, and the result is well worth the effort. I encourage you to try this recipe and share your creation with friends and family. And if you’re feeling adventurous, consider pairing it with a glass of cold milk, a scoop of vanilla ice cream, or a rich cup of coffee. Happy baking!