
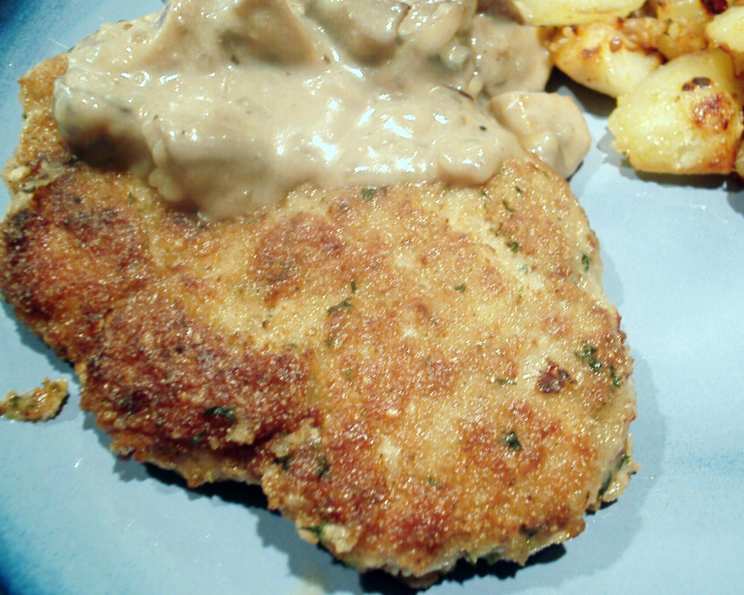
Russian-Style Turkey Cutlets: A Culinary Embrace
The memory is so vivid: my grandmother’s small kitchen, sunlight streaming through lace curtains, and the unmistakable aroma of dill and butter sizzling in a pan. She called them kotleti, these humble yet deeply satisfying Russian-style cutlets. They weren’t fancy, but they were made with love, a simple expression of comfort and care that transcended language. Every bite was a warm hug, a taste of home that I cherish to this day. Now, I share her recipe, adapted for modern kitchens, but with the same heart and soul.
Recipe Overview
- Prep Time: 15 minutes
- Cook Time: 10-12 minutes
- Total Time: 25-27 minutes
- Servings: 4
- Dietary Type: Dairy-containing
Ingredients
- 2 slices good-quality white bread, crusts removed
- ¼ cup half-and-half
- 1 lb ground turkey
- 1 egg
- ½ teaspoon salt
- ¼ teaspoon fresh ground black pepper
- ½ teaspoon dried dill
- 5 tablespoons butter, 3 of them at room temperature
- 1 cup dry breadcrumbs
- 2 tablespoons cooking oil
Equipment Needed
- Large bowl
- Nonstick frying pan
Instructions
- Begin by preparing the bread. Break the bread into pieces and place them in a large bowl.
- Pour the half-and-half over the bread. Let it soak until the liquid is absorbed, approximately 2 minutes. This step is crucial for adding moisture and tenderness to the cutlets.
- Add the ground turkey, egg, salt, pepper, dried dill, and the softened 3 tablespoons of room-temperature butter to the bowl with the bread mixture.
- Thoroughly mix all the ingredients together using your hands or a spoon until well combined. Be careful not to overmix, as this can result in tough cutlets.
- Place the turkey mixture in the freezer for about 10 minutes to firm up slightly. This makes it easier to handle and shape.
- Remove the turkey mixture from the freezer. It will still be soft, but more manageable.
- Divide the mixture into four equal portions and shape each portion into an oval cutlet.
- Place the dry breadcrumbs in a shallow dish.
- Gently coat each cutlet with the breadcrumbs, ensuring they are evenly covered on all sides. Press lightly to help the breadcrumbs adhere.
- In a large, nonstick frying pan, heat the remaining 2 tablespoons of butter and the cooking oil over moderate heat. Using a combination of butter and oil prevents the butter from burning and adds richness to the cutlets.
- Carefully place the cutlets in the hot pan, making sure not to overcrowd it. Work in batches if necessary.
- Cook the cutlets until golden brown and cooked through, about 4 to 5 minutes per side. The internal temperature should reach 165°F (74°C).
- Remove the cooked cutlets from the pan and place them on a plate lined with paper towels to drain any excess oil.
Expert Tips & Tricks
- Bread Choice: The quality of the white bread matters. Opt for a soft, enriched bread that will absorb the half-and-half well. Stale bread works perfectly.
- Butter Temperature: Ensure the butter is truly at room temperature. This allows it to incorporate evenly into the meat mixture, creating a more tender cutlet.
- Freezing Trick: Don’t skip the brief freezer stint! It makes shaping the cutlets significantly easier and helps them hold their form during cooking.
- Pan Temperature: Maintaining a moderate heat is essential. Too high, and the cutlets will burn on the outside before cooking through. Too low, and they’ll absorb too much oil.
- Doneness Check: Use a meat thermometer to ensure the cutlets are fully cooked. Insert the thermometer into the thickest part of the cutlet, avoiding any bone.
Serving & Storage Suggestions
Serve the Russian-style turkey cutlets immediately while they are still hot and juicy. Traditionally, they are served with a side of sautéed mushrooms, which perfectly complement the richness of the cutlets. Other excellent accompaniments include beets, glazed carrots, mashed potatoes, or a simple green salad.
To store leftovers, place the cooked cutlets in an airtight container and refrigerate them for up to 3-4 days. You can also freeze them for longer storage, up to 2-3 months. To reheat, either pan-fry them gently until warmed through or microwave them. Note that microwaving may make them slightly less crispy.
Nutritional Information
| Nutrient | Amount per Serving | % Daily Value |
|---|---|---|
| Calories | 454.9 kcal | N/A |
| Calories from Fat | 302 g | 67% |
| Total Fat | 33.6 g | 51% |
| Saturated Fat | 13.9 g | 69% |
| Cholesterol | 168.6 mg | 56% |
| Sodium | 623.3 mg | 25% |
| Total Carbohydrate | 12.3 g | 4% |
| Dietary Fiber | 0.7 g | 2% |
| Sugars | 1.1 g | N/A |
| Protein | 26.4 g | 52% |
Variations & Substitutions
- Gluten-Free: Substitute the white bread with gluten-free bread crumbs or a mixture of almond flour and gluten-free panko.
- Dairy-Free: Use a plant-based milk alternative like oat milk or almond milk in place of the half-and-half. Substitute the butter with a dairy-free butter alternative or olive oil.
- Spice it Up: Add a pinch of red pepper flakes or a dash of hot sauce to the turkey mixture for a little heat.
- Herb Variations: Experiment with different herbs such as parsley, chives, or thyme in place of the dill.
- Meat Mixture: Feel free to use ground chicken or a combination of ground turkey and ground pork for a different flavor profile.
FAQs (Frequently Asked Questions):
Q: Can I use frozen ground turkey for this recipe?
A: Yes, but make sure to thaw it completely before using. Drain any excess liquid to prevent the cutlets from being too wet.
Q: How can I prevent the cutlets from sticking to the pan?
A: Use a non-stick frying pan and ensure it is properly heated before adding the cutlets. A combination of butter and oil also helps to create a non-stick surface.
Q: Can I bake these cutlets instead of frying them?
A: Yes, you can bake them at 375°F (190°C) for about 20-25 minutes, or until they are golden brown and cooked through. Make sure to grease the baking sheet or use parchment paper to prevent sticking.
Q: What if my turkey mixture is too wet?
A: Add a tablespoon or two of breadcrumbs to the mixture to absorb the excess moisture.
Q: Can I make these cutlets ahead of time?
A: Yes, you can prepare the cutlets ahead of time and store them in the refrigerator for up to 24 hours before cooking. Make sure to keep them covered to prevent them from drying out.
Final Thoughts
These Russian-style turkey cutlets are a testament to the fact that simple ingredients, when combined with care, can create something truly special. They are a comforting and flavorful dish that is perfect for a weeknight meal or a special occasion. I encourage you to try this recipe and experience the warmth and deliciousness of my grandmother’s kitchen. Share your creations and feedback, and perhaps pair them with a crisp Beaujolais for the ultimate culinary experience.