
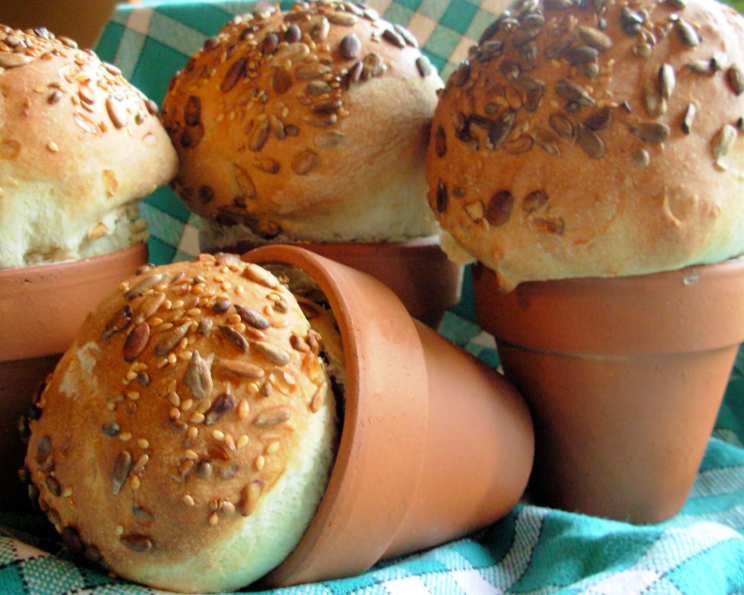
Rustic Flower Pot Bread Loaves or Rolls
The scent of baking bread always brings me back to my grandmother’s kitchen. She wasn’t one for fancy gadgets, but she had a knack for making simple things extraordinary. I remember one summer afternoon, she pulled out these curious-looking terracotta pots, filled them with dough, and baked them until golden brown. The result? The most charming, rustic bread I’d ever seen. The slightly earthy flavor from the pots added something special. Recreating her flower pot bread brings back those warm memories of family and delicious home-baked goodness.
Recipe Overview
- Prep Time: 30 minutes
- Cook Time: 10-30 minutes
- Total Time: 1 hour 30 minutes (includes proving time)
- Servings: 6
- Yield: 2-6 Flower Pot Loaves or Rolls
- Dietary Type: Vegetarian
Ingredients
Bread
- 1 lb strong white bread flour (Note: All-purpose flour is NOT suitable)
- 2 teaspoons sugar
- 1 1/2 teaspoons salt
- 1/2 ounce butter
- 1/2 ounce fresh yeast or 2 teaspoons dried yeast
- 1/2 pint tepid water
Optional Extras (choose one or a combination):
- 2 ounces poppy seeds
- 2 ounces mixed seeds
- 2 ounces pumpkin seeds
- 2 ounces chopped walnuts
- 2 ounces grated cheese
- 2 ounces chopped olives
- 2 garlic cloves, peeled and crushed
- 2 tablespoons mixed herbs
- 2 tablespoons chopped chives
- 1/2 onion, peeled and grated
- 2 tablespoons sun-dried tomatoes, drained and finely diced
Flower Pot Seasoning
- Oil
- Lard
- Butter
Equipment Needed
- 2-6 earthenware flower pots (3-6 inches in size)
- Baking tray
- Greaseproof paper or baking parchment
- Large mixing bowl
- Work surface
- Large oiled polythene bag
- Wire rack
Instructions
- Take two to six earthenware flower pots (3 to 6 inches in size). These must be new and unused plant pots.
- Wash thoroughly and grease them inside and outside with lard, butter, or oil.
- Heat in a pre-heated oven at 190°C (375°F, Gas Mark 5) for 25-30 minutes. This is the seasoning process.
- Repeat the process two or three times for a good “seasoning” and non-stick surface on your flower pots.
- Before baking with them, line the base with greaseproof paper or baking parchment – especially if there is a hole in the bottom of the flower pot! This will prevent the dough from sticking.
- If you are using dried yeast: Dissolve one teaspoon of the sugar in the warm water, then add the dried yeast. Leave until frothy, about ten minutes. This activates the yeast. If you are using fresh yeast: Blend it into the warm water.
- Place the flour, salt, and remaining sugar in a large mixing bowl and rub in the butter until the mixture resembles breadcrumbs.
- (Add any optional extras you might be using here.) Incorporate your chosen seeds, cheese, herbs, or other additions into the flour mixture at this stage.
- Add the yeast liquid to the dry ingredients and mix to a soft dough. The dough should be slightly sticky but not overly wet. Add a little more flour if needed.
- Turn the dough onto a work surface and knead the dough by folding it towards you, then pushing down and away from you with the heel of your hand. Give the dough a quarter turn and repeat the action. Knead until smooth and no longer sticky, about 5-10 minutes.
- Cut the dough into even-sized pieces and place them in the prepared and well-oiled/buttered flower pots, which should be placed on a baking tray. The amount of dough per pot depends on the desired size of the loaves or rolls.
- Glaze with milk or salted water and sprinkle with mixed seeds. This will give the bread a lovely color and texture.
- Place the pots inside a large oiled polythene bag and leave in a warm place until the dough doubles in size, about 45-60 minutes. This is the proving stage, essential for light and airy bread.
- Remove the polythene bag and bake on the middle shelf of a hot oven at 230°C (450°F, Gas Mark 8) for 10 to 30 minutes, depending on the size of your flower pots, or until the bread is browned and sounds hollow when tapped. Smaller rolls will require less baking time than larger loaves.
- Remove the bread from the flower pots and cool on a wire rack. You can then replace them in the flower pots to serve, once they have cooled! This makes for a visually appealing presentation.
- This dough can be proved in a bread maker/machine for ease and with good results. Follow your machine’s instructions. I add liquids to my bread maker first and then dry ingredients last.
- Add the extras before adding the liquids to the dry ingredients and if using a bread maker/machine, add them when the “Extras” alert sounds or add them to the “Extras” tray.
Expert Tips & Tricks
- Seasoning is key: Don’t skip the seasoning process for the flower pots. This ensures the bread doesn’t stick and imparts a subtle earthy flavor.
- Yeast Activation: Make sure your yeast is active before adding it to the flour. If it doesn’t froth after 10 minutes, it’s likely dead and you’ll need to use fresh yeast.
- Dough Consistency: The dough should be soft but not too sticky. If it’s too wet, add a tablespoon of flour at a time until it comes together.
- Proving Time: The proving time can vary depending on the temperature of your kitchen. A warm environment will speed up the process.
- Oven Temperature: Keep an eye on the bread while it’s baking. If it starts to brown too quickly, lower the oven temperature slightly.
- Doneness Test: The bread is done when it’s golden brown and sounds hollow when tapped on the bottom.
Serving & Storage Suggestions
These rustic flower pot breads are best served warm, either straight from the pot or sliced. They’re perfect with soups, stews, or as a side to any meal.
Storage: Leftover bread can be stored at room temperature in an airtight container for up to 2 days. For longer storage, wrap the bread tightly in plastic wrap and freeze for up to 2 months.
Reheating: To reheat, thaw frozen bread completely. Warm in a preheated oven at 175°C (350°F) for 5-10 minutes, or until heated through. You can also microwave slices for a few seconds, but be careful not to overheat them, as they can become tough.
Nutritional Information
| Nutrient | Amount per Serving | % Daily Value |
|---|---|---|
| Calories | 516 kcal | N/A |
| Total Fat | 20.9g | 32% |
| Saturated Fat | 4.8g | 23% |
| Cholesterol | 11.1mg | 3% |
| Sodium | 793.6mg | 33% |
| Total Carbohydrate | 67.8g | 22% |
| Dietary Fiber | 6g | 23% |
| Sugars | 3.1g | N/A |
| Protein | 16.4g | 32% |
Nutritional information is an estimate and may vary based on specific ingredients and portion sizes.
Variations & Substitutions
- Whole Wheat Variation: Substitute half of the strong white bread flour with whole wheat flour for a nuttier flavor and increased fiber.
- Herb & Garlic Bread: Add 2 tablespoons of chopped fresh herbs (such as rosemary, thyme, or oregano) and 2 cloves of minced garlic to the dough.
- Cheese Bread: Incorporate 2 ounces of grated cheddar, parmesan, or Gruyère cheese into the dough.
- Sweet Flower Pot Bread: Add 2 tablespoons of honey or maple syrup to the dough and omit the salt. Consider adding dried fruits like raisins or cranberries.
- Gluten-Free Option: While this recipe relies heavily on gluten for structure, experimenting with gluten-free bread flour blends and adding a binder like xanthan gum might yield acceptable results. Note that the texture will likely be different.
FAQs (Frequently Asked Questions)
Q: Do I really need to use new flower pots?
A: Yes, it’s essential to use new, unused flower pots to ensure they are clean and free from any harmful chemicals or contaminants that might be present in previously used pots.
Q: Can I use smaller or larger flower pots?
A: Yes, you can adjust the size of the flower pots. Just be mindful that the baking time will vary depending on the size. Smaller pots will bake faster, while larger pots will require more time.
Q: What if I don’t have a bread machine?
A: No problem! You can easily make this bread by hand following the instructions. The bread machine simply automates the kneading and proving process.
Q: Can I skip the “seasoning” of the flower pots?
A: It’s highly recommended to season the flower pots. This helps to create a non-stick surface and adds a subtle earthy flavor to the bread.
Q: My bread is browning too quickly. What should I do?
A: If the bread is browning too quickly, lower the oven temperature by 10-15°C (25-50°F) and cover the top of the pots loosely with aluminum foil.
Final Thoughts
I hope you’re inspired to try baking these charming rustic flower pot bread loaves or rolls. They’re a delightful conversation starter and a truly unique way to enjoy freshly baked bread. Don’t be afraid to get creative with your additions and make them your own! Share your baking adventures with me—I can’t wait to see your “blooming marvellous” creations! Pair these adorable breads with a hearty soup or a simple cheese board for a memorable meal. Happy baking!