
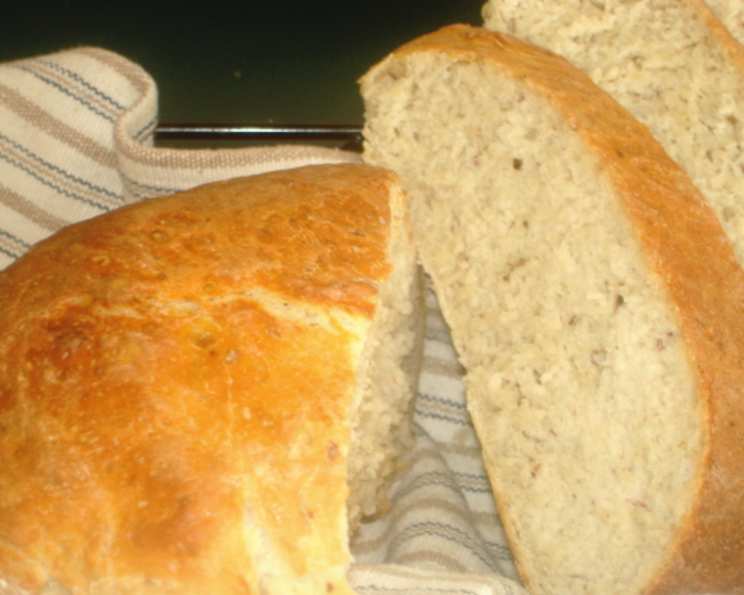
Rustic Potato Loaves: A Taste of Home
I remember the first time I made these rustic potato loaves. It was a grey, drizzly day, the kind that called for comfort food. The aroma alone – earthy potatoes mingling with the warm, yeasty scent of baking bread – was enough to chase away the gloom. Pulling those deeply browned, crusty loaves from the oven felt like uncovering a hidden treasure. Each slice, with its soft, slightly dense interior and wonderfully chewy crust, was a small piece of edible happiness. From that day on, this recipe has been a regular in my kitchen, and I’m thrilled to share it with you.
Recipe Overview
- Prep Time: 45 minutes
- Cook Time: 50 minutes
- Rise Time: 1 hour 10 minutes
- Total Time: 2 hours 25 minutes
- Yield: 2 loaves
- Dietary Type: Vegetarian
Ingredients
- 1 ½ lbs (680g) russet potatoes (about 3 large)
- 4 teaspoons kosher salt, divided
- ½ cup (120ml) tepid reserved potato water
- 1 tablespoon (7g) active dry yeast (not instant)
- 2 tablespoons olive oil
- 4 ¾ cups (570g) unbleached all-purpose flour
Equipment Needed
- Large pot
- KitchenAid stand mixer with paddle and dough hook attachments (or equivalent mixer)
- Greased bowl
- Plastic wrap
- Pizza stone (optional)
- Baking sheet
- Parchment paper
- Spray bottle
Instructions
-
Begin by preparing the potatoes. Thoroughly scrub the russet potatoes (peeling is optional, and in this recipe, we’re keeping the peels on for added texture and flavor). Cube them into large pieces and place them in a large pot.
-
Cover the potatoes with water, add 2 teaspoons of kosher salt, and bring the mixture to a boil. Continue to boil the potatoes until they are completely cooked through, about 15-20 minutes. They should be easily pierced with a fork.
-
Carefully draw off ½ cup (120ml) of the water the potatoes cooked in (this is your reserved potato water) and set it aside to cool. Then, drain the potatoes and spread them out on a baking sheet to dry completely. This is an important step; the drier the potatoes, the better the bread’s texture. Allow the potatoes to cool for at least 30 minutes. Leaving the peel on is key for the rustic flavor and texture.
-
Once the reserved ½ cup of potato water has cooled to a tepid temperature (warm to the touch but not hot, around 105-115°F or 40-46°C), add the 1 tablespoon (7g) of active dry yeast. Let the mixture bloom for about 5 minutes, until the yeast is foamy and active. This step ensures the yeast is alive and ready to leaven the bread.
-
Place the dried, cooled potatoes in the bowl of a stand mixer fitted with the paddle attachment. Mash the potatoes until they are smooth. The peel will create a slightly speckled appearance, which is perfectly fine.
-
With the mixer still on low speed, add the bloomed yeast/potato water mixture and the 2 tablespoons of olive oil to the mashed potatoes. Mix until everything is well combined.
-
Change to the dough hook attachment. Add the 4 ¾ cups (570g) of unbleached all-purpose flour and the remaining 2 teaspoons of kosher salt all at once to the bowl. Mix on low speed for about 3 minutes, then increase the speed to medium and mix for an additional 11 minutes.
-
The dough will initially appear firm and may even seem dry, resembling pie dough. Resist the urge to add more liquid or flour. Just let the mixer do its work. The flour will gradually be absorbed, and the dough will transform into a very soft, almost batter-like consistency, similar to brioche dough. Stop the machine a few times during the mixing process to scrape the dough down from the sides and bottom of the bowl, ensuring even incorporation.
-
Scrape the dough into a greased bowl. Cover the bowl tightly with plastic wrap and let the dough rise for 35 minutes. Don’t expect a dramatic rise; the dough will increase only slightly in volume.
-
While the dough is proofing, place a rack in the bottom of the oven and place a pizza stone on it (if you have one). Preheat the oven to 375°F (190°C). If you don’t have a pizza stone, you can bake the loaves directly on a baking sheet.
-
Invert a baking sheet and place a piece of parchment paper on it. Lightly sprinkle the parchment with flour. This will be the resting place for the bread’s final rise.
-
Turn the dough out onto a lightly floured surface and divide it in half. Shape each piece into a torpedo shape, with tapered ends. Place the shaped loaves on the prepared parchment paper, cover with a clean kitchen towel, and let them rise at room temperature for about 35 minutes.
-
After the final 35-minute rise, carefully slide the loaves, still on the parchment paper, onto the preheated pizza stone in the oven. Using a spray bottle, spray the oven walls with water to create steam, then quickly shut the door to trap the steam. This steam is crucial for creating a crisp, golden-brown crust.
-
Bake the loaves for 50 minutes, spraying the oven with water occasionally throughout the baking process to maintain a steamy environment.
-
When the loaves are done, they will be deeply browned, sound hollow when tapped on the bottom, and the interior temperature will register approximately 200°F (93°C) on an instant-read thermometer.
-
Remove the loaves from the oven and let them cool on a wire rack for at least 20 minutes before slicing. This allows the internal structure to set, making them easier to slice and preventing a gummy texture.
Expert Tips & Tricks
- Drying the potatoes thoroughly after boiling is essential for preventing a sticky dough.
- Don’t be tempted to add more flour or liquid during the mixing process. Trust the recipe; the dough will come together beautifully with time.
- The steam is key to achieving a wonderfully crusty exterior.
- If you don’t have a pizza stone, bake the loaves directly on a baking sheet. The crust won’t be quite as crisp, but the bread will still be delicious.
Serving & Storage Suggestions
Serve these rustic potato loaves warm or at room temperature. They are fantastic on their own, with a smear of butter, or alongside soups, stews, and salads. These loaves also make exceptional sandwiches.
Store leftover bread at room temperature in a breadbox or wrapped in a paper bag for up to 3 days. For longer storage, wrap the loaves tightly in plastic wrap and freeze for up to 2 months. To reheat, thaw completely and warm in a 350°F (175°C) oven for 10-15 minutes, or until heated through.
Nutritional Information
| Nutrient | Amount per Serving | % Daily Value |
|---|---|---|
| Calories | 740 kcal | 37% |
| Total Fat | 8.5g | 13% |
| Saturated Fat | 1.25g | 6% |
| Cholesterol | 0mg | 0% |
| Sodium | 1759mg | 73% |
| Total Carbohydrate | 144g | 48% |
| Dietary Fiber | 8.4g | 34% |
| Sugars | 1.75g | 7% |
| Protein | 19.9g | 40% |
Please note: Nutritional information is an estimate and can vary based on specific ingredients and portion sizes.
Variations & Substitutions
- Herb Infusion: Add 1-2 tablespoons of chopped fresh rosemary or thyme to the dough for an herbaceous twist.
- Whole Wheat Variation: Substitute up to half of the all-purpose flour with whole wheat flour for a nuttier flavor and increased fiber.
- Garlic and Cheese: Incorporate 2-3 cloves of minced garlic and ½ cup of grated Parmesan or cheddar cheese into the dough during the final mixing stage.
- Potato Type: While russets are preferred, you can experiment with Yukon Gold potatoes for a slightly sweeter flavor and creamier texture.
FAQs (Frequently Asked Questions)
Q: Why do I need to reserve potato water?
A: The potato water contains starches released during boiling, which contributes to the bread’s flavor and texture.
Q: Can I use instant yeast instead of active dry yeast?
A: While active dry yeast is recommended for this recipe, you can substitute with instant yeast. Add the instant yeast directly to the flour mixture without blooming it first.
Q: My dough seems very wet. Is that normal?
A: Yes, the dough for these potato loaves is quite soft and almost batter-like. Resist the urge to add more flour, as it will come together during the mixing process.
Q: How can I tell if my bread is done?
A: The bread is done when it is deeply browned, sounds hollow when tapped on the bottom, and the interior temperature registers approximately 200°F (93°C) on an instant-read thermometer.
Q: Can I freeze the bread?
A: Yes, these potato loaves freeze well. Wrap them tightly in plastic wrap and freeze for up to 2 months. Thaw completely before reheating.
Final Thoughts
These rustic potato loaves are more than just bread; they’re an experience. They’re a testament to the simple pleasure of homemade baking, a reminder that even humble ingredients can be transformed into something extraordinary. So, preheat your oven, gather your ingredients, and embark on this culinary adventure. I’m confident that you’ll fall in love with the unique flavor and texture of these loaves just as I did. And don’t hesitate to share your creations and feedback – I’d love to hear how they turned out for you! Pair a slice with a hearty bowl of soup and a glass of robust red wine for the ultimate comforting meal.