
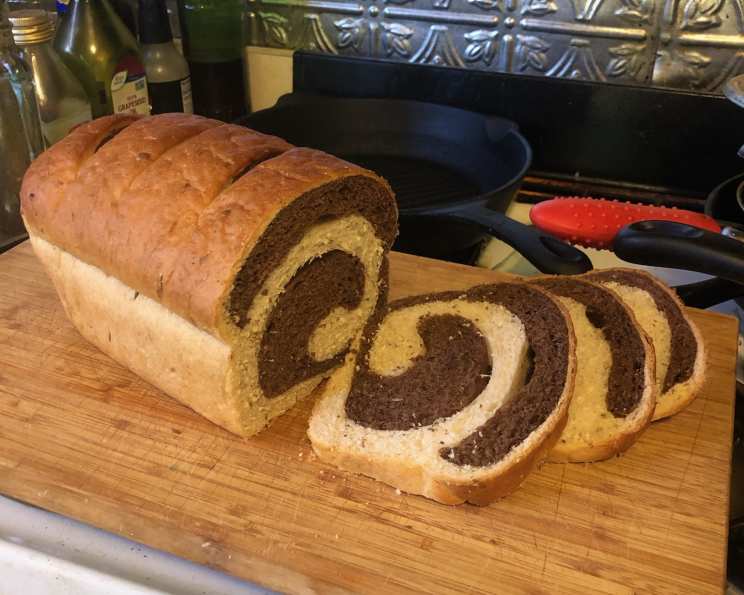
Rye Swirl Bread: A Culinary Symphony of Flavors
The aroma of freshly baked bread has always been a siren song, drawing me back to my grandmother’s cozy kitchen. She wasn’t a fancy baker, but her simple rye bread, made with a touch of molasses and a whole lot of love, was legendary. While I always thought her recipe was too rye-heavy for my liking, I loved the idea of marrying that flavor with something lighter. That’s why this Rye Swirl Bread, a delightful dance between earthy rye and classic white dough, holds a special place in my heart. It’s a nod to tradition with a twist of modern taste.
Recipe Overview
- Prep Time: 1 hour 30 minutes (includes rising time)
- Cook Time: 25-35 minutes
- Total Time: 2 hours 5 minutes
- Servings: Varies
- Yields: 2 loaves
- Dietary Type: Vegetarian
Ingredients
- 4 ½ – 5 cups all-purpose flour
- 2 tablespoons sugar
- 4 ½ teaspoons active dry yeast (2 packets)
- 1 ½ teaspoons salt
- 1 ¼ cups water
- 1 cup milk
- 2 tablespoons unsalted butter
- 2 tablespoons molasses
- 3 cups medium rye flour
Equipment Needed
- Large mixing bowl
- Small mixing bowl
- Measuring cups and spoons
- Electric mixer (optional, but recommended)
- Two loaf pans
- Rolling pin
- Clean kitchen towel
- Wire cooling rack
Instructions
- In a large bowl, combine 2 ½ cups of the all-purpose flour, sugar, yeast, and salt. Make sure the yeast isn’t expired for the best rise!
- In a separate small saucepan (or in the microwave), heat the water, milk, and butter until very warm (around 120-130°F or 49-54°C). The mixture should be warm to the touch, but not scalding. If it’s too hot, let it cool slightly before adding it to the dry ingredients.
- Add the warm liquid mixture to the dry ingredients in the large bowl and beat with an electric mixer (or by hand) for 2 minutes at medium speed, scraping the bowl occasionally to ensure everything is well combined.
- Increase the mixer speed to high and beat for another 2 minutes. The batter should be smooth and elastic.
- Remove half of the batter (approximately half) to a separate bowl. This divides the dough into the white and rye portions.
- Into one bowl (containing half of the batter), gradually stir in enough of the remaining all-purpose flour to form a soft dough. A soft dough should be slightly sticky but still manageable.
- Into the second bowl (containing the other half of the batter), stir in the molasses and enough of the rye flour to form another soft dough. Rye flour absorbs liquid differently than all-purpose, so add it gradually to avoid a dry dough.
- Turn each dough out onto a lightly floured surface and knead separately until smooth and elastic, about 5 minutes each. The kneading process develops the gluten, giving the bread its structure.
- Cover each dough ball with a clean kitchen towel and let them rest for 10-20 minutes. This allows the gluten to relax, making the dough easier to roll out.
- Divide each dough ball (both white and rye) in half. You will now have four portions of dough.
- On a lightly floured surface, roll each portion of dough into a 7 x 14 inch rectangle. Aim for consistent thickness for even baking.
- Place one dark (rye) rectangle on top of each white rectangle. This creates the layers that will form the swirl.
- Starting from one of the short ends, roll up each pair of rectangles tightly, jelly-roll fashion. Pinch the seams along the bottom and the ends to seal, preventing the swirl from unraveling during baking.
- Place the loaves, seam side down, in two greased loaf pans. Greasing the pans prevents the bread from sticking.
- Cover the loaf pans with a clean kitchen towel and let the dough rise in a warm place for 60 minutes, or until doubled in size. If using rapid rise yeast, the rising time may be shorter.
- Preheat your oven to 375°F (190°C).
- Bake the loaves for 25-35 minutes, or until they are golden brown and sound hollow when tapped on the bottom. A good internal temperature should be around 200-210°F (93-99°C).
- Remove the loaves from the pans and let them cool completely on a wire rack before slicing. This prevents the bread from becoming soggy.
Expert Tips & Tricks
- For a more intense rye flavor, try using dark rye flour instead of medium rye flour.
- A longer proofing time (up to 90 minutes) can result in a more open crumb structure.
- If your oven tends to brown bread quickly, tent the loaves with foil during the last 10 minutes of baking to prevent over-browning.
- To add visual appeal, brush the tops of the loaves with an egg wash (1 egg beaten with 1 tablespoon of water) before baking.
- If you don’t have molasses, you can substitute with honey or dark corn syrup, though the flavor will be slightly different.
- Ensure your yeast is active by proofing it before adding it to the dry ingredients. To proof, dissolve the yeast in warm water with a teaspoon of sugar. If it foams up after 5-10 minutes, it’s good to go.
Serving & Storage Suggestions
This Rye Swirl Bread is delicious served warm with butter, cream cheese, or a simple spread of Dijon mustard. It’s also fantastic for sandwiches, especially with cold cuts, cheeses, or smoked fish.
To store, wrap the cooled loaves tightly in plastic wrap or place them in an airtight container. At room temperature, the bread will stay fresh for 2-3 days. For longer storage, you can freeze the loaves for up to 2 months. Thaw completely before slicing and serving. Reheating slices in a toaster oven or under the broiler will restore some of the fresh-baked flavor and texture.
Nutritional Information
(Note: This is an estimate and will vary depending on specific ingredients and serving size.)
| Nutrient | Amount per Serving | % Daily Value |
|---|---|---|
| Calories | 250 kcal | 13% |
| Total Fat | 5g | 8% |
| Saturated Fat | 2g | 10% |
| Cholesterol | 10mg | 3% |
| Sodium | 300mg | 13% |
| Total Carbohydrate | 45g | 15% |
| Dietary Fiber | 4g | 16% |
| Sugars | 3g | – |
| Protein | 8g | 16% |
Variations & Substitutions
- Seeded Rye Swirl: Add 2 tablespoons of caraway seeds to the rye dough for a classic rye flavor.
- Whole Wheat Swirl: Substitute up to half of the all-purpose flour with whole wheat flour for a nuttier flavor and added fiber.
- Sweet Rye Swirl: Add a teaspoon of orange zest to the white dough and brush the baked loaves with a simple syrup (equal parts sugar and water, heated until dissolved) for a sweet treat.
- Gluten-Free: While challenging, a gluten-free version could be attempted using a blend of gluten-free flours, but the texture and rise will be different. Experiment with a combination of rice flour, tapioca starch, and potato starch, and be sure to include a binding agent like xanthan gum.
FAQs (Frequently Asked Questions)
Q: Why is my rye bread so dense?
A: Rye flour has less gluten than all-purpose flour, which can result in a denser loaf. Be careful not to over-knead the dough, as this can also contribute to density.
Q: Can I use instant yeast instead of active dry yeast?
A: Yes, you can substitute instant yeast (also known as rapid-rise yeast) for active dry yeast. You can add it directly to the dry ingredients without proofing it first. The rising time may also be slightly shorter.
Q: How do I know when the bread is done baking?
A: The bread is done when it’s golden brown and sounds hollow when tapped on the bottom. An internal temperature of 200-210°F (93-99°C) is also a good indicator.
Q: Can I make this dough in a bread machine?
A: Yes, you can use a bread machine to mix and knead the dough. Follow your bread machine’s instructions for a basic dough cycle. However, you’ll still need to shape the swirl by hand before baking.
Q: What can I do if my dough doesn’t rise?
A: Several factors can prevent dough from rising, including expired yeast, water that’s too hot or too cold, or a cold environment. Make sure your yeast is fresh, the liquid is warm (not hot), and the dough is in a warm place to rise.
Final Thoughts
This Rye Swirl Bread is more than just a recipe; it’s an invitation to create something beautiful and delicious. The swirling patterns are a testament to the simple elegance of homemade bread, and the flavor is a delightful combination of familiar and intriguing. Don’t be afraid to experiment with variations and substitutions to make it your own. I encourage you to give this recipe a try, share your creations with loved ones, and let the aroma of freshly baked bread fill your home with warmth and joy. Enjoy!