
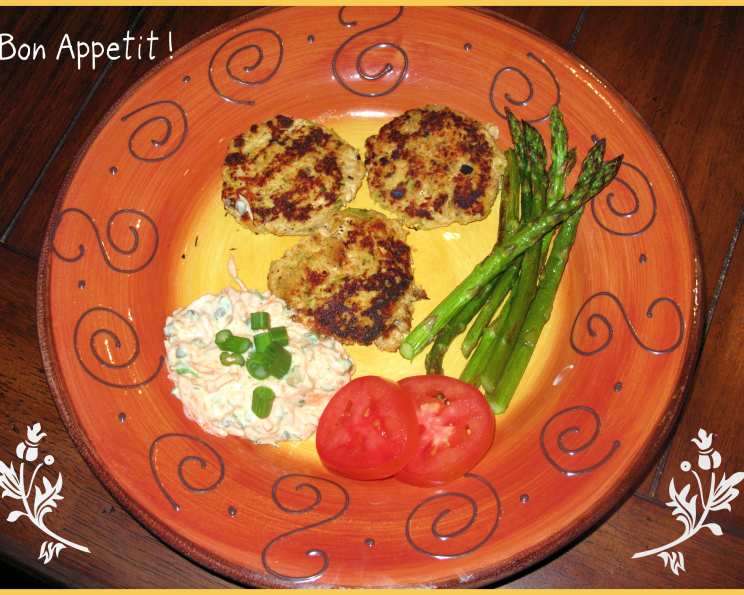
Salmon Cakes With Zesty Remoulade: A Culinary Two-Step
There’s a certain magic that happens when simple ingredients combine to create something truly special. For me, that magic often unfolds in the form of salmon cakes. My grandmother used to make them every summer, a crispy, flavorful treat we’d devour on her porch overlooking the lake. The air, thick with the scent of pine and the promise of adventure, would be filled with laughter as we eagerly dipped those golden-brown cakes into her secret-recipe remoulade. I’ve adapted her recipe over the years, but the heart of it—the perfect balance of savory salmon and tangy sauce—remains a cherished taste of home.
Recipe Overview
- Prep Time: 20 minutes
- Cook Time: 15 minutes
- Total Time: 35 minutes
- Servings: 4-6
- Yield: 8-10 salmon cakes, 2 cups remoulade
- Dietary Type: Gluten-Free (naturally), Dairy-Free (if mayonnaise is dairy-free)
Ingredients
For the Salmon Cakes:
- 1 pound skinless salmon fillet, pin bones removed
- 1/4 cup red onion, finely diced
- 1/4 cup fresh parsley, chopped
- 1 large egg, lightly beaten
- 1/4 cup gluten-free breadcrumbs (or regular if not gluten-free)
- 1 tablespoon Dijon mustard
- 1 tablespoon lemon juice
- 1/2 teaspoon Old Bay seasoning
- 1/4 teaspoon black pepper
- 2 tablespoons olive oil, for cooking
For the Remoulade Sauce:
- 1 cup plain fat-free yogurt
- 1/2 cup carrot, grated
- 1 1/2 tablespoons mayonnaise
- 2 tablespoons fresh parsley, chopped
- 2 tablespoons green onions, chopped
- 2 teaspoons Dijon mustard
- 1 teaspoon capers
- 1/4 teaspoon tarragon
- 3 dashes hot sauce
- 1 dash black pepper
Equipment Needed
- Large mixing bowl
- Small mixing bowl
- Cutting board
- Chef’s knife
- Measuring cups and spoons
- Large skillet
- Spatula
- Whisk
Instructions
- Prepare the Salmon: Gently poach or steam the salmon fillet until cooked through and easily flakes with a fork. This usually takes about 8-10 minutes. Let it cool slightly. Alternatively, you can bake the salmon at 375°F (190°C) for 12-15 minutes.
- Flake the Salmon: In a large mixing bowl, flake the cooled salmon with a fork, removing any remaining skin or bones.
- Combine Salmon Cake Ingredients: Add the diced red onion, chopped parsley, beaten egg, gluten-free breadcrumbs, Dijon mustard, lemon juice, Old Bay seasoning, and black pepper to the flaked salmon.
- Mix Gently: Gently combine all ingredients until just mixed. Be careful not to overmix, as this can make the salmon cakes tough.
- Form the Cakes: Shape the mixture into 8-10 equal-sized cakes, about 2-3 inches in diameter.
- Prepare the Remoulade: While the salmon cools and you prepare the cakes, make the Remoulade. In a small bowl, combine the plain fat-free yogurt, grated carrot, mayonnaise, chopped fresh parsley, chopped green onions, Dijon mustard, capers, tarragon, hot sauce, and black pepper.
- Chill the Remoulade: Cover the remoulade and chill in the refrigerator until ready to serve. This allows the flavors to meld together beautifully.
- Heat the Skillet: Heat the olive oil in a large skillet over medium heat. Make sure the oil is shimmering before adding the salmon cakes.
- Cook the Salmon Cakes: Carefully place the salmon cakes in the hot skillet, being careful not to overcrowd the pan. Cook for about 4-5 minutes per side, or until golden brown and heated through.
- Ensure Doneness: The internal temperature of the salmon cakes should reach 145°F (63°C). Use a meat thermometer to check.
- Serve Immediately: Remove the salmon cakes from the skillet and serve immediately with the chilled remoulade sauce.
Expert Tips & Tricks
- Binder Adjustment: If the salmon cake mixture seems too wet, add a little more gluten-free breadcrumbs (one tablespoon at a time) until it holds its shape. If it seems too dry, add a touch more beaten egg.
- Flavor Enhancement: For an extra layer of flavor, try adding a pinch of smoked paprika or cayenne pepper to the salmon cake mixture.
- Make-Ahead Option: The salmon cakes can be formed ahead of time and stored in the refrigerator for up to 24 hours before cooking. This is great for meal prepping.
- Crispy Cakes: To achieve extra crispy cakes, lightly dredge them in gluten-free flour or cornmeal before cooking.
- Even Cooking: Make sure the skillet is evenly heated to ensure the salmon cakes cook evenly and don’t burn.
- Poaching Perfection: When poaching the salmon, add a bay leaf and a few peppercorns to the poaching liquid for added flavor.
- Sauce Texture: If you prefer a smoother remoulade, pulse the ingredients in a food processor for a few seconds. Be careful not to over-process.
Serving & Storage Suggestions
Serve the salmon cakes hot, straight from the skillet, with a generous dollop of the chilled remoulade sauce. They make a delicious appetizer, light lunch, or even a satisfying dinner. Consider pairing them with a side salad of mixed greens or some roasted vegetables.
Storage:
- Refrigerate: Leftover salmon cakes can be stored in the refrigerator for up to 3 days.
- Reheat: Reheat gently in a skillet over low heat or in a preheated oven at 350°F (175°C) until warmed through.
- Remoulade: The remoulade sauce can be stored in an airtight container in the refrigerator for up to 5 days.
Do not leave the salmon cakes at room temperature for more than 2 hours.
Nutritional Information
| Nutrient | Amount per Serving (approx.) | % Daily Value |
|---|---|---|
| Calories | 350 kcal | 18% |
| Total Fat | 20g | 31% |
| Saturated Fat | 4g | 20% |
| Cholesterol | 100mg | 33% |
| Sodium | 400mg | 17% |
| Total Carbohydrate | 15g | 5% |
| Dietary Fiber | 2g | 8% |
| Sugars | 5g | – |
| Protein | 25g | 50% |
Nutritional information is an estimate and may vary based on specific ingredients used.
Variations & Substitutions
- Spicy Salmon Cakes: Add a pinch of cayenne pepper or a dash of your favorite hot sauce to the salmon cake mixture.
- Herby Salmon Cakes: Experiment with different herbs, such as dill, chives, or thyme, in place of or in addition to the parsley.
- Vegetarian Option: Substitute canned chickpeas or white beans for the salmon for a vegetarian version. Mash the beans well before adding them to the mixture.
- Dairy-Free Remoulade: Ensure you use a dairy-free mayonnaise alternative to keep the entire recipe dairy-free.
- Lemon-Herb Remoulade: Omit the carrot and capers from the remoulade and add a tablespoon of lemon zest and a handful of fresh dill for a lighter, brighter flavor.
FAQs (Frequently Asked Questions)
Q: Can I use canned salmon instead of fresh salmon?
A: Yes, you can use canned salmon, but fresh salmon will yield a better flavor and texture. Be sure to drain the canned salmon well before using.
Q: Can I freeze salmon cakes?
A: Yes, you can freeze the uncooked salmon cakes. Place them on a baking sheet lined with parchment paper and freeze until solid. Then, transfer them to a freezer bag and store for up to 2 months. Cook from frozen, adding a few extra minutes to the cooking time.
Q: What can I serve with salmon cakes besides remoulade?
A: Tartar sauce, aioli, or even a simple squeeze of lemon juice are all great accompaniments to salmon cakes.
Q: How can I prevent the salmon cakes from falling apart?
A: Make sure you don’t overmix the ingredients. Overmixing can develop the gluten in the breadcrumbs, making the cakes tough. Also, ensure the salmon is properly flaked and not too wet.
Q: Can I bake the salmon cakes instead of frying them?
A: Yes, you can bake them. Place the formed cakes on a baking sheet lined with parchment paper and bake at 375°F (190°C) for 15-20 minutes, or until golden brown and cooked through.
Final Thoughts
I hope this recipe inspires you to create your own cherished memories around the simple pleasure of salmon cakes and remoulade. Don’t be afraid to experiment with different flavors and ingredients to make it your own. Whether you’re enjoying them on a sunny porch or at your kitchen table, I guarantee these salmon cakes will bring a touch of culinary magic to your day. So, gather your ingredients, put on some music, and get cooking! And don’t forget to let me know how yours turn out!