
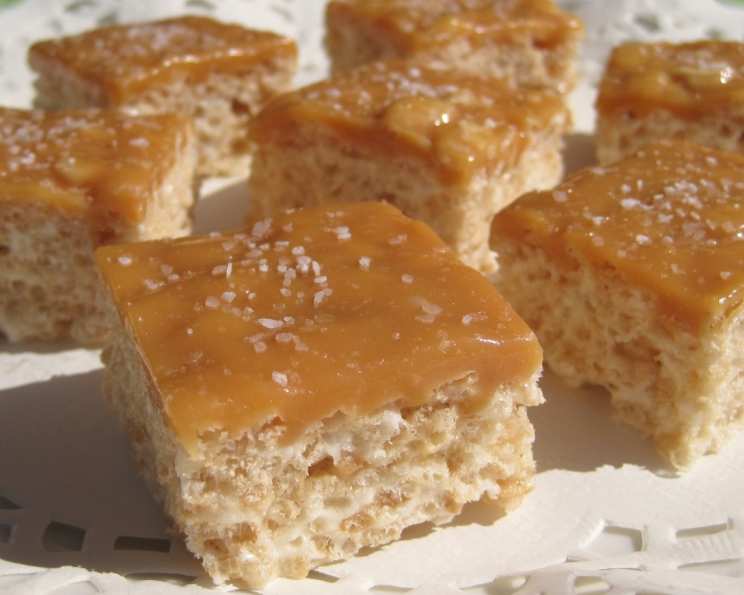
Salted Caramel Dream Squares
The first time I truly understood the magic of salted caramel was in a tiny Parisian patisserie. The aroma alone – a symphony of burnt sugar and creamy butter – was intoxicating. I remember biting into a simple caramel square sprinkled with coarse sea salt, and it was a revelation. The sweet, almost primal comfort of caramel, contrasted with the bright, savory salt, created an explosion of flavor that lingered long after the last bite. I knew then that I had to master the art of salted caramel, and bring that same spark of joy to my own creations. These Salted Caramel Dream Squares are my tribute to that Parisian moment, a simple treat elevated to something truly special.
Recipe Overview
- Prep Time: 20 minutes
- Cook Time: 10 minutes
- Total Time: 30 minutes
- Servings: 24 squares
- Yield: 1 (13×9 inch) pan
- Dietary Type: Not Gluten-Free
Ingredients
For the Caramel:
- 1 (14 ounce) bag caramels, unwrapped
- 1 (14 ounce) can sweetened condensed milk
- 1/4 cup unsalted butter
For the Squares:
- 1/4 cup unsalted butter
- 1 (10 1/2 ounce) bag miniature marshmallows
- 1 1/2 teaspoons vanilla extract
- 3 teaspoons flaked sea salt, divided
- 8 cups toasted rice cereal
Equipment Needed
- Medium saucepan
- 13×9 inch baking dish
- Non-stick aluminum foil
- Rubber spatula
Instructions
- Begin by preparing the caramel. In a medium saucepan, combine the unwrapped caramels, sweetened condensed milk, and 1/4 cup unsalted butter.
- Melt the caramel ingredients over medium-low heat, stirring constantly until smooth and completely melted. This should take approximately 5-7 minutes. Be careful not to burn the caramel; low and slow is key. Remove the saucepan from the heat.
- Line a 13×9 inch baking dish with non-stick aluminum foil, ensuring the foil extends at least 2 inches beyond all edges. This overhang will make it easier to remove the finished squares later.
- In a separate saucepan, melt the remaining 1/4 cup unsalted butter over medium-low heat.
- Add the miniature marshmallows to the melted butter. Using a rubber spatula, stir continuously until the marshmallows are almost completely melted. A few small lumps are okay at this stage.
- Remove the marshmallow mixture from the heat and stir in the vanilla extract and 1 teaspoon of the flaked sea salt.
- Gradually add 1 cup of the melted caramel to the marshmallow mixture, stirring until everything is smooth and evenly combined.
- Pour the toasted rice cereal into the marshmallow-caramel mixture and stir gently but thoroughly until the cereal is evenly coated. Ensure no dry cereal remains.
- Transfer the cereal mixture to the prepared baking dish and press it firmly and evenly into the bottom of the pan. A flat-bottomed measuring cup or spatula can be helpful for this.
- Spread the remaining melted caramel evenly over the top of the pressed cereal mixture. Work quickly, as the caramel will start to set as it cools.
- Sprinkle the remaining 2 teaspoons of flaked sea salt evenly over the caramel topping.
- Let the Salted Caramel Dream Squares cool completely at room temperature. This will take at least an hour, or ideally longer.
- Once cooled and set, use the foil overhang to lift the squares from the baking dish. Peel away the foil and cut the mixture into 24 even squares.
Expert Tips & Tricks
- Caramel Consistency: For a softer caramel layer, add an extra tablespoon of butter to the caramel mixture. For a firmer caramel, cook it for a minute or two longer, watching carefully to prevent burning.
- Toasting the Cereal: While the recipe calls for toasted rice cereal, you can enhance the flavor by lightly toasting it yourself. Spread the cereal on a baking sheet and bake at 300°F (150°C) for 5-7 minutes, stirring occasionally, until lightly golden.
- Marshmallow Melting: Avoid overheating the marshmallows, as this can make them tough. Gentle, even heat is essential for a soft and gooey texture.
- Evenly Distributed Salt: For the best flavor, use a good quality flaked sea salt. Sprinkle it evenly over the caramel while it’s still slightly warm so it adheres properly.
- Clean Cuts: For neat, clean cuts, use a large, sharp knife. You can also lightly grease the knife with cooking spray or dip it in hot water between cuts.
Serving & Storage Suggestions
Serve the Salted Caramel Dream Squares at room temperature. They are delicious on their own as a sweet treat, or paired with a scoop of vanilla ice cream or a cup of hot coffee.
Store leftover squares in an airtight container at room temperature for up to 3 days. For longer storage, refrigerate them for up to a week. While refrigeration may slightly harden the caramel, the squares will still be delicious. You can also freeze the squares for up to 2 months. Thaw them at room temperature before serving.
Nutritional Information
| Nutrient | Amount per Serving | % Daily Value |
|---|---|---|
| Calories | 224 kcal | – |
| Calories from Fat | – | 27% |
| Total Fat | 6.8 g | 10% |
| Saturated Fat | 3.8 g | 18% |
| Cholesterol | 16.9 mg | 5% |
| Sodium | 143.2 mg | 5% |
| Total Carbohydrate | 39.9 g | 13% |
| Dietary Fiber | 0.1 g | 0% |
| Sugars | 27.7 g | – |
| Protein | 3 g | 5% |
Variations & Substitutions
- Gluten-Free: While the original recipe uses toasted rice cereal, which typically contains gluten, you can easily substitute it with a gluten-free puffed rice cereal to make these squares gluten-free.
- Different Cereals: Experiment with other types of cereal, such as corn flakes or Chex, for a different texture and flavor.
- Nutty Addition: Add chopped nuts, such as pecans or walnuts, to the cereal mixture for extra crunch and flavor.
- Chocolate Drizzle: Drizzle melted chocolate over the top of the finished squares for an extra decadent treat.
- Spiced Caramel: Infuse the caramel with spices like cinnamon, nutmeg, or cardamom for a warm and comforting flavor.
FAQs (Frequently Asked Questions)
Q: Can I use a different size pan?
A: While a 13×9 inch pan is recommended for the ideal thickness, you can use a slightly smaller or larger pan. Keep in mind that using a smaller pan will result in thicker squares, while a larger pan will result in thinner squares, and may affect the cooking time slightly.
Q: How do I prevent the caramel from burning?
A: The key to preventing the caramel from burning is to use low heat and stir constantly. Keep a close eye on it and remove it from the heat as soon as it’s smooth and melted.
Q: Can I make these ahead of time?
A: Yes, these squares are a great make-ahead dessert. They can be stored at room temperature for up to 3 days or in the refrigerator for up to a week.
Q: What if my caramel is too hard after cooling?
A: If the caramel becomes too hard, you can soften it slightly by microwaving the squares for a few seconds before serving.
Q: Can I use salted butter instead of unsalted?
A: While you can use salted butter, it’s best to use unsalted butter to control the amount of salt in the recipe. The flaked sea salt provides the perfect balance of sweet and savory.
Final Thoughts
These Salted Caramel Dream Squares are more than just a recipe; they’re an invitation to create moments of pure, unadulterated joy. From the intoxicating aroma of melting caramel to the satisfying crunch of the cereal and the delightful burst of sea salt, every bite is a celebration of simple pleasures. So, gather your ingredients, put on some music, and let the magic of salted caramel transform your kitchen into a haven of deliciousness. Don’t be afraid to experiment with variations, and most importantly, share your creations with loved ones. After all, the best desserts are the ones that are shared with a smile.