
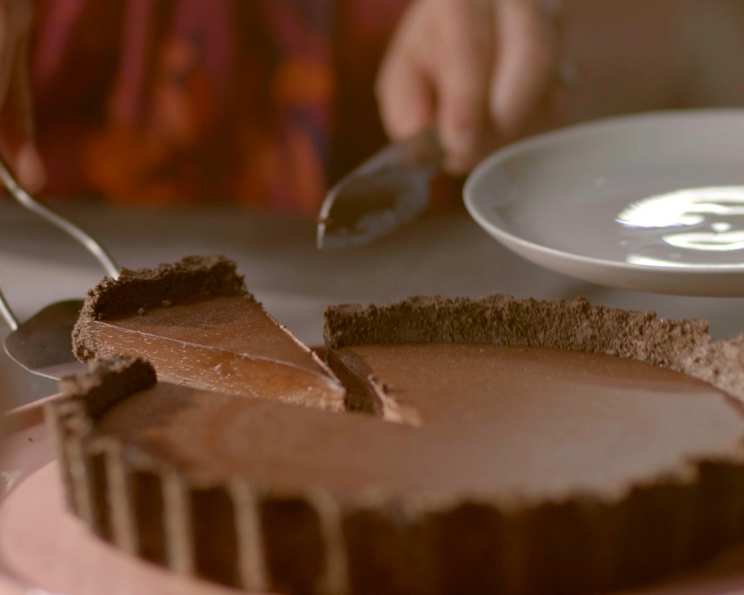
Salted Chocolate Tart: A Decadent Delight
I’ll never forget the first time I truly appreciated the power of salt in a sweet dessert. It was at a tiny Parisian patisserie, and I ordered what I thought was a standard chocolate tart. But upon the first bite, the rich, dark chocolate exploded with flavor, punctuated by a subtle but distinct saltiness. It was a revelation, a symphony of flavors that elevated the experience from pleasant to utterly unforgettable. That memory has fueled my passion for crafting the perfect salted chocolate tart, and this recipe is the result of years of experimentation and refinement.
Recipe Overview
- Prep Time: 30 minutes
- Cook Time: 10 minutes
- Total Time: At least 4 hours (including chilling)
- Servings: 12-14
- Yield: 1 tart
- Dietary Type: Not specified
Ingredients
For the Base:
- 2 (154 g) packets Oreo cookies (28 biscuits in all)
- 50 g dark chocolate (min. 70% cocoa solids)
- 50 g soft unsalted butter
- ½ teaspoon smoked flaked sea salt
For the Filling:
- 100 g dark chocolate (min. 70% cocoa solids)
- 25 g cornflour
- 60 ml full-fat milk
- 500 ml double cream
- 50 g cocoa, sieved
- 2 teaspoons instant espresso powder or strong instant coffee powder
- 75 g caster sugar
- 1 teaspoon vanilla bean paste or 1 teaspoon extract
- 2 teaspoons extra virgin olive oil
- ¾ teaspoon flaked sea salt, smoked
Equipment Needed
- 23cm/10in deep-sided (approx. 5cm/2in deep), loose-bottomed flan tin
- Food processor (optional)
- Heavy-based saucepan
- Whisk (small and large)
- Wooden spoon
- Measuring jug or batter jug
- Baking parchment or greaseproof paper
- Refrigerator
Instructions
-
Prepare the Oreo Crust: Begin by breaking the Oreo cookies into pieces and placing them into the bowl of a food processor. Add the dark chocolate to the bowl as well. Pulse the mixture until you achieve a fine crumb consistency. If you don’t have a food processor, you can place the cookies in a freezer bag and crush them with a rolling pin, and finely chop the chocolate.
-
Bind the Crust: Add the soft unsalted butter and smoked flaked sea salt to the cookie crumb mixture. Pulse again in the food processor until the mixture begins to clump together. If mixing by hand, melt the butter and combine it with the crushed cookies, chopped chocolate, and salt in a large bowl. Use a wooden spoon or your hands (wearing disposable gloves) to thoroughly mix everything.
-
Press the Crust into the Tin: Transfer the mixture into your flan tin. Using your hands or the back of a spoon, firmly press the mixture into the bottom and up the sides of the tin. Ensure that the base and sides are evenly lined and smooth to create a stable and attractive tart shell.
-
Chill the Crust: Place the prepared tart tin into the refrigerator to chill and harden. This will take at least 1 hour, but 2 hours is preferable, especially if your refrigerator is full. Note: The Oreo crust tends to get too crumbly if left for longer than a day, so avoid chilling it for extended periods.
-
Prepare the Chocolate Filling: Finely chop the dark chocolate for the filling. In a separate cup, whisk together the cornflour and full-fat milk until the mixture is smooth, ensuring no lumps remain.
-
Combine Filling Ingredients: Pour the double cream into a heavy-based saucepan, ensuring there’s enough room to stir without spillage. Add the chopped dark chocolate, sieved cocoa, espresso powder (or strong instant coffee powder), caster sugar, vanilla bean paste (or extract), extra virgin olive oil, and smoked salt.
-
Melt and Infuse: Place the saucepan over medium-low heat. Using a small whisk, gently stir the mixture as the cream heats up and the chocolate begins to melt. The goal is to banish any lumps and ensure all the ingredients are well combined. Avoid introducing too much air into the mixture.
-
Thicken the Filling: Remove the saucepan from the heat and whisk in the cornflour and milk mixture until it is completely incorporated and smooth. Place the pan back on low heat. Using a wooden spoon, continuously stir the mixture until it thickens. This should take around 10 minutes, but may require a few minutes more or less depending on your stovetop.
-
Achieve the Right Consistency: Occasionally, remove the pan from the heat while continuing to stir. This allows the flavors to meld without the cream boiling. The filling is ready when it’s thick enough to coat the back of a wooden spoon. If you run your finger across the coating, the line should remain distinct.
-
Cool Slightly: Pour the chocolate mixture into a wide measuring jug or batter jug.
-
Prevent a Skin: Run a piece of baking parchment or greaseproof paper under cold water, wring it out, and crumple it. Place the damp, crumpled paper directly on top of the chocolate mixture in the jug. This prevents a skin from forming while it cools slightly. Refrigerate the jug for 15 minutes. The mixture should be warm enough to pour into the base without melting it.
-
Fill the Tart: Pour and scrape the chocolate mixture into the prepared biscuit-lined flan tin, ensuring it is evenly distributed.
-
Chill Overnight: Return the filled tart to the refrigerator and chill overnight. Avoid leaving it longer than 24 hours, as the base may begin to soften.
-
Unmold and Serve: Remove the tart from the refrigerator 10 minutes before serving. Place the flan tin on top of a large tin or jar and let the ring part fall away. Carefully transfer the tart to a serving plate or board, leaving the tin base on.
Expert Tips & Tricks
- Don’t over-whisk the filling: Over-whisking can incorporate too much air, leading to a less smooth and rich texture.
- Use high-quality chocolate: The quality of your chocolate directly impacts the overall flavor of the tart. Opt for a dark chocolate with at least 70% cocoa solids for a deep, intense chocolate flavor.
- Salt is Key: Don’t be afraid of the salt! The smoked flaked sea salt balances the sweetness of the chocolate and enhances the overall flavor profile.
- Patience is a virtue: Allow the tart to chill completely for the best texture and flavor. Rushing the chilling process can result in a runny filling.
- The damp parchment paper is essential: Don’t skip the step of placing damp parchment paper on the cooling filling. This prevents an unpleasant skin from forming.
- For a smoother filling, you can strain the mixture through a fine-mesh sieve before pouring it into the crust. This will remove any small lumps or imperfections.
Serving & Storage Suggestions
Slice the tart modestly, as it is rich and decadent. Serve chilled with a dollop of crème fraîche to provide a tangy counterpoint to the sweetness of the chocolate. Alternatively, a scoop of vanilla ice cream or a sprinkle of fresh berries would also complement the tart beautifully.
Leftovers can be stored in the refrigerator for 4-5 days, although the base will gradually soften and the sides may become slightly crumbly. This does not significantly detract from the taste, but it is best enjoyed within the first two days for optimal texture. Due to the nature of the filling, freezing is not recommended as it may affect the texture.
Nutritional Information
| Nutrient | Amount per Serving | % Daily Value |
|---|---|---|
| Calories | 400 kcal | 20% |
| Total Fat | 30g | 46% |
| Saturated Fat | 18g | 90% |
| Cholesterol | 60mg | 20% |
| Sodium | 150mg | 6% |
| Total Carbohydrate | 35g | 12% |
| Dietary Fiber | 4g | 16% |
| Sugars | 20g | – |
| Protein | 5g | 10% |
Note: Nutritional information is an estimate and may vary based on specific ingredients used.
Variations & Substitutions
- Gluten-Free Crust: Use gluten-free Oreo cookies or create a crust from gluten-free chocolate graham crackers combined with melted butter and salt.
- Dairy-Free Filling: Substitute the double cream with full-fat coconut cream for a vegan alternative. Ensure that the coconut cream is well chilled before use.
- Different Chocolate: Experiment with different types of chocolate, such as milk chocolate or white chocolate, for a different flavor profile. Adjust the sugar accordingly, as milk chocolate is sweeter than dark chocolate.
- Spice It Up: Add a pinch of chili powder to the filling for a subtle kick.
- Citrus Zest: Incorporate orange or lemon zest into the filling for a bright, aromatic twist.
FAQs (Frequently Asked Questions)
Q: Can I use regular sea salt instead of smoked flaked sea salt?
A: Yes, you can, but the smoked flaked sea salt adds a unique depth of flavor that complements the chocolate beautifully. If using regular sea salt, start with a smaller amount and adjust to taste.
Q: What if my chocolate filling is too thick?
A: If the filling becomes too thick, add a tablespoon or two of milk or cream while gently stirring until you reach the desired consistency.
Q: Can I make this tart ahead of time?
A: Absolutely! The base can be made a day ahead and stored in the refrigerator. The filled tart can also be made a day ahead and stored in the refrigerator until ready to serve.
Q: My Oreo crust is too crumbly. What did I do wrong?
A: This usually happens if there’s not enough butter or if the mixture isn’t pressed firmly enough into the tin. Make sure the butter is softened and press the crust firmly and evenly.
Q: What’s the best way to unmold the tart without breaking it?
A: Chilling the tart thoroughly is key. Also, placing the flan tin on top of a jar or tin allows the ring to drop away easily. Be gentle when transferring the tart to a serving plate.
Final Thoughts
This Salted Chocolate Tart is more than just a dessert; it’s an experience. The combination of the crunchy Oreo crust, the rich, decadent chocolate filling, and the subtle hint of salt is truly irresistible. I encourage you to try this recipe and discover the magic for yourself. Don’t be afraid to experiment with variations and make it your own. And please, share your creations and feedback – I’d love to see what you come up with! Pair it with a glass of chilled red wine or a strong cup of coffee for the ultimate indulgence. Happy baking!