
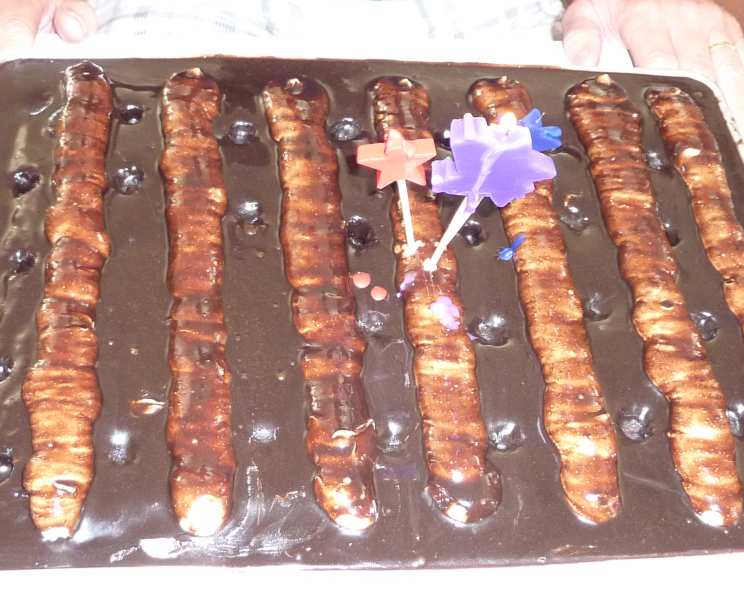
Sanders’ Chocolate Bumpy Cake: A Slice of Detroit Nostalgia
My grandmother, Nana Rose, had a recipe box overflowing with treasures, but the faded, cocoa-stained card for Sanders’ Chocolate Bumpy Cake always held a special allure. Growing up, the arrival of this cake signaled a celebration – birthdays, holidays, or simply a Sunday visit to her cozy kitchen. The moist chocolate cake, the fluffy buttercream ‘bumps,’ and that undeniably rich fudge frosting… it was pure joy in every bite, a taste of Detroit history made with love. Even now, the aroma of chocolate baking in the oven instantly transports me back to Nana Rose’s kitchen, filled with warmth, laughter, and the promise of Bumpy Cake.
Recipe Overview
- Prep Time: 45 minutes
- Cook Time: 35-40 minutes
- Total Time: 1 hour 20 minutes (plus freezer time)
- Servings: 24 (smaller slices)
- Yield: 1 9×13 inch cake
- Dietary Type: Not specified (contains dairy and eggs)
Ingredients
For the Cake:
- 1/2 cup hot black coffee or 1/2 cup water
- 1/2 cup cocoa
- 1/2 cup oil (vegetable or canola)
- 1 cup buttermilk
- 1 1/2 teaspoons baking soda
- 1/2 teaspoon salt
- 2 teaspoons vanilla extract
- 2 eggs
- 2 cups sugar
- 2 cups flour (all-purpose)
For the Sanders’ Buttercream Icing:
- 2 cups butter, softened
- 2 cups sifted powdered sugar
- 2/3 cup sweetened condensed milk
- 2 large egg whites
- 1/2 cup sifted powdered sugar
- 1/2 teaspoon salt
- 1/2 teaspoon vanilla extract
- 1/2 cup powdered sugar (plus more if needed)
For the Pourable Fudge Frosting:
- 1/2 cup buttermilk
- 1 cup sugar
- 1/3 cup dark corn syrup
- 1/3 cup cocoa
- 1 dash salt
- 1/2 lb (2 sticks) butter, divided
- 2 1/2 cups powdered sugar
- 1 teaspoon vanilla extract
Equipment Needed
- 9×13 inch baking pan
- Large mixing bowl
- Electric mixer (stand or hand-held)
- Saucepan
- Candy thermometer (optional, but recommended)
- Whisk
- Rubber spatula
- Freezer
Instructions
- Prepare the Cake Batter: In a large bowl, combine the hot coffee (or water) and cocoa. Beat on medium speed with an electric mixer for 30 seconds until well combined. This blooms the cocoa, intensifying its flavor.
- Incorporate Wet Ingredients: Add the oil and beat for 30 seconds. Then, add the buttermilk and beat for another 30 seconds.
- Add Leavening and Flavorings: Add the baking soda, and beat for 30 seconds. Next, add the salt and beat for 30 seconds. Finally, add the vanilla extract and beat for 30 seconds. Beating after each addition helps to ensure even distribution.
- Add Eggs and Sugar: Add the eggs and beat for 30 seconds, followed by the sugar, and beat for 30 seconds.
- Incorporate Flour: Add the flour and beat for a full 5 minutes. The batter will become very bubbly; this is normal.
- Bake the Cake: Pour the batter into a greased 9×13 inch pan. Bake at 375ºF (190ºC) for 35-40 minutes, or until a wooden skewer inserted into the center comes out clean.
- Cool the Cake: Let the cake cool completely in the pan. Once cooled, place the cake in the freezer for at least 30 minutes. This makes it easier to apply the buttercream.
- Prepare the Buttercream Icing: In a mixing bowl, place the softened butter and add 2 cups of sifted powdered sugar. Mix at low speed to obtain a smooth paste.
- Whip to Fluffy Perfection: Whip the mixture at medium speed, adding the sweetened condensed milk slowly and gradually, until the icing is light and fluffy.
- Create the Meringue: In a very clean bowl and using a very clean beater, whip the egg whites until stiff peaks form, while slowly adding 1/2 cup of sifted powdered sugar. This creates a stable meringue.
- Combine Buttercream and Meringue: Gently fold the meringue into the buttercream mixture. Be careful not to overmix, as this will deflate the meringue.
- Adjust Sweetness: Add the vanilla extract and the remaining 1/2 cup of powdered sugar. This last amount of sugar can be doubled if a stiffer icing is desired.
- Shape the Buttercream Bumps: Once the cake is frozen, shape the buttercream icing into 1-inch rolls. Place these rolls on the frozen cake, 1 inch apart, across the top of the cake.
- Freeze Again: Return the cake to the freezer for at least an additional 15 minutes. This will help the buttercream bumps hold their shape when the fudge frosting is poured over.
- Prepare the Fudge Frosting: In a saucepan over medium-high heat, combine the buttermilk, sugar, dark corn syrup, salt, and half of the butter.
- Bring to Soft-Ball Stage: Bring the mixture to a boil, stirring constantly to prevent scorching. Continue cooking until the mixture reaches the soft-ball stage (235-240ºF or 112-115ºC on a candy thermometer). If you don’t have a thermometer, you can test by dropping a small amount of the hot syrup into a bowl of cold water. If it forms a soft, pliable ball, it’s ready.
- Finish the Frosting: Remove the fudge frosting from the heat. Add the remaining butter, powdered sugar, and vanilla extract. Stir until smooth and glossy. The frosting will have a pouring consistency.
- Assemble the Cake: Apply the cooled fudge frosting to the top of the cake, covering the buttercream rolls completely.
- Final Freeze: Return the cake to the freezer for several minutes or longer to allow the frosting to set. This will make slicing easier and prevent the buttercream from smearing.
Expert Tips & Tricks
- Coffee Substitute: If you don’t have coffee on hand, simply use hot water. The coffee enhances the chocolate flavor, but water works perfectly well.
- Buttermilk Substitute: If you don’t have buttermilk, you can make a quick substitute by adding 1 tablespoon of white vinegar or lemon juice to a liquid measuring cup, then adding enough milk to reach 1 cup. Let it sit for 5 minutes before using.
- Even Baking: For even baking, use oven thermometer and rotate the cake halfway through the baking time.
- Preventing a Soggy Cake: Make sure the cake is completely cool before frosting. This will prevent the warm frosting from melting the cake and causing a soggy texture.
- Clean Cuts: For clean slices, use a warm knife. Dip the knife in hot water and wipe it dry between each slice.
- Fudge Frosting Consistency: If your fudge frosting seems too thick, add a tablespoon of buttermilk at a time until you reach the desired pouring consistency. If it’s too thin, add a tablespoon of powdered sugar at a time.
Serving & Storage Suggestions
Serve Sanders’ Chocolate Bumpy Cake chilled or at room temperature. The coldness helps to set the frosting and keeps the buttercream bumps firm. To present the cake attractively, dust the top with a light coating of cocoa powder before serving.
Store leftover cake in an airtight container in the refrigerator for up to 5 days. You can also freeze the cake for up to 2 months. Wrap individual slices tightly in plastic wrap and then place them in a freezer-safe bag or container. To thaw, transfer the cake to the refrigerator overnight or let it sit at room temperature for a few hours.
Nutritional Information
Note: Nutritional information is an estimate and may vary based on specific ingredients and serving sizes.
| Nutrient | Amount per Serving | % Daily Value |
|---|---|---|
| Calories | 552 kcal | 28% |
| Total Fat | 29g | 45% |
| Saturated Fat | 16g | 80% |
| Cholesterol | 80mg | 27% |
| Sodium | 430mg | 18% |
| Total Carbohydrate | 71g | 24% |
| Dietary Fiber | 1g | 4% |
| Sugars | 59g | N/A |
| Protein | 4g | 8% |
Variations & Substitutions
- Gluten-Free Bumpy Cake: Substitute the all-purpose flour in the cake recipe with a gluten-free all-purpose flour blend. You may need to add a binder like xanthan gum to help with the texture.
- Dairy-Free Bumpy Cake: Use plant-based milk (like almond or soy milk) in place of buttermilk. Substitute vegan butter for the butter in the buttercream and fudge frosting. Be sure to check the labels of all ingredients to ensure they are dairy-free.
- Less Sweet Frosting: Reduce the amount of powdered sugar in both the buttercream and fudge frosting to adjust the sweetness level to your liking.
- Peppermint Bumpy Cake: Add a teaspoon of peppermint extract to the buttercream for a festive holiday twist.
FAQs (Frequently Asked Questions)
Q: Why is the cake batter so bubbly?
A: The reaction between the baking soda and the buttermilk creates carbon dioxide, which makes the batter bubbly. This helps to give the cake a light and airy texture.
Q: Can I use a different type of frosting?
A: While the buttercream bumps and fudge frosting are iconic to Sanders’ Bumpy Cake, you could experiment with other frostings. However, the texture and flavor profile will be different.
Q: How do I prevent the buttercream bumps from melting when I pour the fudge frosting over them?
A: Freezing the cake and the buttercream bumps before adding the fudge frosting helps to keep them firm and prevents them from melting.
Q: What is the soft-ball stage, and how do I know when the fudge frosting has reached it without a candy thermometer?
A: The soft-ball stage is a specific temperature range (235-240ºF) where the sugar syrup forms a soft, pliable ball when dropped into cold water. If you don’t have a thermometer, test by dropping a small amount of the hot syrup into a bowl of cold water. If it forms a soft, pliable ball that flattens easily when you pick it up, it’s ready.
Q: Can I make the cake ahead of time?
A: Yes, you can bake the cake and make the buttercream and fudge frosting ahead of time. Store the cake in an airtight container at room temperature or in the refrigerator. Store the buttercream and fudge frosting in separate airtight containers in the refrigerator. Bring the buttercream to room temperature and re-whip before using.
Final Thoughts
Sanders’ Chocolate Bumpy Cake is more than just a dessert; it’s a cherished memory, a symbol of home, and a taste of pure indulgence. Don’t be intimidated by the multiple components – each step is straightforward, and the resulting cake is well worth the effort. Gather your ingredients, follow the recipe, and get ready to create a slice of Detroit nostalgia that will impress your friends and family. I encourage you to try this recipe and share your creations! Serve it with a scoop of vanilla ice cream or a steaming mug of coffee for the perfect pairing. Enjoy!