
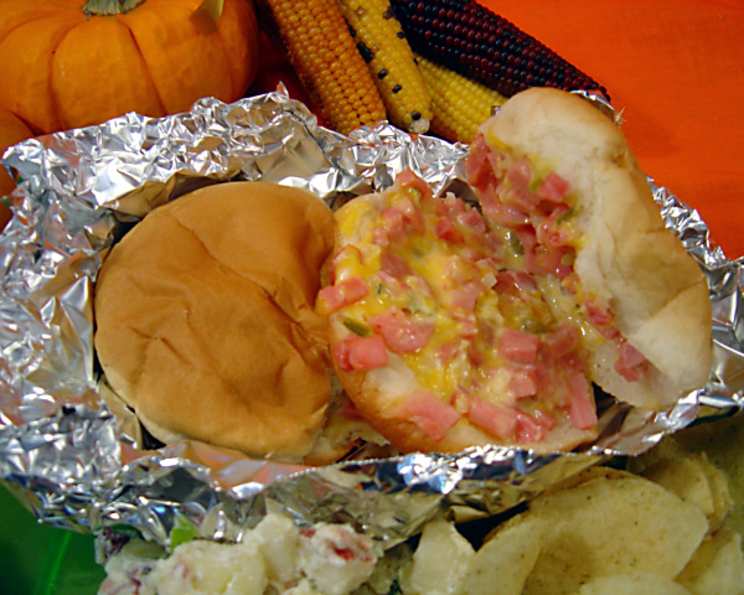
Foil-Wrapped Ham & Cheese Delights
The aroma of warm ham and melted cheese can instantly transport me back to childhood camping trips. My family had a well-worn, forest green Coleman stove, and Dad always made foil-wrapped sandwiches for lunch. There was something magical about unwrapping that warm packet, the steam rising to reveal a gooey, comforting treasure. It was simple, delicious, and the perfect fuel for a day of hiking and exploring. Even now, years later, that specific combination of flavors evokes a sense of nostalgia and pure, simple joy.
Recipe Overview
- Prep Time: 15 minutes
- Cook Time: 20 minutes
- Total Time: 35 minutes
- Servings: 8
- Yield: 8 sandwiches
- Dietary Type: Not specified. Easily adaptable for gluten-free with gluten-free buns.
Ingredients
- 2 cups chopped cooked ham
- 1 cup shredded cheddar cheese
- 2 tablespoons pickle relish
- 1 tablespoon finely chopped onion
- 2 tablespoons salad dressing (such as mayonnaise or Miracle Whip)
- 1 teaspoon prepared mustard
- 8 sliced hamburger buns
Equipment Needed
- Large mixing bowl
- Spoon or spatula
- Aluminum foil
- Baking sheet
Instructions
-
Preheat your oven to 350 degrees Fahrenheit (175 degrees Celsius). This is a crucial step, ensuring the sandwiches heat evenly and the cheese melts beautifully.
-
In a large mixing bowl, combine the chopped cooked ham, shredded cheddar cheese, pickle relish, finely chopped onion, salad dressing, and prepared mustard. Mix thoroughly until all the ingredients are evenly distributed. This mixture is the heart and soul of your sandwich, so make sure everything is well combined. Taste and adjust seasonings as desired; a pinch of black pepper can add a nice touch.
-
Now it’s time to assemble the sandwiches. Open each of the sliced hamburger buns and generously fill them with the ham and cheese mixture. Don’t be shy; you want each bite to be packed with flavor.
-
Tear off eight sheets of aluminum foil, large enough to completely wrap each sandwich. Place each filled bun in the center of a foil sheet.
-
Carefully wrap each sandwich tightly in the aluminum foil. Ensure the foil is sealed well to trap the heat and steam inside. This will help the cheese melt and the flavors meld together beautifully.
-
Arrange the foil-wrapped sandwiches on a baking sheet. This prevents any potential mess in your oven and makes it easier to handle the sandwiches.
-
Place the baking sheet in the preheated oven and bake for 20 minutes. The foil will protect the buns from drying out while the filling heats through and the cheese becomes gloriously melted and gooey.
-
After 20 minutes, carefully remove the baking sheet from the oven. Let the sandwiches rest for a minute or two before unwrapping them, as they will be very hot.
-
Unwrap the foil-wrapped ham and cheese delights and serve immediately. Enjoy the warm, cheesy goodness!
Expert Tips & Tricks
- Cheese Choice: While cheddar is a classic, feel free to experiment with other cheeses. Monterey Jack, provolone, or even a sharp Swiss would all work beautifully. Consider a mix of cheeses for added depth of flavor.
- Spice it Up: If you like a little kick, add a dash of hot sauce or a pinch of red pepper flakes to the ham mixture.
- Make-Ahead Option: You can assemble the sandwiches and wrap them in foil ahead of time. Store them in the refrigerator for up to 24 hours. When ready to bake, simply add a few extra minutes to the baking time to ensure they are heated through.
- Bun Variety: Consider using different types of buns, such as brioche or pretzel rolls, for a more gourmet experience.
- Even Heating: To ensure even heating, avoid overcrowding the baking sheet. If necessary, bake the sandwiches in batches.
Serving & Storage Suggestions
Serve these foil-wrapped sandwiches hot and fresh from the oven. They are perfect for a casual lunch, a picnic, or a quick and easy dinner. You can serve them with a side of coleslaw, potato salad, or a simple green salad.
Leftover sandwiches can be stored in the refrigerator for up to 3 days. To reheat, rewrap them in foil and bake in a preheated oven at 350 degrees Fahrenheit for about 10-15 minutes, or until heated through. You can also microwave them, but the buns may become a bit soggy. For best results, reheat in the oven. Freezing is not recommended as it can affect the texture of the bread and cheese.
Nutritional Information
Please note that the following is an estimate. Actual values may vary based on specific ingredients used.
| Nutrient | Amount per Serving | % Daily Value |
|---|---|---|
| Calories | 320 kcal | 16% |
| Total Fat | 18g | 28% |
| Saturated Fat | 8g | 40% |
| Cholesterol | 60mg | 20% |
| Sodium | 600mg | 25% |
| Total Carbohydrate | 25g | 8% |
| Dietary Fiber | 1g | 4% |
| Sugars | 4g | N/A |
| Protein | 18g | 36% |
Variations & Substitutions
- Vegetarian Option: Substitute the ham with sliced roasted vegetables, such as bell peppers, zucchini, and eggplant.
- Gluten-Free: Use gluten-free hamburger buns for a gluten-free version.
- Dairy-Free: Use dairy-free cheddar cheese and a dairy-free salad dressing.
- Italian Twist: Add sliced provolone cheese, pesto, and sun-dried tomatoes for an Italian-inspired sandwich.
- Spicy Kick: Add some sliced jalapeños or a dash of chili flakes for a spicy version.
- Deluxe Version: Add bacon! Everything is better with bacon.
FAQs (Frequently Asked Questions)
Q: Can I use different types of bread?
A: Absolutely! While hamburger buns are classic, you can use any type of sliced bread you prefer, such as sourdough, ciabatta, or even English muffins.
Q: Can I add other vegetables to the filling?
A: Yes, feel free to add other vegetables to the filling. Sliced tomatoes, bell peppers, or spinach would all be delicious additions.
Q: How can I prevent the sandwiches from sticking to the foil?
A: Lightly spray the foil with cooking spray before wrapping the sandwiches. This will help prevent sticking.
Q: Can I cook these on a grill?
A: Yes, you can cook these on a grill. Place the foil-wrapped sandwiches on a preheated grill over medium heat and cook for about 10-15 minutes, turning occasionally, until heated through.
Q: My cheese isn’t melting. What am I doing wrong?
A: Make sure your oven is preheated to the correct temperature. Also, ensure that the sandwiches are wrapped tightly in foil to trap the heat and steam. If the cheese still isn’t melting, you may need to bake them for a few extra minutes.
Final Thoughts
These foil-wrapped ham and cheese sandwiches are more than just a quick meal; they’re a comforting experience, a taste of simpler times. Whether you’re preparing them for a family picnic, a camping trip, or a cozy night in, they are sure to be a hit. Don’t be afraid to experiment with different ingredients and flavors to create your own signature version. I encourage you to give this recipe a try and share your own memories and variations with friends and family. Enjoy!