
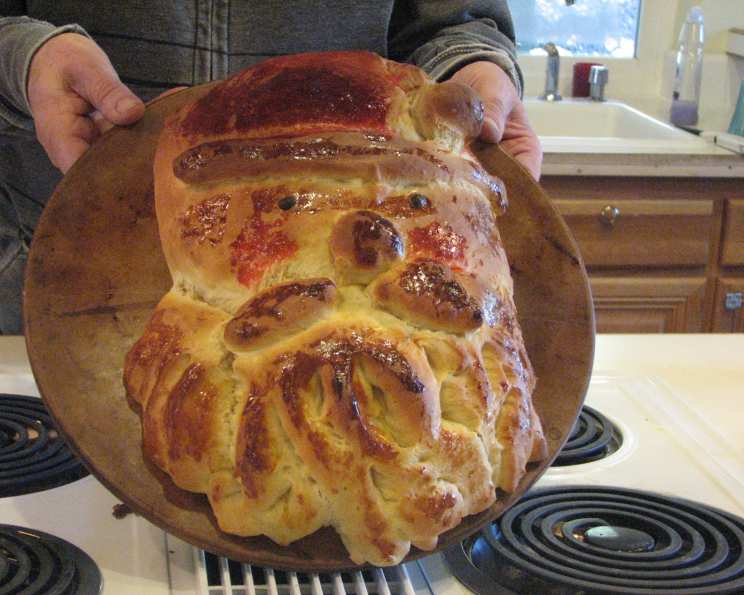
Santa Bread: A Holiday Centerpiece
The aroma of baking bread always evokes cherished childhood memories, but one particular bake stands out: Santa Bread. My grandmother, a woman who could turn any occasion into a celebration, used to make this festive loaf every Christmas Eve. I remember sitting at her kitchen table, mesmerized as she skillfully shaped the dough into Santa’s jolly face. The sweet yeasty scent mingling with the warm glow of the Christmas tree created a sense of magic I’ll never forget. This isn’t just bread; it’s a tradition, a hug from the past, and a symbol of the joy we share during the holidays.
Recipe Overview
- Prep Time: 45 minutes
- Cook Time: 27 minutes
- Total Time: 1 hour 12 minutes (excluding rising time)
- Servings: 12
- Yield: 1 loaf
- Dietary Type: Vegetarian
Ingredients
- 4 cups bread flour, plus more as needed (may need up to 4 1/2 cups)
- 1/2 cup sugar
- 2 (1/4 ounce) packages active dry yeast
- 1 1/2 teaspoons salt
- 1/2 cup milk
- 1/4 cup water
- 1/4 cup butter, cubed
- 2 eggs
- 2 raisins
- 2 egg yolks
- 3 drops red food coloring
Equipment Needed
- Large bowl
- Small saucepan
- Measuring cups and spoons
- Floured surface
- Greased bowl
- Pizza cutter or scissors
- Small bowls
- Pastry brush
- Baking sheet
- Wire rack
Instructions
-
In a large bowl, combine 2 cups of the bread flour, sugar, yeast, and salt. Make sure the yeast isn’t expired for the best rise.
-
In a small saucepan, heat the milk, water, and cubed butter to between 120°F and 130°F. Use a thermometer to ensure the temperature is just right – too hot, and you risk killing the yeast; too cold, and it won’t activate properly.
-
Add the heated milk mixture to the dry ingredients. Beat the mixture just until moistened.
-
Beat in the eggs until the batter is smooth.
-
Stir in enough of the remaining flour to form a stiff dough. You may need up to 4 1/2 cups of flour in total. Add it gradually, 1/4 cup at a time, to avoid making the dough too dry.
-
Turn the dough out onto a lightly floured surface. Knead the dough until it is smooth and elastic, approximately 6-8 minutes. Proper kneading is crucial for developing gluten, which gives the bread its structure.
-
Place the kneaded dough in a greased bowl, turning it once to grease the top. This prevents the dough from drying out while rising.
-
Cover the bowl and let the dough rise in a warm place until it has doubled in size, about 1 hour. A warm environment encourages yeast activity.
-
Punch the dough down to release the air. This step is essential for creating an even texture in the final loaf.
-
Turn the dough onto a lightly floured surface. Divide it into two portions, with one portion slightly larger than the other.
-
Shape the larger portion into an elongated triangle with rounded corners to form Santa’s head and hat.
-
Divide the smaller portion of dough in half.
-
Shape and flatten one half into a beard. Using a pizza cutter or scissors, cut the beard into strips to within 1 inch of the top edge. Position the beard on Santa’s face and twist or curl the strips as desired to create a realistic look.
-
Use the remaining dough for Santa’s mustache, nose, hat pom-pom, and hat brim. Shape a portion of dough into a mustache, flatten it slightly, and cut the ends into small strips using scissors. Place the mustache above the beard. Place a small ball of dough above the mustache for the nose.
-
Fold the tip of the hat over and add another ball of dough for the pom-pom.
-
Roll out a narrow piece of dough to create the hat brim. Position the brim under the hat.
-
With scissors, carefully cut two small slits for the eyes. Insert raisins into the slits. For a fun twist, you could use blueberry craisins for blue eyes!
-
In separate small bowls, beat the egg yolks.
-
Add the red food coloring to one egg yolk and carefully brush it over the hat, nose, and cheeks. This adds a festive rosy color.
-
Brush the plain egg yolk over the remaining dough. This gives the bread a golden-brown shine.
-
Cover the Santa Bread loosely with foil.
-
Bake at 350°F (175°C) for 15 minutes.
-
Remove the foil and bake for an additional 10-12 minutes, or until the bread is golden brown. Keep a close eye on it to prevent burning.
-
Cool the Santa Bread on a wire rack before serving. This prevents the bottom from becoming soggy.
Expert Tips & Tricks
- For a richer flavor, try using melted butter instead of cubed butter in the dough.
- If the dough is too sticky, add a tablespoon of flour at a time until it reaches the right consistency.
- To ensure even baking, rotate the bread halfway through the baking time.
- If the hat starts to brown too quickly, loosely tent it with foil.
- For a shiny crust, brush the bread with melted butter after baking.
Serving & Storage Suggestions
Serve the Santa Bread as a festive centerpiece for your holiday table. It pairs perfectly with a warm bowl of soup or chili. Leftovers can be stored at room temperature in an airtight container for up to 2 days. For longer storage, wrap the bread tightly in plastic wrap and freeze it for up to 2 months. To reheat, thaw the bread overnight in the refrigerator and then warm it in a low oven (300°F) for about 10 minutes.
Nutritional Information
| Nutrient | Amount per Serving | % Daily Value |
|---|---|---|
| Calories | 248.6 kcal | N/A |
| Calories from Fat | 55g | 22% |
| Total Fat | 6.2 g | 9% |
| Saturated Fat | 3.2 g | 16% |
| Cholesterol | 70.3 mg | 23% |
| Sodium | 344.2 mg | 14% |
| Total Carbohydrate | 41.3 g | 13% |
| Dietary Fiber | 1.4 g | 5% |
| Sugars | 8.5 g | N/A |
| Protein | 6.6 g | 13% |
Nutritional information is an estimate and may vary based on specific ingredients and preparation methods.
Variations & Substitutions
- For a sweeter bread, add a tablespoon of honey or maple syrup to the dough.
- Add some orange or lemon zest to the dough for a citrusy flavor.
- Use different dried fruits, such as cranberries or chopped apricots, instead of raisins.
- Sprinkle the bread with coarse sugar before baking for a sparkly finish.
- For a savory version, add herbs such as rosemary or thyme to the dough and brush with garlic-infused olive oil before baking.
FAQs (Frequently Asked Questions)
Q: Can I use all-purpose flour instead of bread flour?
A: While bread flour is recommended for its higher protein content, which creates a chewier texture, you can substitute all-purpose flour. The bread may be slightly less chewy and have a softer crust.
Q: Can I make the dough ahead of time?
A: Yes, you can prepare the dough a day in advance. After the first rise, punch down the dough, wrap it tightly, and refrigerate it. Let it come to room temperature for about 30 minutes before shaping and baking.
Q: What if my yeast doesn’t activate?
A: Make sure your milk and water mixture is between 120°F and 130°F. If it’s too hot, it will kill the yeast. If your yeast doesn’t foam after 5-10 minutes, it might be expired and you’ll need to use fresh yeast.
Q: How do I prevent the bread from burning?
A: Monitor the bread closely during the last 10-12 minutes of baking. If the top is browning too quickly, loosely tent it with foil.
Q: Can I freeze the baked bread?
A: Yes, you can freeze the baked bread. Wrap it tightly in plastic wrap and then in foil. It will keep for up to 2 months. Thaw it overnight in the refrigerator before serving.
Final Thoughts
This Santa Bread is more than just a recipe; it’s a way to create lasting memories and share the joy of the holiday season with your loved ones. Gather your family in the kitchen, roll up your sleeves, and let the magic of baking fill your home. Don’t be afraid to get creative with the decorations and make it your own. And most importantly, savor every delicious bite and the heartwarming moments shared around the table. Happy baking!