
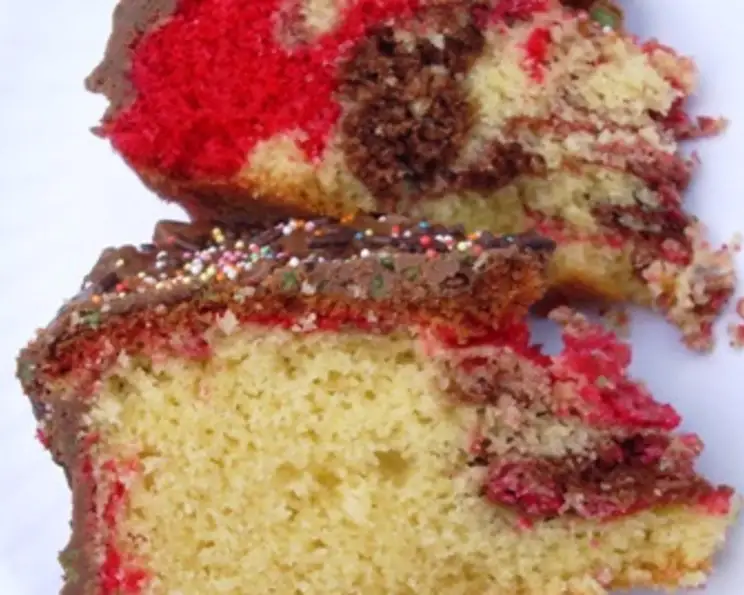
Sasha’s Marble Birthday Cake
The scent of vanilla and melted chocolate always takes me back to our tiny kitchen, flour dusting every surface. Sasha, my daughter, perched on a stool, her brow furrowed in concentration as she carefully swirled pink and chocolate batter into a cake tin. Birthdays in our house were never complete without this marble cake, a tradition born from a simple children’s cookbook and fueled by Sasha’s enthusiasm for all things baking. Even now, years later and a seasoned chef myself, I can taste the joy and messy love baked into every slice.
Recipe Overview
- Prep Time: 20 minutes
- Cook Time: 1 hour
- Total Time: 1 hour 20 minutes
- Servings: 8
- Yield: 1 cake
- Dietary Type: Vegetarian
Ingredients
- Vegetable oil, for brushing
- 4 ounces plain white flour
- 4 ounces self-raising white flour
- 1 teaspoon baking powder
- 6 ounces soft margarine or 6 ounces butter
- 2 tablespoons milk
- 6 ounces caster sugar
- 1 teaspoon vanilla essence
- 3 medium eggs
- Pink food coloring
- 2 tablespoons cocoa powder
- 6 ounces milk chocolate or 6 ounces chocolate
Equipment Needed
- 18 cm (7 inch) deep round cake tin
- Pastry brush
- Greaseproof paper
- Pencil
- Food processor
- Small bowl
- Spoon
- Round-bladed knife
- Wire rack
- Heatproof bowl
- Saucepan
- Palette knife
Instructions
-
Preheat your oven to 350°F/180°C.
-
Prepare the cake tin: Pour a few drops of vegetable oil into the 18 cm (7 inch) deep round cake tin. Use a pastry brush to spread the oil evenly all over the inside of the tin.
-
Create a parchment paper circle: Place the tin on a piece of greaseproof paper and trace around it with a pencil. Cut out the circle and press it into the bottom of the tin. Brush the paper with a little more oil. This ensures the cake releases cleanly after baking.
-
Combine dry ingredients: In a food processor, combine the plain white flour, self-raising white flour, baking powder, margarine (or butter), 1 tablespoon of the milk, the caster sugar, and the vanilla essence.
-
Add the eggs: Crack the eggs into a small bowl, then pour them into the flour mixture in the food processor.
-
Mix the batter: Put the lid on the food processor and turn the machine on for just two minutes, or until everything is mixed together. Be careful not to overmix the batter, as this can result in a tough cake. Overmixing develops the gluten in the flour too much, which prevents the cake from rising properly.
-
Divide the batter: Divide the cake mixture into three equal portions. Put about 1/3 of the cake mixture in a bowl, add a few drops of pink food coloring, and mix it evenly with a spoon. Put another 1/3 of the mixture in another bowl, and add the cocoa powder and the rest of the milk. Mix well to incorporate the cocoa powder fully, ensuring no lumps remain.
-
Layer the batter: Put a tablespoon of the plain (white) cake mixture in the prepared cake tin, then add a spoonful of the chocolate mixture, followed by a spoonful of the pink mixture. Continue layering the different cake mixtures in this way until all of the batter is used up. Try to distribute the colors evenly for the best marble effect.
-
Create the marble effect: Using a round-bladed knife, make the shape of an eight right through the mixture in the tin. This helps to swirl and mix the colors together, creating the desired marble effect. Be careful not to overmix at this stage, as too much swirling can muddy the colors. Level the surface of the mixture in the tin for even baking.
-
Bake the cake: Bake the cake in the preheated oven for about 1 hour, or until the cake is golden-brown on the top. To check for doneness, gently press the top of the cake. If it is cooked, it will spring back into shape. You can also insert a skewer into the center; if it comes out clean, the cake is done. If the top of the cake is browning too quickly, you can loosely cover it with foil during the last 15-20 minutes of baking.
-
Cool the cake: Carefully run a knife around the edge of the cake between the cake and the tin to loosen it. Turn the cake onto a wire rack to cool completely. Peel the greaseproof paper off the bottom. Allow the cake to cool completely before frosting.
-
Melt the chocolate: Once the cake is completely cold, you can decorate it. Break the milk chocolate (or chocolate) into squares, and put it in a heatproof bowl. Put a little water in a saucepan and heat until it simmers. Stand the bowl over the water (the bowl should not touch the water), and turn the heat down to very low. This creates a double boiler, which gently melts the chocolate without burning it. You can also melt the chocolate in the microwave on HIGH for two minutes, stirring every 30 seconds to prevent burning.
-
Frost the cake: Stir the chocolate until it has completely melted and is smooth. Pour the hot chocolate on top of the cake, and spread it evenly with a palette knife.
-
Decorate and set: Decorate the cake with sweets and candles as desired. Leave the chocolate to set completely before slicing and serving.
Expert Tips & Tricks
- For an extra moist cake, brush the cooled cake layers with a simple syrup made from equal parts sugar and water that has been heated until the sugar dissolves.
- If you don’t have a food processor, you can cream the butter and sugar together by hand or with an electric mixer.
- To prevent the cake from sticking, make sure the cake tin is well-greased and lined with parchment paper.
- If you want a richer chocolate flavor, use dark chocolate instead of milk chocolate.
- For a neater frosting application, chill the cake in the refrigerator for 30 minutes before frosting. This will help the chocolate set more quickly.
Serving & Storage Suggestions
Serve Sasha’s Marble Birthday Cake at room temperature. It’s best enjoyed fresh but can be stored in an airtight container at room temperature for up to 3 days. You can also store it in the refrigerator for up to a week, but the cake may become slightly drier. To freeze the cake, wrap it tightly in plastic wrap and then in foil. It can be frozen for up to 2 months. Thaw overnight in the refrigerator before serving.
Nutritional Information
| Nutrient | Amount per Serving | % Daily Value |
|---|---|---|
| Calories | 388 kcal | N/A |
| Total Fat | 20.3 g | 31% |
| Saturated Fat | 4.3 g | 21% |
| Cholesterol | 73.5 mg | 24% |
| Sodium | 313.7 mg | 13% |
| Total Carbohydrate | 45.9 g | 15% |
| Dietary Fiber | 1.2 g | 4% |
| Sugars | 21.5 g | N/A |
| Protein | 6.4 g | 12% |
Note: Nutritional information is an estimate and may vary based on specific ingredients used.
Variations & Substitutions
- Gluten-Free: Substitute the plain and self-raising flours with a gluten-free all-purpose flour blend. You may also need to add a binding agent like xanthan gum to help with the texture.
- Dairy-Free: Replace the butter with a dairy-free margarine or shortening. Use a plant-based milk alternative such as almond, soy, or oat milk. Substitute the milk chocolate with a dairy-free chocolate alternative.
- Different Food Coloring: Instead of pink, try other food colorings like blue, green, or yellow for a different visual effect. Natural food colorings, such as beet juice or spinach juice, can also be used, although they may not be as vibrant.
- Extract Variations: Experiment with different extracts in place of vanilla extract, such as almond extract, lemon extract, or orange extract.
- Nutty Addition: Add 1/2 cup of chopped nuts (walnuts, pecans, or almonds) to the batter for added texture and flavor.
FAQs (Frequently Asked Questions)
Q: Can I make this cake without a food processor?
A: Yes, you can. Cream the butter and sugar together using an electric mixer or by hand until light and fluffy. Then, gradually add the eggs, followed by the flour and other dry ingredients.
Q: How do I prevent the cake from sticking to the tin?
A: Make sure to grease the cake tin thoroughly with vegetable oil and line the bottom with a parchment paper circle. This double layer of protection will help the cake release cleanly.
Q: Can I use a different type of chocolate for the frosting?
A: Absolutely! Feel free to use dark chocolate, semi-sweet chocolate, or even white chocolate, depending on your preference.
Q: How can I make the marble effect more pronounced?
A: Avoid overmixing the batter when creating the swirl. The more you mix, the more the colors will blend together, resulting in a less defined marble effect.
Q: Can I add sprinkles or other decorations to the cake?
A: Of course! Get creative with your decorations. Sprinkles, chocolate shavings, fresh fruit, or even edible flowers can add a festive touch to the cake.
Final Thoughts
Sasha’s Marble Birthday Cake is more than just a recipe; it’s a cherished memory baked into every slice. It’s a reminder that the simplest creations, made with love and a little bit of messy enthusiasm, can become the most treasured traditions. Don’t be afraid to get your hands dirty, experiment with the flavors, and make this cake your own. I hope this recipe brings as much joy to your family as it has to mine. Enjoy every delicious bite! And don’t forget to share your creations – I’d love to see your own marbled masterpieces!