
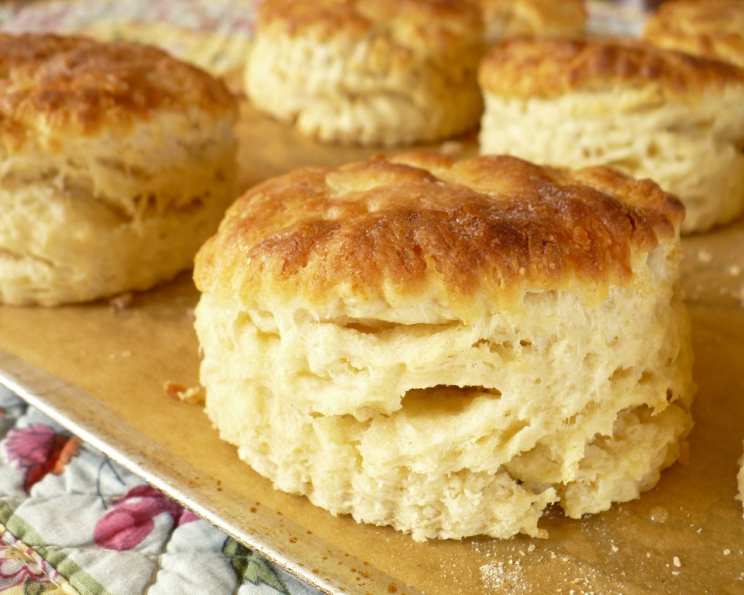
Savory Cheese and Herb Biscuits: A Culinary Love Letter
There’s a scent that instantly transports me back to my grandmother’s kitchen: the warm, buttery aroma of freshly baked biscuits. Not just any biscuits, mind you, but her famous cheese and herb biscuits. I remember standing on a wobbly stool, barely tall enough to reach the counter, watching her deft hands work the dough, the air thick with the peppery bite of freshly ground black pepper and the sharp tang of cheddar. Those biscuits weren’t just food; they were edible hugs, tokens of love baked with care and passed down through generations. Each bite was a comforting reminder of home, family, and the simple pleasures of life.
Recipe Overview
- Prep Time: 30 minutes
- Cook Time: 14-16 minutes
- Total Time: 44-46 minutes
- Yields: 18 2.5 inch biscuits
- Dietary Type: Vegetarian
Ingredients
- 2 cups all-purpose flour
- 2 tablespoons baking powder
- ½ teaspoon baking soda
- 1 tablespoon sugar
- 1 teaspoon salt
- 1 tablespoon fresh ground black pepper (MUST be freshly ground)
- Dash cayenne pepper (no more than ⅛ teaspoon!)
- 8 tablespoons butter (Soft, cut into 1 tablespoon amounts to easily work into the dough)
- 1 cup buttermilk (Do NOT use “soured milk”!)
- 1 cup extra-sharp cheddar cheese (cut into tiny cubes the size of garden peas)
- ½ cup chives, snipped into tiny pieces (Can use ¾ cup lightly packed)
- 2 tablespoons heavy cream (Half and Half, Whipping Cream – for spreading on top of the biscuits before they go into the oven)
Equipment Needed
- Large mixing bowl
- Pastry cutter
- Measuring cups and spoons
- Biscuit cutter (2.5-inch)
- Parchment paper
- Baking sheet
- Wire rack
Instructions
-
Preheat your oven to 450 degrees F. This high heat is crucial for creating that beautiful rise and golden-brown crust.
-
In a very large bowl, combine all the dry ingredients: flour, baking powder, baking soda, sugar, salt, black pepper, and cayenne pepper. Stir well to ensure even distribution.
-
Drop the cut tablespoons of butter all around the flour mixture. Cut in the butter using a pastry cutter until the mixture resembles coarse crumbs, about the size of peas. You should still see small bits of butter – these are key to flaky layers.
-
Cover the bowl and chill it in the refrigerator for 10-15 minutes to allow the butter to harden. Cold butter equals flakier biscuits! If you prefer to work with cold butter from the start, you can skip softening and refrigerating, just make sure it’s well-chilled when you cut it in.
-
Add the cheddar cheese chunks and chives to the chilled butter/flour mixture. Stir gently to coat them well with the flour mixture, preventing them from clumping together.
-
Stir in the buttermilk only until the dough just barely holds together, about 30 seconds. Avoid over-stirring! This is paramount for light and fluffy biscuits. The dough should still be quite shaggy and not tightly packed.
-
Turn the dough out onto a lightly floured surface. Knead the dough gently a few times (about 3-4 times) and then pat it into a 5-inch x 9-inch rectangle, about ¾ inch thick. Sprinkle the top of the dough with a small amount of additional flour and fold it into thirds, like a letter.
-
Repeat the entire process two more times, beginning with pressing the dough into a ¾ inch-thick rectangle again. This creates layers that will rise beautifully in the oven.
-
Press or pat the dough into a ½ inch thickness on a lightly floured surface. Dip the edges of a 2.5-inch biscuit cutter into flour (this helps prevent sticking) and cut out a biscuit. Cut straight down with the biscuit cutter! Do NOT twist the cutter, as this seals the edges and inhibits rising.
-
Transfer the biscuits to a parchment-lined baking sheet, placing them side by side so they touch. Biscuits that touch tend to rise higher.
-
Continue cutting out biscuits with the remaining dough. With the scraps, very lightly press the dough together to form another rectangle and continue cutting out biscuits. Be cautious not to overwork the dough; the more you handle it, the tougher the biscuits will become.
-
Brush the tops of the biscuits lightly with heavy cream. This will give them a lovely golden-brown sheen.
-
Bake for 14-16 minutes, or until the biscuits are lightly browned and have risen beautifully.
-
Remove the biscuits from the oven by sliding the parchment paper with the biscuits onto a table or countertop. Allow them to sit for only 1 minute on the parchment paper. Then, transfer them to a wire rack to cool for a couple of minutes before serving. Caution: Moisture builds up quickly on the bottom, hence the brief parchment stay. Cooling on the rack for a few minutes allows the cheese to cool and prevent burns!
Expert Tips & Tricks
- Flour Power: Spoon your flour into the measuring cup and level it off with a knife. Scooping directly from the bag compresses the flour and leads to dry biscuits.
- Cold is Key: The colder the butter, the better the rise. This creates steam during baking, resulting in those beautiful flaky layers.
- Buttermilk Brilliance: Always shake the buttermilk carton before measuring and ensure it is COLD. It keeps the butter cold and contributes to a lighter, fluffier biscuit.
- Gentle Hands: Handle the dough with care. Overworking the gluten results in tough, dense biscuits.
- Sharp Cuts: Use a sharp biscuit cutter and press straight down. Twisting seals the edges and prevents a good rise.
Serving & Storage Suggestions
Serve these savory cheese and herb biscuits warm from the oven. They’re perfect alongside soups, stews, salads, or as a delightful accompaniment to breakfast. To store leftovers, place them in an airtight container at room temperature for up to 2 days, or in the refrigerator for up to 5 days. For longer storage, freeze the biscuits in a freezer-safe bag for up to 2 months. Reheat in a preheated oven at 350 degrees F for 5-10 minutes, or until warmed through. You can also microwave them in 15-second intervals, but the texture won’t be quite as good.
Nutritional Information
| Nutrient | Amount per Serving | % Daily Value |
|---|---|---|
| Calories | 141.4 kcal | N/A |
| Calories from Fat | 76 kcal | N/A |
| Total Fat | 8.4 g | 12% |
| Saturated Fat | 5.3 g | 26% |
| Cholesterol | 24.1 mg | 8% |
| Sodium | 391.1 mg | 16% |
| Total Carbohydrate | 12.8 g | 4% |
| Dietary Fiber | 0.5 g | 2% |
| Sugars | 1.5 g | N/A |
| Protein | 3.9 g | 7% |
Note: Nutritional information is an estimate and may vary based on specific ingredients and portion sizes.
Variations & Substitutions
- Feta-Oregano or Marjoram: Stir 4-8 ounces of crumbled feta cheese and 1 teaspoon of either oregano or marjoram into the chilled butter/flour mixture before adding the buttermilk.
- Bacon-Cheddar: Stir 6 cooked, drained, cooled, and crumbled slices of bacon into the chilled butter/flour mixture along with ½ a cup of cubed Cheddar Cheese. Omit chives.
- Gruyere-Rosemary: Stir in 1 cup of cubed Gruyere cheese and ½ tablespoon of fresh, snipped rosemary into the chilled butter/flour mixture. Use ¼ cup of snipped chives and ½ tablespoon of freshly ground black pepper.
- Havarti-Dill: Stir in 1 cup of cubed Havarti cheese with 1 tablespoon of freshly snipped dill into the chilled butter/flour mixture. Omit chives.
- Pimento Cheese: Stir in 1 cup cubed Sharp Cheddar Cheese with 1-4 ounce jar of DRAINED and patted dry Pimento into the chilled butter/flour mixture. Omit chives.
FAQs (Frequently Asked Questions)
Q: Can I use self-rising flour instead of all-purpose flour?
A: I don’t recommend it. The leavening in self-rising flour can leave a slightly bitter taste on the outside of the biscuit.
Q: Can I use milk instead of buttermilk?
A: Buttermilk adds a tanginess and acidity that helps create a tender crumb. Milk will work in a pinch, but the texture and flavor won’t be quite the same.
Q: My biscuits didn’t rise very much. What went wrong?
A: Most likely, the butter wasn’t cold enough, or the dough was over-mixed. Make sure to chill the butter and flour mixture, and handle the dough gently.
Q: Can I make the dough ahead of time?
A: Yes, you can make the dough, wrap it tightly, and refrigerate it for up to 24 hours. However, the biscuits are best when baked fresh.
Q: Can I freeze the unbaked biscuits?
A: Yes, you can freeze the unbaked biscuits. Place them on a baking sheet and freeze until solid. Then, transfer them to a freezer-safe bag. Bake directly from frozen, adding a few minutes to the baking time.
Final Thoughts
These Savory Cheese and Herb Biscuits are more than just a recipe; they’re a connection to cherished memories, a celebration of simple flavors, and a testament to the power of homemade goodness. I encourage you to try this recipe and experience the joy of creating something truly special. Experiment with different cheese and herb combinations to find your own signature biscuit. Share your creations with loved ones and let the warmth of these biscuits fill your home with happiness. Bon appétit!