
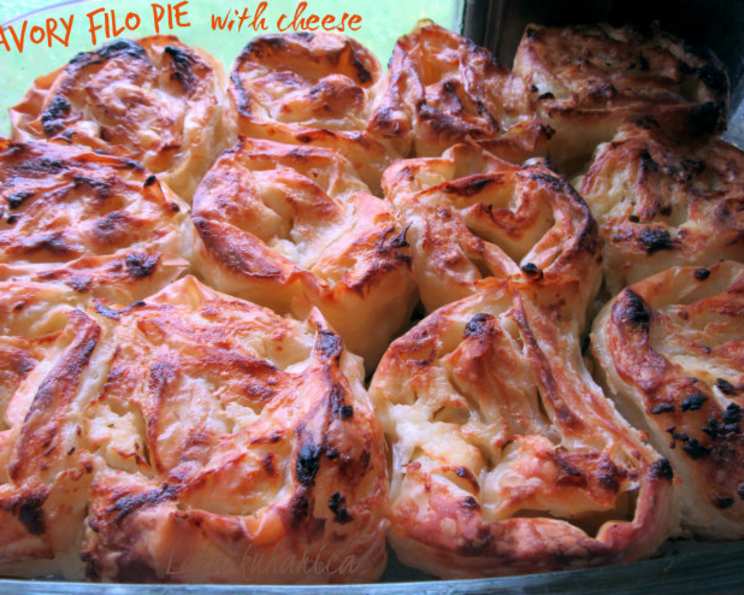
Savory Filo Pie with Cheese: A Culinary Embrace
My grandmother, Yia Yia Eleni, made the best pites – savory pies – in the village. Her hands, gnarled and strong from a lifetime of kneading dough, moved with an effortless grace when layering filo. I can still picture her, flour dusting her apron, carefully swirling the cheesy filling into delicate spirals before baking them to golden perfection. The aroma that filled her tiny kitchen – warm cheese, toasty filo, and a hint of sunshine – is forever etched in my memory, a comforting reminder of home and the love baked into every bite. This recipe attempts to capture that magic, bringing a taste of Yia Yia’s kitchen to your table.
Recipe Overview
- Prep Time: 20 minutes
- Cook Time: 40 minutes
- Total Time: 1 hour
- Servings: 8-10
- Yield: 1 pie
- Dietary Type: Vegetarian
Ingredients
- 500 g phyllo pastry sheets
- 500 g cottage cheese or ricotta cheese
- 150 ml sparkling water
- 5 tablespoons sunflower oil
- 2 teaspoons sea salt
- 4 tablespoons sour cream
Equipment Needed
- Shallow oven-proof dish (approximately 9×13 inches)
- Fork
- Pastry brush (optional)
Instructions
-
Preheat your oven to 200°C (390°F). This is crucial for achieving that perfectly crisp filo crust.
-
In a bowl, combine the cottage cheese (or ricotta cheese), sea salt, and 2 tablespoons of the sunflower oil. Use a fork to thoroughly mix the ingredients. Ensure there are no large lumps of cheese remaining; a slightly chunky texture is fine, but it should be mostly smooth.
-
Prepare your work surface. A clean, dry countertop is ideal. Lay out one phyllo pastry sheet. Immediately sprinkle it lightly with some sparkling water and a drizzle of sunflower oil from the remaining 3 tablespoons. The sparkling water helps to create a flaky texture.
-
Fold the phyllo sheet in half lengthwise. This creates a longer, narrower strip.
-
Spread a tablespoon of the cheese mixture evenly over the folded phyllo sheet. Don’t overfill; a thin, even layer is best.
-
Starting from one long end, gently and loosely roll the phyllo sheet over the cheese filling to form a long, thin crepe. Be careful not to press or squeeze the roll too tightly; leave some room for the cheese and eggs to expand during baking.
-
Slowly twist the filo crepe around itself to form a spiral. This is what gives the pie its characteristic shape.
-
Repeat steps 3-7 with the remaining phyllo pastry sheets and cheese mixture. You should end up with approximately 10 to 12 spirals, depending on the size of your phyllo sheets and how generously you fill them.
-
Grease your oven-proof dish lightly with sunflower oil or cooking spray. This prevents the pie from sticking.
-
Arrange the filo spirals in the prepared dish. Place them close to each other but don’t squeeze them together. Allow enough space for the pie to expand as it bakes. A little bit of space between the spirals is preferable to crowding them.
-
In a separate small bowl, combine the remaining cheese filling with the sour cream and the rest of the sunflower oil. Mix well until the mixture is smooth and spreadable.
-
Using a spoon or pastry brush, carefully spread this mixture over the top of each filo spiral. Ensure each spiral is coated evenly for a golden-brown finish.
-
Bake in the preheated oven at 200°C (390°F) for 40 minutes.
-
After 20 minutes of baking, check the pie’s color. If the top is browning too quickly, loosely cover the dish with aluminum foil to prevent burning. This will ensure that the filling cooks through evenly without the crust becoming overly dark.
-
Once the pie is golden brown and the filo is crisp (approximately 40 minutes total baking time), remove it from the oven.
-
Allow the pie to cool slightly before cutting it into pieces and serving. This helps the filling to set and makes it easier to slice.
Expert Tips & Tricks
- Filo Dough Handling: Phyllo dough dries out quickly, so keep the stack covered with a damp towel while you’re working with it. This prevents it from cracking and becoming difficult to handle.
- Cheese Choice: While the recipe calls for cottage or ricotta cheese, you can experiment with other cheeses. Feta cheese, crumbled and mixed with the ricotta, adds a salty tang.
- Crispy Crust Guarantee: To ensure an extra crispy crust, brush the finished pie with a little melted butter or olive oil immediately after baking.
- Make-Ahead Tip: Assemble the pie ahead of time and store it, unbaked, in the refrigerator. Add the sour cream topping just before baking for the best results.
Serving & Storage Suggestions
Serve the savory filo pie warm or at room temperature. It pairs beautifully with a dollop of yogurt, a drizzle of kefir, or simply enjoyed on its own. Leftovers can be stored in an airtight container in the refrigerator for up to 3 days. Reheat in the oven or microwave until warmed through. This pie is best enjoyed fresh, but it still tastes delicious the next day. The filo may soften slightly upon refrigeration. Do not freeze the baked pie as the texture of the filo will be compromised.
Nutritional Information
| Nutrient | Amount per Serving | % Daily Value |
|---|---|---|
| Calories | 310 kcal | 16% |
| Total Fat | 16g | 25% |
| Saturated Fat | 4g | 20% |
| Cholesterol | 20mg | 7% |
| Sodium | 800mg | 33% |
| Total Carbohydrate | 25g | 8% |
| Dietary Fiber | 1g | 4% |
| Sugars | 3g | N/A |
| Protein | 10g | 20% |
Variations & Substitutions
- Gluten-Free: Substitute the phyllo pastry sheets with a gluten-free filo dough alternative.
- Vegan: Replace the cottage cheese or ricotta cheese with a vegan alternative. Use plant-based sour cream and brush the top of the pie with olive oil instead of the sour cream mixture.
- Herb Infusion: Add fresh herbs like dill, parsley, or mint to the cheese filling for a brighter flavor.
- Vegetable Boost: Incorporate sautéed vegetables such as spinach, mushrooms, or zucchini into the cheese mixture.
- Spicy Kick: Add a pinch of red pepper flakes or a dash of hot sauce to the filling for a touch of heat.
FAQs (Frequently Asked Questions)
Q: Can I use frozen phyllo dough?
A: Yes, frozen phyllo dough works well. Make sure to thaw it completely in the refrigerator overnight before using it. Keep the stack covered with a damp cloth while you’re working with it to prevent it from drying out.
Q: My filo dough keeps tearing. What am I doing wrong?
A: Phyllo dough is very delicate and prone to tearing if it’s dry. Keep the stack covered with a damp towel while you work, and handle the sheets gently.
Q: Can I make this pie ahead of time?
A: Yes, you can assemble the pie ahead of time and store it, unbaked, in the refrigerator for up to 24 hours. Add the sour cream topping just before baking.
Q: My pie is browning too quickly. What should I do?
A: Cover the pie loosely with aluminum foil after about 20 minutes of baking to prevent the top from burning.
Q: Can I freeze the baked pie?
A: Freezing the baked pie is not recommended as the texture of the phyllo will become soggy upon thawing. It’s best to enjoy it fresh.
Final Thoughts
This savory filo pie with cheese is more than just a recipe; it’s an invitation to create a moment of warmth and connection. It’s a dish that embodies comfort, simplicity, and the joy of sharing good food with loved ones. I encourage you to try this recipe, adapt it to your own tastes, and let the flavors transport you to a place of cherished memories and culinary delight. Let me know how it turns out, and what variations you tried! Kala Orexi! (Bon appétit!)