
School Bus Cake: A Sweet Ride Down Memory Lane
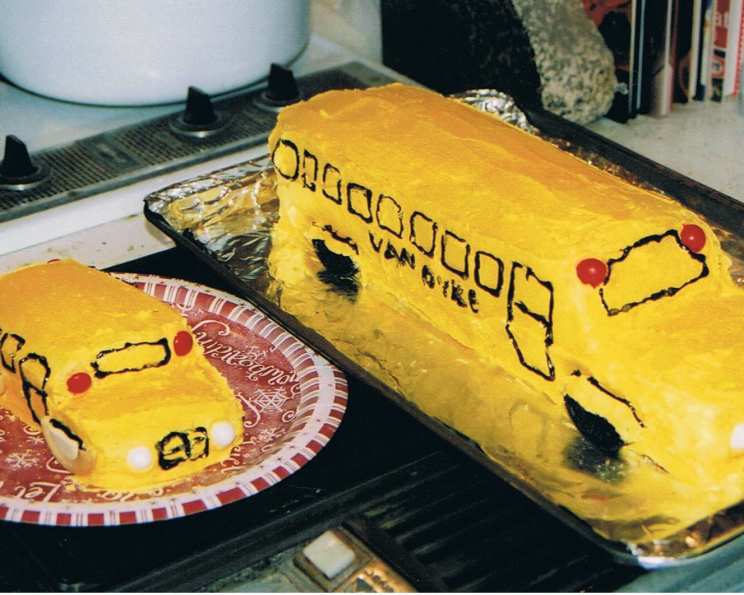
The aroma of yellow cake still transports me back to elementary school bake sales. Rows of eager children, clutching crumpled dollar bills, would circle the tables laden with sugary treasures. But one cake always stood out – the School Bus Cake. Its bright yellow frosting, cookie wheels, and gumdrop headlights were an irresistible beacon of pure, unadulterated joy. It wasn’t just a cake; it was a symbol of school spirit, friendship, and the sweet anticipation of summer vacation. Recreating this classic brings back that rush of childhood excitement, a reminder that even the simplest things can create lasting memories.
Recipe Overview
- Prep Time: 45 minutes
- Cook Time: 40-45 minutes
- Total Time: 1 hour 30 minutes
- Servings: 12-16
- Yield: 1 cake
- Dietary Type: Not specified
Ingredients
- 1 (18 1/4 ounce) package yellow cake mix (or adjust water, oil and eggs for cake mix you are using)
- 1 1/3 cups water
- 1/2 cup vegetable oil
- 3 eggs
- 1 cup butter, softened
- 1 cup shortening
- 8-9 cups confectioners’ sugar
- 1/4 cup milk
- 1 teaspoon vanilla extract
- 1/4 teaspoon salt
- 2 teaspoons black gel food coloring (or black paste coloring)
- 1/2 – 3/4 teaspoon yellow liquid food coloring (or yellow paste coloring)
- 2 cream-filled chocolate sandwich cookies, cut in half
- 2 yellow gumdrops
- 6 red gumdrops
Equipment Needed
- Two 8-in. x 4-in. x 2-in. loaf pans
- Wire rack
- 22-in. x 8-in. covered board
- Large mixing bowl
- Pastry or plastic bag
- #5 round tip
Instructions
-
Preheat your oven to 350°F (175°C). Prepare the yellow cake mix according to the package directions, using the specified amount of water, oil, and eggs. Remember to check your cake mix box for the precise quantities needed as they can vary by brand.
-
Grease two 8-in. x 4-in. x 2-in. loaf pans thoroughly. This will prevent the cakes from sticking and ensure they release easily.
-
Divide the cake batter evenly between the two prepared loaf pans.
-
Bake in the preheated oven for 40-45 minutes, or until a toothpick inserted near the center comes out clean. Start checking for doneness around the 40-minute mark. If the top of the cake is browning too quickly, loosely tent it with foil.
-
Once baked, let the cakes cool in the pans for 10 minutes before inverting them onto a wire rack to cool completely. Make sure the wire rack is clean and dry.
-
Place the completely cooled cakes end to end on a 22-in. x 8-in. covered board. This will be your base for assembling and frosting the school bus. The covered board makes it easier to move the finished cake.
-
If the cakes are uneven, use a serrated knife to level them. This is important for creating a stable and visually appealing bus shape.
-
Now, it’s time to shape the front of the bus. From the top of one end of the combined cakes, cut out a section 1 inch deep and 3 inches long. This creates the angled front of the bus. Be sure to save the removed piece for another use – cake pops, trifle, or snacking!
-
For the frosting, in a large bowl, beat the softened butter and shortening until light and fluffy. Using a stand mixer or an electric hand mixer makes this process easier. The fluffier the butter and shortening, the smoother the frosting.
-
Add 6 cups of the confectioners’ sugar, the milk, vanilla extract, and salt to the butter and shortening mixture. Beat until smooth.
-
Gradually add the remaining confectioners’ sugar, beating until you reach your desired frosting consistency. The amount of confectioners’ sugar needed can vary depending on humidity.
-
Divide the frosting. Tint 3/4 cup of the frosting with the black gel food coloring (or black paste coloring). Mix well until you achieve a deep black color. Set this aside for outlining the bus.
-
Tint the remaining frosting with the yellow liquid food coloring (or yellow paste coloring). Add the coloring a little at a time until you reach your desired shade of yellow.
-
Frost the top and sides of the cake with the yellow frosting. Use an offset spatula for a smooth and even finish.
-
Frost the cut edges of the cream-filled chocolate sandwich cookies with yellow frosting to create the wheel wells.
-
Place two cookie halves on each side of the bus to form the wheels. Press them gently into the frosting to secure them.
-
Cut a small hole in the corner of a pastry or plastic bag and insert a #5 round tip. This will allow you to pipe the black frosting with precision.
-
Fill the bag with the black frosting.
-
Outline windows on both sides of the bus with the black frosting. Pipe strips under the windows for added detail.
-
Pipe the windshield and back window with the black frosting and then fill them in completely.
-
Pipe lines on the front of the grille using the black frosting.
-
Place the yellow gumdrops on the front of the bus for the headlights and the red gumdrops on the front and back for the lights.
Expert Tips & Tricks
- For an extra moist cake, try adding a tablespoon of sour cream or yogurt to the batter.
- To prevent the frosting from becoming too sweet, use unsalted butter and a pinch of salt.
- If your frosting is too thick, add a tiny bit more milk, one teaspoon at a time. If it’s too thin, add more confectioners’ sugar.
- For a more defined black frosting, use a gel or paste food coloring instead of liquid.
- If you don’t have a pastry bag, you can use a resealable plastic bag. Just snip off a small corner.
- To make the cake ahead of time, bake and cool the cake layers, wrap them tightly in plastic wrap, and store them at room temperature for up to 2 days or in the freezer for up to a month. Frost the cake on the day you plan to serve it.
Serving & Storage Suggestions
Serve the School Bus Cake as a centerpiece for a birthday party, back-to-school celebration, or any fun occasion. Store leftover cake in an airtight container at room temperature for up to 3 days or in the refrigerator for up to 5 days. The frosting may become slightly softer if stored at room temperature. You can also freeze individual slices of cake for up to 2 months. Thaw in the refrigerator before serving.
Nutritional Information
Please note that these values are estimates and may vary based on specific ingredient brands and portion sizes.
| Nutrient | Amount per Serving | % Daily Value |
|---|---|---|
| Calories | 905.7 kcal | N/A |
| Calories from Fat | 434 g | N/A |
| Total Fat | 48.3 g | 74% |
| Saturated Fat | 16.5 g | 82% |
| Cholesterol | 95.1 mg | 31% |
| Sodium | 471.3 mg | 19% |
| Total Carbohydrate | 117.7 g | 39% |
| Dietary Fiber | 0.5 g | 2% |
| Sugars | 99.5 g | N/A |
| Protein | 3.9 g | 7% |
Variations & Substitutions
- Cake Mix Flavor: Feel free to experiment with different cake mix flavors. Chocolate, vanilla, or even funfetti would all work well.
- Frosting Flavor: Add a drop of lemon extract to the yellow frosting for a citrusy twist.
- Wheel Alternatives: If you don’t have cream-filled chocolate sandwich cookies, use mini donuts or even cut circles of cake.
- Gumdrop Colors: Use different colored gumdrops to personalize your bus.
- Gluten-Free: Use a gluten-free yellow cake mix and gluten-free cookies for a gluten-free version.
FAQs (Frequently Asked Questions)
Q: Can I use homemade cake instead of a cake mix?
A: Absolutely! If you have a favorite yellow cake recipe, feel free to use it. Just make sure you have enough batter to fill two 8-in. x 4-in. loaf pans.
Q: What if I don’t have gel food coloring?
A: Liquid food coloring can be used as a substitute, but you may need to use more to achieve the desired color intensity, especially for the black frosting. Gel food coloring is more concentrated.
Q: Can I make this cake a day in advance?
A: Yes, you can bake and frost the cake a day ahead of time. Just store it in an airtight container in a cool place.
Q: Is there a way to make the frosting less sweet?
A: You can reduce the amount of confectioners’ sugar slightly or add a pinch of salt to balance the sweetness. Using unsalted butter can also help.
Q: Can I freeze the leftover cake?
A: Yes, you can freeze individual slices of cake for up to 2 months. Wrap them tightly in plastic wrap before freezing.
Final Thoughts
This School Bus Cake is more than just a dessert; it’s a celebration of childhood memories and the joy of baking. Gather your family or friends, follow this recipe, and let the sweet aroma transport you back to simpler times. Don’t be afraid to get creative with the decorations and add your personal touch. And most importantly, have fun! We would love to see your creations, so please share your photos and feedback. This cake is perfect for sharing with friends, family, and maybe even your local school!