
Growing Your Own Kombucha SCOBY: A Culinary Adventure
I remember the first time I tasted kombucha. A friend, a fellow culinary explorer, practically forced a bottle into my hands, describing it as a “tangy, fizzy elixir of life.” I was skeptical. But one sip turned into a gulp, and soon I was hooked. The slightly sour, effervescent delight sparked a curiosity that led me down a path of fermentation and home brewing. What started with a simple bottle of kombucha has now blossomed into a passion, and it all begins with the SCOBY – the fascinating, gelatinous culture that makes the magic happen.
Recipe Overview
- Prep Time: 30 minutes
- Fermentation Time: 2-4 weeks
- Yield: 1 SCOBY
- Dietary Type: Vegan
Ingredients
- ½ cup white vinegar, for cleaning equipment
- 12 cups filtered water
- 1 cup unbleached cane sugar or 1 cup granulated sugar
- 8 teabags of unflavored black tea
- 2 cups plain kombucha (storebought)
Equipment Needed
- 4 quart or larger pan (uncoated or stainless steel)
- Glass jar, 1 gallon capacity
- Clean, tightly-woven cloth at least 8″x8″
- Large rubber band
- Adhesive strip thermometer (optional)
Instructions
-
Begin by ensuring all your equipment is scrupulously clean. This is paramount for successful kombucha brewing. Wipe down the pan, glass jar, and any utensils you plan to use with plain white vinegar. Let the vinegar sit for a few minutes, then rinse well with hot water. Dry the equipment with a clean towel, or allow it to air dry completely.
-
In the saucepan, heat 4 cups of the filtered water to a boil on the stovetop. Once boiling, add the 8 tea bags of unflavored black tea. Allow the tea to steep for 7-10 minutes. This extracts the necessary tannins and nutrients for the SCOBY to thrive.
-
While the tea is still warm (but not scalding), remove the tea bags. Then, add the sugar to the hot tea and stir until the sugar is completely dissolved. This sugar will be the primary food source for the kombucha culture.
-
Pour the remaining 8 cups of filtered water into the gallon jar. This cools the water and creates a larger volume for fermentation.
-
Allow the tea mixture to cool to a warm room temperature, ideally around 75°F (24°C). This is crucial, as adding the kombucha culture to hot liquid can damage or kill it. An adhesive strip thermometer can be helpful here.
-
Once the liquid is cooled, add the 2 cups of plain, store-bought kombucha to the tea mixture. This provides the initial culture needed to kickstart the fermentation process. Stir gently with a clean metal spoon to ensure the kombucha is well incorporated into the tea.
-
Cover the entire mouth of the jar with the clean cloth and secure it tightly with a rubber band. This allows air to circulate while preventing fruit flies and other contaminants from entering. The cloth should be tightly woven to prevent small insects from getting through.
-
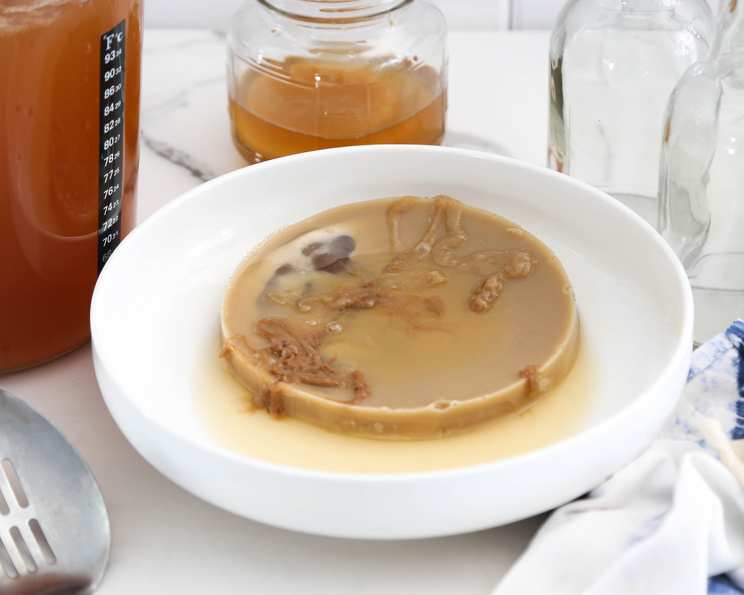
Now comes the patience-testing part. Allow the mixture to stand, undisturbed, in a warm place away from direct sunlight for 2-4 weeks. The ideal temperature range is between 68-78°F (20-26°C). During this time, you will begin to see subtle changes. First, small bubbles will form. Then, a translucent skin will appear on the surface. Over time, this skin will thicken and develop into white clusters that eventually merge into an opaque, gelatinous film – your SCOBY! The mixture should also develop a characteristic sweet and vinegary aroma.
-
Check your SCOBY periodically. When the SCOBY has grown to approximately ¼ inch in thickness, it is ready to be used for kombucha brewing. This indicates that the culture is strong enough to ferment a larger batch of tea.
-
Important Note: Before you preserve or ferment anything, including a SCOBY or kombucha, it is crucial to follow all canning and processing instructions included in the recipe and refer to USDA guidelines about the sterilization of canned products. Find information on canning at the National Center for Home Food Preservation website: http://nchfp.uga.edu/.
Important Tips:
- Always use a glass container for growing your SCOBY. Plastic containers can harbor harmful bacteria that can contaminate your brew.
- Use filtered, non-chlorinated water. Chlorine in tap water can inhibit the growth of the SCOBY.
- Avoid sugar substitutes such as stevia or sucralose. The SCOBY needs sucrose to thrive.
- Monitor the SCOBY regularly for mold. Mold will appear as a fuzzy white, green, or black growth on the surface. If you find mold, discard the entire brew and start over.
- Don’t worry if your SCOBY doesn’t look picture-perfect. Home-grown SCOBYs can vary in appearance – white, yellowish-tan, or brown, wrinkled, bubbly, or smooth. Brown spots are usually just harmless yeast deposits.
- The liquid used to grow the SCOBY will be too strong and acidic to drink directly. However, you can reserve some of it (about 2 cups) as the starter for your first batch of home-brewed kombucha.
- To store your kombucha SCOBY, keep it in some of the kombucha liquid in a jar covered with a cloth at room temperature. Feed it room temperature sweet black tea every 7-10 days to keep it viable.
Expert Tips & Tricks
- Temperature is key: Maintaining a consistent temperature is critical for optimal SCOBY growth. Use a seedling heat mat or a warm corner of your kitchen to ensure a stable environment.
- Patience is a virtue: Don’t be discouraged if your SCOBY takes longer to develop. Factors like temperature and initial kombucha culture can influence the fermentation time.
- SCOBY Hotel: As you brew more kombucha, you’ll likely end up with multiple SCOBYs. Create a “SCOBY hotel” – a large jar filled with starter tea where you can store extra SCOBYs. This acts as a backup and provides a constant source of starter liquid.
- Air circulation is important: Make sure the cloth covering the jar is breathable to allow proper air circulation, which is essential for fermentation.
Serving & Storage Suggestions
The SCOBY itself is not consumed. It’s used to brew kombucha. Once you have a mature SCOBY, you can use it to brew your own kombucha. Store your SCOBY in a jar with some of the kombucha liquid, covered with a cloth, at room temperature. Feed it sweetened tea every week or two to keep it healthy. The SCOBY will continue to grow and reproduce, providing you with a continuous supply of kombucha-making power!
Nutritional Information
Note: Nutritional information is for the sweetened tea used to grow the SCOBY and does not represent the SCOBY itself.
| Nutrient | Amount per Serving | % Daily Value |
|---|---|---|
| Calories | 100 kcal | 5% |
| Total Fat | 0g | 0% |
| Saturated Fat | 0g | 0% |
| Cholesterol | 0mg | 0% |
| Sodium | 10mg | 0% |
| Total Carbohydrate | 25g | 8% |
| Dietary Fiber | 0g | 0% |
| Sugars | 25g | – |
| Protein | 0g | 0% |
Variations & Substitutions
- Type of Tea: While unflavored black tea is the standard, you can experiment with green tea or white tea. Avoid flavored teas, as the oils and additives can harm the SCOBY.
- Type of Sugar: While cane sugar and granulated sugar are the most common, you could try using organic sugar.
- Adding Fruit: Once your kombucha is brewed, you can add fruit for a second fermentation.
FAQs (Frequently Asked Questions)
Q: How long does it take to grow a SCOBY?
A: It typically takes 2-4 weeks for a SCOBY to grow to a usable thickness, but this can vary depending on temperature and other factors.
Q: What if my SCOBY sinks to the bottom of the jar?
A: This is perfectly normal! The SCOBY can float or sink. A new SCOBY will still form on the surface of the liquid.
Q: Can I use honey instead of sugar?
A: It’s generally not recommended to use honey to grow a SCOBY, as it can introduce different bacteria and affect the fermentation process. However, you can create a “jun” SCOBY, which is specifically cultured for honey.
Q: What do I do with older SCOBYs?
A: As your SCOBY grows, you can peel off the older, thicker layers and compost them or give them away to friends.
Q: Is it normal for the SCOBY to have brown spots?
A: Yes, brown spots are usually just yeast deposits and are perfectly normal. The only spots to be concerned about are fuzzy, mold-like growths.
Final Thoughts
Embarking on the journey of growing your own kombucha SCOBY is more than just following a recipe; it’s an invitation to participate in the ancient art of fermentation. It’s a testament to the power of simple ingredients transformed by time and a bit of friendly bacteria. So, gather your supplies, embrace the process, and prepare to be amazed as you cultivate your own little ecosystem, one delicious batch of kombucha at a time. Share your successes (and occasional hiccups!) with fellow fermentation enthusiasts. And most importantly, enjoy the tangy, fizzy fruits of your labor!