
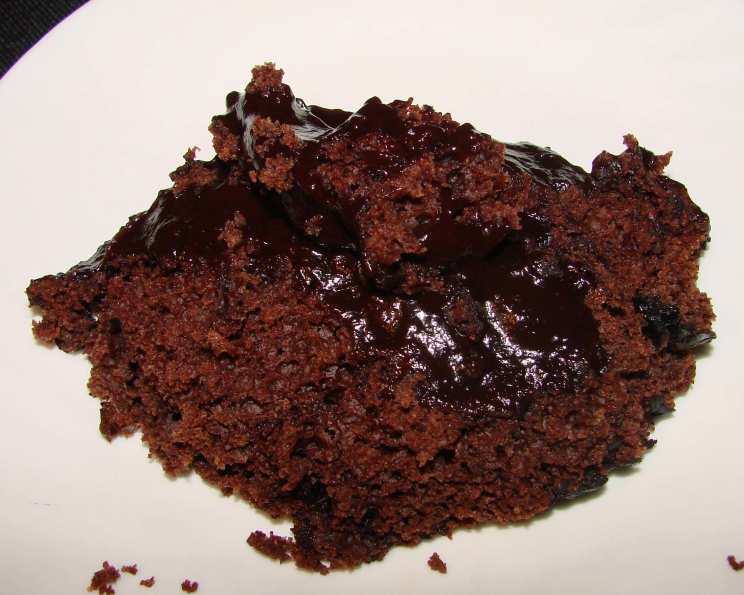
Decadent Self-Saucing Chocolate Pudding: A Warm Embrace in a Bowl
The aroma of chocolate always transports me back to my grandmother’s kitchen. She wasn’t a fancy baker, but her simple desserts held a magic all their own. I remember one particularly gloomy afternoon, the rain drumming against the windowpane, when she pulled a bubbling dish from the oven. It was a self-saucing chocolate pudding, the kind where the cakey top hides a molten chocolate river below. The warmth of that pudding, both in temperature and in spirit, chased away the gloom and created a memory I still cherish. That’s the power of a truly comforting dessert.
Recipe Overview
- Prep Time: 15 minutes
- Cook Time: 40-50 minutes
- Total Time: 55-65 minutes
- Servings: 4-6
- Yield: 1 Pudding
- Dietary Type: Vegetarian
Ingredients
- 1 cup self-raising flour
- ¾ cup caster sugar
- 2 tablespoons good cocoa powder
- ½ cup milk
- 1 teaspoon vanilla essence
- 1 ounce melted butter
- ¾ cup brown sugar, firmly packed
- ¼ cup cocoa powder
- 1 ¾ cups hot water
Equipment Needed
- 8-cup capacity ovenproof dish (not too shallow)
- Large bowl
- Sifter
- Measuring cups and spoons
Instructions
-
Preheat your oven to 350 degrees F (175 degrees C). Ensuring your oven is properly preheated is crucial for even baking and the perfect sauce consistency.
-
Grease an eight-cup capacity ovenproof dish. The size of the dish is important – too shallow, and the sauce might overflow; too large, and the sauce layer might be too thin. A standard 8×8 inch baking dish works perfectly.
-
In a large bowl, sift together the self-raising flour, caster sugar, and 2 tablespoons of good cocoa powder. Sifting is key to preventing lumps and ensuring a light and airy cake topping. Use a good quality cocoa powder for the best flavor depth.
-
In a separate bowl or directly into the sifted dry ingredients, combine the milk, vanilla essence, and melted butter. Add this wet mixture to the dry ingredients and stir until just smooth and combined. Avoid overmixing, as this can develop the gluten in the flour and result in a tough pudding.
-
Pour the batter into your prepared ovenproof dish. Distribute it evenly across the base of the dish.
-
In a small bowl, combine the ¾ cup brown sugar and the ¼ cup cocoa powder. Mix thoroughly, breaking up any lumps in the brown sugar.
-
Evenly sift the brown sugar and cocoa mixture over the top of the batter. This step is essential for creating the self-saucing effect. The sugar and cocoa will sink to the bottom during baking, forming the rich chocolate sauce.
-
Carefully pour the hot water over the pudding mix. Pour it gently and evenly over the entire surface. Don’t stir! This may seem counterintuitive, but resist the urge to mix the water into the batter. The hot water is what creates the magic, allowing the cocoa and sugar to form a luscious sauce as it bakes.
-
Bake for approximately 40-50 minutes, or until the pudding feels firm to the touch. Check for doneness by gently pressing the surface of the cake topping. It should spring back slightly. If the top is browning too quickly, you can loosely tent it with foil.
-
Remove from the oven and let cool slightly before serving. If desired, dust with icing/confectioners sugar for an extra touch of sweetness.
Expert Tips & Tricks
- For an extra rich sauce: Use full-fat milk and real butter. The higher fat content contributes to a smoother and more decadent sauce.
- Don’t overbake: Overbaking will result in a dry cake and less sauce. Keep a close eye on it towards the end of the baking time.
- Spice it up: Add a pinch of cinnamon or chili powder to the dry ingredients for a subtle kick.
- Coffee boost: Replace some of the hot water with strong brewed coffee to enhance the chocolate flavor.
- Make ahead: You can prepare the pudding up to the point of baking, cover it tightly, and store it in the refrigerator for up to 24 hours. Add a few minutes to the baking time if baking from cold.
- If the sauce is too thin: If the sauce is thinner than you’d like after baking, you can carefully spoon some of the sauce into a saucepan and simmer over low heat until it thickens slightly. Then, pour it back over the pudding.
Serving & Storage Suggestions
Serve this self-saucing chocolate pudding warm, straight from the oven. A scoop of vanilla ice cream or a dollop of softly whipped cream is the perfect complement to the rich chocolate flavor.
- Storage: Leftovers can be stored in an airtight container in the refrigerator for up to 3 days.
- Reheating: Reheat individual portions in the microwave for 30-60 seconds, or until warmed through. You can also reheat the entire pudding in a low oven (300 degrees F) for about 15-20 minutes.
- Freezing: While the pudding can be frozen, the texture of the sauce may change slightly upon thawing. To freeze, let the pudding cool completely, then wrap it tightly in plastic wrap and foil. Freeze for up to 2 months. Thaw overnight in the refrigerator before reheating.
Nutritional Information
| Nutrient | Amount per Serving | % Daily Value |
|---|---|---|
| Calories | 504.3 kcal | N/A |
| Calories from Fat | 74 g | 15% |
| Total Fat | 8.3 g | 12% |
| Saturated Fat | 5 g | 25% |
| Cholesterol | 19.5 mg | 6% |
| Sodium | 479.2 mg | 19% |
| Total Carbohydrate | 107.4 g | 35% |
| Dietary Fiber | 3.5 g | 14% |
| Sugars | 77.8 g | 311% |
| Protein | 5.8 g | 11% |
Note: Nutritional information is an estimate and may vary based on specific ingredients and portion sizes.
Variations & Substitutions
- Gluten-free: Use a gluten-free self-raising flour blend. You may need to add a pinch of xanthan gum for added structure.
- Dairy-free: Substitute the milk with almond milk, soy milk, or oat milk. Use a dairy-free butter alternative.
- Vegan: In addition to the dairy-free substitutions, ensure the caster sugar is vegan-friendly (some refined sugars are processed using bone char).
- Nutty twist: Add ½ cup of chopped walnuts or pecans to the batter for a crunchy texture and added flavor.
- Citrus zest: Add the zest of an orange or lemon to the dry ingredients for a bright and zesty flavor.
- Chocolate chips: Sprinkle chocolate chips over the batter before baking for an extra dose of chocolatey goodness.
FAQs (Frequently Asked Questions)
Q: Why is the water poured over the top and not mixed in?
A: Pouring the hot water over the top without mixing is essential for creating the self-saucing effect. The water helps the cocoa and sugar sink to the bottom, forming a luscious chocolate sauce as it bakes.
Q: Can I use regular flour instead of self-raising flour?
A: You can, but you’ll need to add baking powder. Use 1 cup of plain flour plus 1 ½ teaspoons of baking powder.
Q: My pudding came out dry. What did I do wrong?
A: Overbaking is the most common cause of a dry pudding. Make sure to check for doneness frequently towards the end of the baking time. Also, ensure your oven temperature is accurate.
Q: Can I make this in individual ramekins?
A: Yes, you can! Reduce the baking time accordingly, checking for doneness after about 25-30 minutes.
Q: The sauce is too bitter. How can I fix it?
A: The bitterness may be due to the cocoa powder used. Try using a Dutch-processed cocoa powder, which is less acidic and has a smoother flavor. You can also add a touch more sugar to balance the bitterness.
Final Thoughts
This self-saucing chocolate pudding is more than just a dessert; it’s a hug in a bowl, a comforting reminder of simpler times. Don’t be intimidated by the seemingly separate layers – the beauty of this recipe lies in its simplicity and the almost magical transformation that occurs in the oven. I urge you to give it a try. Share it with loved ones, savor each warm, chocolatey spoonful, and let the delightful sauce transport you to a place of pure bliss. And please, let me know how it turns out! I’d love to hear about your experiences and any variations you might create. Perhaps pair it with a scoop of raspberry sorbet for a delightful contrast in flavors. Happy baking!