
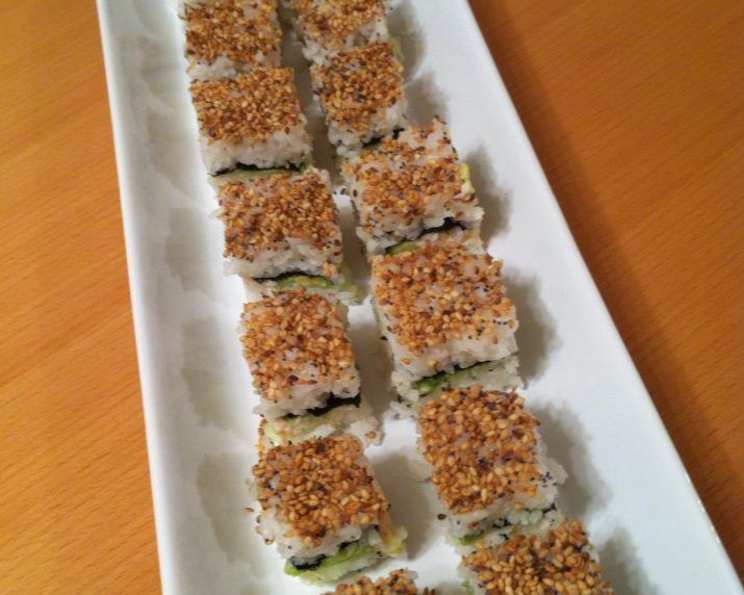
Sensational California Sushi Squares
I remember my first attempt at rolling sushi. The seaweed tore, the rice stuck to everything but itself, and the filling squished out in all directions. It was a culinary disaster! That’s when I discovered the genius of sushi squares – all the delicious flavors of sushi, presented in a neat, easily manageable form. This recipe brings back those memories with a smile, because these squares are foolproof, fun to make, and always a crowd-pleaser.
Recipe Overview
- Prep Time: 30 minutes
- Cook Time: 0 minutes
- Total Time: 2 hours 30 minutes (includes chilling time)
- Servings: 8
- Yield: 64 squares
- Dietary Type: Gluten-Free (check soy sauce ingredients)
Ingredients
- 6 cups cooked and seasoned sushi rice (Minado’s is very good)
- 2 sheets nori
- 1/2 cup toasted sesame seeds or 1/2 cup black sesame seeds
- 1 ripe avocado
- 3 cups crabmeat
- 2 tablespoons mayonnaise
- 1 green onion, sliced thinly
- 1 cucumber
- Soya sauce
- Wasabi
Equipment Needed
- 9 x 13 inch pan
- Plastic wrap
- Sharp knife
Instructions
-
Begin by lining your 9 x 13 inch pan. Spread plastic wrap generously over the bottom and up the sides, ensuring there’s enough overhang to fully enclose the sushi squares later. This makes removal a breeze.
-
Next, create the base layer. Sprinkle the toasted sesame seeds or black sesame seeds evenly over the bottom of the plastic wrap-lined pan. This adds a nutty flavor and a beautiful visual appeal.
-
Now, add the first rice layer. Spoon half of the cooked and seasoned sushi rice over the sesame seeds. Dampen your hands with cold water – this prevents the rice from sticking to your fingers – and press the rice down into an even, compact layer. Consistency is key here for a firm square.
-
Create a barrier between the rice and the fillings. Cover the rice layer completely with the nori sheets. This seaweed layer provides that classic sushi flavor and helps hold the layers together.
-
Prepare the avocado. Peel the ripe avocado, remove the pit, and slice it into thin strips. Layer the avocado strips evenly over the nori sheets.
-
Combine the crabmeat, mayonnaise, and green onion in a bowl. Mix thoroughly until well combined. This creamy crab mixture adds richness and flavor to the sushi squares.
-
Spread the crab mixture evenly over the avocado layer. Ensure a consistent thickness across the entire surface.
-
Prepare the cucumber. Peel the cucumber, cut it lengthwise, and use a spoon to scoop out the seeds. Cut the cucumber halves into thin strips. Layer the cucumber strips over the crabmeat mixture.
-
Spoon the remaining cooked and seasoned sushi rice over the cucumber layer. Again, dampen your hands with cold water and press the rice down into an even, compact layer. Be sure to press firmly to create a solid block.
-
Cover the last layer of rice with plastic wrap. This will prevent it from drying out and allow for even pressure when chilling.
-
Set another 9 x 13 inch pan directly on top of the sushi squares. Press down firmly to compress all the layers together. This helps the squares hold their shape when cut.
-
Place the pan in the refrigerator and chill for at least two hours. This allows the flavors to meld and the squares to firm up, making them easier to cut.
-
After chilling, remove the pan from the refrigerator. Take the bottom layer of plastic wrap and use it to carefully invert the pan onto a cutting surface.
-
Using a VERY sharp knife, cut the sushi block into 64 squares. Wipe your knife clean after each cut and dip it into cold water before each cut. This prevents the rice from sticking to the knife and ensures clean, even slices.
-
Arrange the Sensational California Sushi Squares on a platter and serve immediately with soya sauce and wasabi.
Expert Tips & Tricks
- Rice is Key: Using high-quality sushi rice is essential for the right texture and flavor. Make sure it’s properly seasoned with rice vinegar, sugar, and salt.
- Sharp Knife, Clean Cuts: A dull knife will tear the sushi squares. Sharpen your knife or use a very sharp chef’s knife for clean, professional-looking cuts.
- Don’t Overfill: Avoid overfilling the sushi squares, or they will be difficult to press and cut. Maintain consistent layer thicknesses.
- Make-Ahead Magic: These squares are perfect for making ahead of time. Prepare them a day in advance and store them in the refrigerator.
- Vegetarian Variation: Replace the crabmeat with seasoned tofu or avocado for a delicious vegetarian option.
Serving & Storage Suggestions
Serve the Sensational California Sushi Squares chilled with a side of soya sauce for dipping and a dollop of wasabi for a spicy kick. They’re perfect as an appetizer, a light lunch, or a party snack.
Leftover sushi squares should be stored in an airtight container in the refrigerator. They will last for up to 2 days. However, the texture of the rice may change slightly over time. They are best consumed fresh. Freezing is not recommended as it affects the texture and flavor.
Nutritional Information
| Nutrient | Amount per Serving | % Daily Value |
|---|---|---|
| Calories | 656 kcal | N/A |
| Calories from Fat | 114 g | 17% |
| Total Fat | 12.7 g | 19% |
| Saturated Fat | 1.9 g | 9% |
| Cholesterol | 1 mg | 0% |
| Sodium | 40.2 mg | 1% |
| Total Carbohydrate | 121.6 g | 40% |
| Dietary Fiber | 7.8 g | 31% |
| Sugars | 1.1 g | 4% |
| Protein | 12.7 g | 25% |
Variations & Substitutions
- Spicy Tuna Squares: Substitute the crabmeat with spicy tuna for a fiery kick. Mix canned tuna with mayonnaise, sriracha, and a touch of sesame oil.
- Smoked Salmon Squares: Replace the crabmeat with thinly sliced smoked salmon and add cream cheese for a rich and decadent variation.
- Vegetable Medley: Use a combination of shredded carrots, bell peppers, and sprouts for a vibrant and healthy vegetarian option.
- Mango Tango: Add thin strips of ripe mango for a sweet and tropical twist. It pairs especially well with shrimp or avocado.
- Spicy Mayo: Mix sriracha sauce into the mayonnaise for a little heat!
FAQs (Frequently Asked Questions)
Q: Can I use different types of rice?
A: While sushi rice is recommended for its sticky texture, you can use other short-grain rice varieties, but the squares may not hold together as well.
Q: How do I prevent the rice from sticking to my hands?
A: Keep a small bowl of cold water nearby and dampen your hands before handling the rice. This will prevent it from sticking.
Q: Can I make these ahead of time?
A: Yes, these squares can be made a day in advance and stored in the refrigerator. Just be sure to wrap them tightly in plastic wrap to prevent drying out.
Q: What if I don’t have a 9×13 inch pan?
A: You can use a similar-sized baking dish, but adjust the amount of rice and fillings accordingly.
Q: Can I add other vegetables?
A: Absolutely! Feel free to add other vegetables like bell peppers, shredded carrots, or even pickled radish. Just be sure to slice them thinly.
Final Thoughts
So, ditch the sushi mat and embrace the ease of these Sensational California Sushi Squares! They’re a fun and delicious way to enjoy all your favorite sushi flavors without the fuss of rolling. Whether you’re a seasoned sushi chef or a complete beginner, this recipe is sure to impress. Give it a try, experiment with different fillings, and let me know what you think! These sushi squares pair beautifully with a chilled glass of sake or a crisp white wine. Enjoy!