
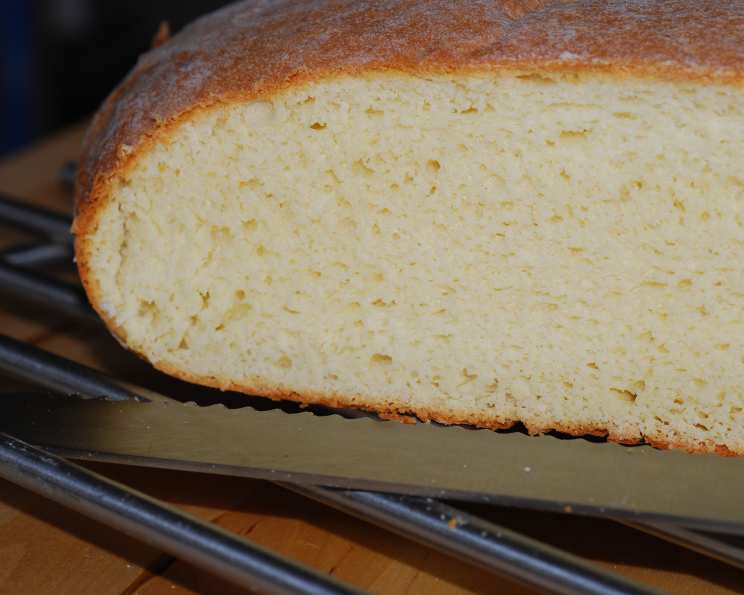
The Soul of Serbia: Baking Authentic Pogacha Bread
The aroma alone transports me back to my childhood summers spent with my grandmother in her sun-drenched Serbian kitchen. The heavy wooden table, always dusted with flour, was her stage, and pogacha, this humble yet magnificent bread, was her masterpiece. I remember the satisfying thwack of the dough as she punched it down, the warmth radiating from the oven as the loaf transformed into a golden, crusty wonder. Each bite was a taste of home, a connection to generations past, and a reminder of the simple pleasures of life. It wasn’t just bread; it was love, baked into every crumb.
Recipe Overview
- Prep Time: 30 minutes
- Cook Time: 1 hour
- Total Time: 1 hour 30 minutes
- Servings: 4-6
- Yield: 1 round loaf
- Dietary Type: Vegetarian
Ingredients
- 1 cup milk
- 1/4 cup (1/2 stick) butter
- 2 1/4 teaspoons active dry yeast
- 2 tablespoons sugar
- 5 cups flour, plus additional for shaping
- 1 cup sour cream
- 1/4 cup vegetable oil (or canola oil)
- 1 large egg, slightly beaten
- 1 teaspoon salt
Equipment Needed
- Stand mixer with paddle and dough hook attachments
- Large greased bowl
- 10-inch round greased pan with high sides (about 3 inches) or parchment-lined baking sheet
- Sharp knife or lame
- Cooling rack
- Instant-read thermometer
Instructions
- Begin by scalding the milk. This involves heating the milk until it just begins to simmer, but not boil. Remove it from the heat and add the butter, allowing it to melt completely. This step is crucial as it helps activate the yeast and enriches the dough.
- Cool the milk and butter mixture to lukewarm. This is important because excessively hot temperatures can kill the yeast, hindering the dough’s ability to rise properly. Test the temperature with your finger – it should feel comfortably warm, not hot.
- In a small bowl, add the yeast and sugar to the lukewarm milk mixture. Stir until dissolved, ensuring that the yeast is well-distributed. This mixture should sit for about 5-10 minutes, allowing the yeast to activate and create a frothy layer on top. This indicates that the yeast is alive and ready to leaven the dough.
- Measure 5 cups of flour into the work bowl of a stand mixer fitted with the paddle attachment. Creating a well in the center of the flour is helpful for incorporating the wet ingredients evenly.
- Add the milk-yeast mixture, sour cream, oil, egg, and salt to the flour. The sour cream adds a subtle tang and contributes to the bread’s moistness.
- Mix well with the paddle attachment on low speed until the ingredients are roughly combined. This initial mixing ensures that all ingredients are incorporated before kneading.
- Switch to the dough hook attachment and knead on medium-low speed for about 5 minutes, or until the dough is smooth and elastic. The dough should pull away from the sides of the bowl and form a cohesive ball. If the dough seems too sticky, add a tablespoon of flour at a time until it reaches the desired consistency. Be careful not to add too much flour, as this can result in a dry, dense loaf.
- Turn the dough out into a large greased bowl. This prevents the dough from sticking to the bowl as it rises.
- Flip the dough over to grease both sides. This helps prevent a skin from forming on the surface of the dough during the rising process.
- Cover the bowl with plastic wrap or a clean kitchen towel and let rise in a warm place until doubled in size. The rising time will vary depending on the temperature of your environment, but it usually takes about 1-1.5 hours. A warm spot, such as near a radiator or in a slightly warmed oven (turned off!), will encourage faster rising.
- Preheat the oven to 350 degrees Fahrenheit (175 degrees Celsius). Make sure your oven is properly preheated to ensure even baking.
- Punch down the dough to release the air. This step helps to redistribute the yeast and creates a more even texture in the final product.
- Place the dough in a 10-inch round greased pan with high sides (about 3 inches) or hand-shape it into a 10-inch round and place it on a parchment-lined baking sheet. Using a high-sided pan will help the pogacha maintain its shape and prevent it from spreading out too much. Alternatively, shaping the dough by hand and placing it on a baking sheet gives you more control over the final form.
- Using a sharp knife or a lame, slash the top of the dough three times. Some prefer to make an “X” on top. These slashes allow the bread to expand properly during baking and create an attractive, rustic appearance.
- Bake for about 1 hour, or until an instant-read thermometer registers 190 degrees Fahrenheit (88 degrees Celsius) when inserted into the center of the loaf. If the top of the pogacha starts to brown too quickly, you can tent it with foil to prevent burning.
- Remove from the oven and place on a cooling rack. Allow the pogacha to cool slightly before slicing and serving. This allows the internal structure of the bread to set, making it easier to slice.
Expert Tips & Tricks
- For a richer flavor, consider using whole milk instead of low-fat milk. The higher fat content will contribute to a more tender and flavorful crumb.
- To enhance the crust’s golden color, brush the top of the dough with an egg wash (a mixture of egg and a splash of water or milk) before baking.
- If you don’t have a stand mixer, you can knead the dough by hand on a lightly floured surface for about 8-10 minutes, or until it is smooth and elastic.
- For a more pronounced sour flavor, use a high-quality, tangy sour cream.
- If the dough is rising too quickly, you can slow it down by placing it in the refrigerator. The cooler temperature will retard the yeast activity.
Serving & Storage Suggestions
Pogacha is best served warm, either on its own or as an accompaniment to soups, stews, or grilled meats. Its hearty texture and subtle flavor make it a versatile bread that pairs well with a variety of dishes.
Store leftover pogacha at room temperature in an airtight container for up to 3 days. To keep it fresh for longer, wrap it tightly in plastic wrap and store it in the refrigerator for up to a week. You can also freeze pogacha for up to 2 months. To reheat, thaw it completely and then warm it in the oven or microwave.
Nutritional Information
| Nutrient | Amount per Serving | % Daily Value |
|---|---|---|
| Calories | 990.5 kcal | N/A |
| Calories from Fat | 374 g | 38% |
| Total Fat | 41.6 g | 64% |
| Saturated Fat | 17.7 g | 88% |
| Cholesterol | 115.4 mg | 38% |
| Sodium | 780.6 mg | 32% |
| Total Carbohydrate | 131.1 g | 43% |
| Dietary Fiber | 4.8 g | 19% |
| Sugars | 8.8 g | N/A |
| Protein | 21.9 g | 43% |
Note: Nutritional information is an estimate and may vary based on specific ingredients and preparation methods.
Variations & Substitutions
- Garlic & Herb Pogacha: Add 2 cloves of minced garlic and 1 tablespoon of chopped fresh herbs (such as rosemary, thyme, or oregano) to the dough during the kneading process.
- Cheese Pogacha: Incorporate 1 cup of shredded cheese (such as feta, mozzarella, or cheddar) into the dough during kneading. You can also sprinkle cheese on top of the dough before baking.
- Gluten-Free Pogacha: Substitute the all-purpose flour with a gluten-free flour blend. You may need to adjust the amount of liquid to achieve the desired dough consistency.
- Vegan Pogacha: Replace the milk with a plant-based milk alternative (such as almond milk or soy milk), the butter with vegan butter, and the sour cream with a plant-based sour cream alternative. You can also use a flax egg (1 tablespoon of ground flaxseed mixed with 3 tablespoons of water) instead of the egg.
FAQs (Frequently Asked Questions)
Q: Why is my pogacha dense and not rising properly?
A: This could be due to several factors, including using expired yeast, not allowing the dough to rise in a warm enough environment, or adding too much flour. Ensure your yeast is fresh, allow ample rising time in a warm place, and avoid over-measuring the flour.
Q: Can I make the dough ahead of time and bake it later?
A: Yes, you can prepare the dough through the first rise, then punch it down, wrap it tightly, and refrigerate it for up to 24 hours. Allow it to come to room temperature for about 30 minutes before shaping and baking.
Q: How can I tell if the pogacha is done baking?
A: The best way to check for doneness is to insert an instant-read thermometer into the center of the loaf. It should register 190 degrees Fahrenheit (88 degrees Celsius). The pogacha should also be golden brown and sound hollow when tapped on the bottom.
Q: Can I freeze pogacha?
A: Yes, pogacha freezes well. Allow it to cool completely, then wrap it tightly in plastic wrap and place it in a freezer bag. It can be frozen for up to 2 months. Thaw it completely before reheating.
Q: What’s the best way to reheat leftover pogacha?
A: You can reheat pogacha in the oven at 350 degrees Fahrenheit (175 degrees Celsius) for about 10-15 minutes, or in the microwave for shorter intervals. For best results, brush the top with a little butter or oil before reheating to prevent it from drying out.
Final Thoughts
I encourage you to embark on this culinary journey and experience the warmth and comfort of homemade pogacha. It’s more than just a recipe; it’s a connection to a rich cultural heritage, a celebration of simple ingredients, and a reminder of the joy of sharing good food with loved ones. Don’t be afraid to experiment with variations and personalize it to your own taste. And most importantly, savor every moment of the baking process and enjoy the delicious result! Pair this lovely loaf with a hearty bowl of Serbian Bean Soup (Pasulj) and a glass of chilled Serbian wine for a truly authentic experience.