
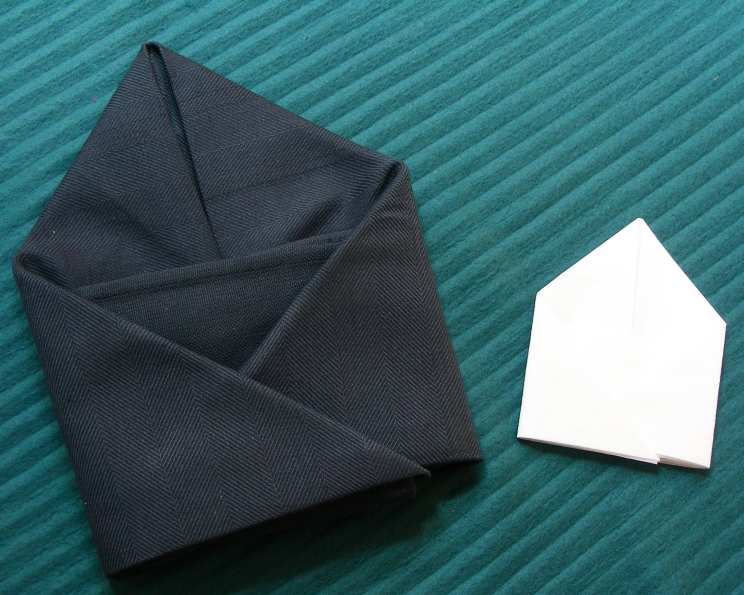
The Art of the Serviette: Mastering the Pocket Fold
I remember being a young apprentice in a bustling Parisian bistro, nervously tasked with setting tables before the dinner rush. While the chefs orchestrated culinary masterpieces in the kitchen, my domain was the dining room, and my tools were crisp linens and gleaming silverware. It wasn’t just about placing things correctly; it was about creating an atmosphere of elegance and anticipation. That’s when I learned the subtle power of a well-folded serviette – a small detail that spoke volumes about the care and attention to detail given to the entire dining experience. This particular pocket fold, while simple in execution, always impressed, offering a delightful reveal for a menu card or a sprig of fresh herbs.
Recipe Overview
- Prep Time: 3 minutes
- Ingredients: 2
- Serves: 1
- Dietary Type: N/A (Decorative)
Ingredients
- 1 large paper serviette
- 1 large cloth serviette (optional, for a more elegant presentation)
Equipment Needed
None. Just a flat surface to work on.
Instructions
-
Begin by laying your serviette flat on a clean, even surface. Ensure it’s in a perfect square shape before you. This is crucial for achieving a symmetrical and polished final result.
-
Now, take the two bottom corners of the square and fold them upwards towards the center. Fold each corner approximately one-third of the way up the serviette. The resulting fold line should run horizontally across the bottom portion of the square. Press the folds firmly to create a sharp crease.
-
Next, focus on the top two corners. Fold them downwards, again about one-third of the way, so that the tips of the top corners align with the horizontal fold line you created in the previous step. This will create a sort of overlapping effect, maintaining a rectangular shape in the center.
-
At this stage, you should have a rectangle in front of you. Place your finger at the center top point of this rectangle to anchor it. With your other hand, grasp the top right-hand corner of the rectangle and fold it diagonally towards the center bottom of the rectangle. However, continue the fold slightly past the bottom edge of the rectangle, creating a small flap extending beyond the bottom. This extension is key for the pocket’s structure. Ensure a neat, straight vertical line runs down the center of your fold. Repeat this step on the left side of the rectangle, mirroring the fold and creating another flap extending beyond the bottom edge.
-
Now, fold the two bottom flaps back upwards and on top of themselves. The goal is to align these flaps with the bottom edge of the rest of the serviette. This step will define the base of your pocket and create a more refined appearance.
-
At this point, you should see a thin rectangular shape at the bottom and a triangular shape on top. There will be a vertical gap running through the center of both shapes. Take the right-hand end of the rectangle and fold it inwards towards the center, stopping at the midline. Repeat this process with the left-hand end of the rectangle, but this time, instead of simply folding it, insert it into the fold you just created on the opposite side. This interlocking action is what forms the pocket structure.
-
The final result should be a neat, small square pocket with a triangular top. The pocket is now ready to hold a menu, a name card, or a decorative element.
Expert Tips & Tricks
-
Starch is your friend: For an extra-crisp and professional look, lightly starch cloth napkins before folding. This will help the folds hold their shape beautifully.
-
Ironing is essential: Always iron your napkins before folding. Wrinkles can detract from the overall elegance of the presentation.
-
Practice makes perfect: Don’t be discouraged if your first attempt isn’t perfect. Like any skill, napkin folding improves with practice.
-
Vary the size: While the recipe calls for large napkins, you can adapt this fold for smaller napkins as well. Just adjust the fold proportions accordingly.
-
The thickness matters: Thicker napkins tend to hold their shape better than thinner ones. Consider the thickness of your napkins when choosing this fold.
Serving & Storage Suggestions
This napkin fold is designed for immediate use. It’s best to fold the napkins shortly before your guests arrive to maintain a fresh, crisp appearance. You don’t need to “store” it in the traditional sense. Simply place the finished napkin on each plate at the place setting. The pocket can hold a variety of items, such as:
- A personalized name card
- The dinner menu
- A small sprig of fresh herbs (rosemary, thyme, or mint)
- A small flower
- A decorative place setting marker
Nutritional Information
Since this is a decorative technique and not a food recipe, there is no nutritional information to provide.
Variations & Substitutions
- Color coordination: Use napkins in colors that complement your table setting or the theme of your event.
- Fabric variations: Experiment with different fabric types, such as linen, cotton, or silk, to create different textures and visual effects.
- Embellishments: Add embellishments such as ribbons, charms, or small ornaments to the finished napkin fold for a personalized touch.
FAQs (Frequently Asked Questions)
Q: What size napkins work best for this fold?
A: Large napkins, typically around 20×20 inches, are ideal for creating a prominent pocket and a visually appealing presentation.
Q: Can I use paper napkins instead of cloth?
A: Yes, you can certainly use paper napkins, especially for casual events. However, cloth napkins will generally provide a more elegant and durable result.
Q: How do I keep the pocket from unfolding?
A: Ensure that each fold is crisp and precise. Press the folds firmly as you go to help the napkin hold its shape. Using slightly starched cloth napkins can also improve the fold’s stability.
Q: What can I put in the pocket?
A: The pocket is versatile! You can insert name cards, menus, small flowers, sprigs of herbs, or even small candies as a delightful surprise for your guests.
Q: Is this fold difficult to master?
A: Not at all! The pocket fold is relatively simple, even for beginners. With a little practice, you’ll be able to create this elegant presentation effortlessly.
Final Thoughts
Don’t underestimate the power of a simple yet elegant touch. This pocket napkin fold is a wonderful way to elevate your table setting and add a touch of sophistication to any occasion. Whether you’re hosting a formal dinner party or a casual brunch, this technique will surely impress your guests. So, grab your napkins, give it a try, and let your creativity shine! I encourage you to experiment with different colors, fabrics, and embellishments to create a unique and memorable dining experience. And please, share your creations – I’d love to see your personal touch!