
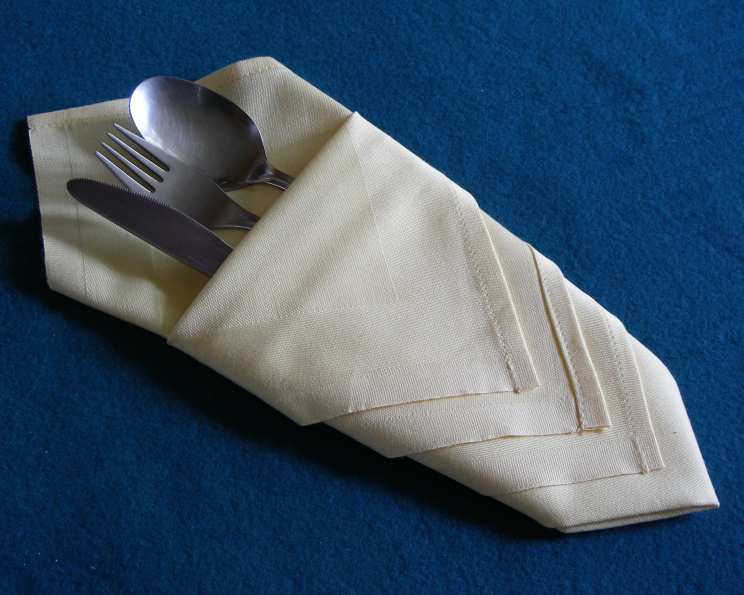
The Diamond Pouch: Elevate Your Table Setting with Elegant Napkin Folding
There’s something truly special about setting a beautiful table. I remember as a child, my grandmother always took immense pride in even the smallest details, especially when hosting family dinners. She’d spend hours meticulously ironing her best linen napkins and demonstrating intricate folds. Although her creations were sometimes beyond my clumsy childhood fingers, her napkins always felt like a warm embrace, signifying that something special was about to happen. This Diamond Pouch fold reminds me of her dedication; it’s simple enough to master yet elegant enough to impress, a perfect way to add a touch of sophistication to any occasion, whether it’s a casual brunch or a formal dinner.
Recipe Overview
- Prep Time: 3 minutes
- Serves: 2
- Ingredients: 2
Ingredients
- 1 Paper, Serviette (large)
- 1 Cloth, Serviette (large)
Equipment Needed
- Iron (optional, for crisper folds)
Instructions
- Begin by laying your chosen serviette, whether paper or cloth, flat on a clean surface. Ensure it is in a square orientation before you.
- Fold the serviette in half horizontally, bringing the top edge to meet the bottom edge. Crease the fold firmly.
- Take the folded serviette and fold it in half again, this time vertically. Bring the left edge to meet the right edge. You should now have a smaller square that is approximately a quarter of the size of the original serviette.
- Observe the resulting small square. Only one corner of the square will have four open or loose edges. Rotate your square so that this corner with the open edges is pointing upwards, resembling the North point of a compass. The opposite corner, with the folded edges, will be the South point. The square should now look like a flat diamond shape.
- Take the first open flap at the North corner and fold it downwards, towards the South corner. The tip of this flap should stop short of reaching the South corner. Iron this fold flat for a crisper finish if desired. This first fold creates the first layer of your cascading “diamond” effect.
- Take the next open flap at the North corner and bring it towards the South corner. Again, stop slightly above the fold you just created with the first flap. It’s essential to ensure that the points of both flaps line up neatly along the center vertical axis.
- Repeat this process with the third open flap. You will now have a square-ish shape with three descending triangular flaps on the front, resembling a set of cascading diamonds.
- Carefully turn the entire serviette over, keeping the folds intact.
- Locate the East and West points of the serviette (the two side points). Fold each of these points inwards, towards the center, overlapping them slightly. This creates a nice, sloping “V” shape on the back.
- Now your Diamond Pouch is complete. The bottom of the serviette, corresponding to the most southerly point of the triangles, will form the bottom of the pouch. There should be a defined cuff or pocket into which you can neatly place your knife, fork, spoon, small flowers, or even a small gift.
Expert Tips & Tricks
- Fabric Choice Matters: While this fold works with both paper and cloth serviettes, the choice of material will significantly impact the final presentation. Linen or high-quality cotton napkins provide a more luxurious and structured look, while thicker paper napkins are ideal for more casual settings.
- Ironing is Key: For the sharpest, most professional-looking Diamond Pouch, ironing each fold as you go makes a world of difference. This is especially crucial for cloth napkins. A little steam can help to create a clean, crisp finish.
- Sizing Considerations: The size of your serviette will determine the scale of the finished pouch. Larger serviettes will naturally create larger pouches, suitable for holding larger utensils or even small bread rolls. Smaller serviettes are better suited for holding just cutlery.
- Practice Makes Perfect: Don’t be discouraged if your first attempt isn’t flawless. Like any skill, serviette folding improves with practice. Work through the steps slowly and deliberately, paying attention to the alignment of the folds.
- Secure the Pouch: For added security, especially if using paper napkins or placing heavier items in the pouch, consider using a small piece of double-sided tape to secure the overlapping East and West points on the back of the serviette. This will prevent the pouch from unfolding unexpectedly.
Serving & Storage Suggestions
The beauty of the Diamond Pouch is that it can be prepared well in advance of your event. Once folded, store the serviettes flat in a dry place. They can be stacked neatly and will hold their shape perfectly until you are ready to set the table. If you’ve ironed the serviettes, storing them flat will prevent any unwanted creasing.
When serving, consider the overall theme of your table setting. For a rustic look, pair the Diamond Pouch with natural linen serviettes and wooden cutlery. For a more formal occasion, opt for crisp white serviettes and elegant silverware.
There’s no need to “store” them once used, just throw them away or in the laundry!
Nutritional Information
Since this recipe involves folding serviettes and does not involve any edible ingredients, there is no nutritional information to display.
Variations & Substitutions
- Color Coordination: Experiment with different colors and patterns of serviettes to match your table decor. Consider using complementary colors or coordinating with the colors of your dinnerware.
- Embellishments: Add a personal touch to your Diamond Pouch by embellishing it with small decorative items. Tie a ribbon around the pouch, insert a sprig of fresh herbs, or attach a small charm.
- Seasonal Adaptations: Adapt the colors and embellishments to reflect the current season. Use autumnal hues and dried leaves in the fall, festive reds and greens during the holidays, or pastel shades and fresh flowers in the spring.
- Monogramming: For a truly personalized touch, consider using serviettes that are monogrammed with your initials or the initials of your guests.
FAQs (Frequently Asked Questions)
Q: Can I use smaller napkins for this fold?
A: Yes, but the size of the finished pouch will be smaller. You might only be able to fit a knife or fork. Experiment with different sizes to find what works best for your needs.
Q: Will this fold work with patterned napkins?
A: Absolutely! Just be mindful of how the pattern will appear when folded. Consider how the pattern will be presented in the final shape.
Q: Can I make these the day before an event?
A: Yes, this fold is excellent for making ahead. Store them flat in a dry location, to maintain their shape and crispness.
Q: Is it necessary to iron the napkins?
A: While not strictly required, ironing will create a much sharper and more professional-looking fold, especially with cloth napkins.
Q: What can I put inside the pouch besides cutlery?
A: You can get creative! Consider placing a small bread roll, a handwritten note for each guest, or a small favor or gift inside the pouch.
Final Thoughts
So, go ahead, embrace the art of serviette folding and elevate your next dining experience. The Diamond Pouch is more than just a way to present cutlery; it’s a gesture of care and attention to detail that your guests will surely appreciate. Don’t be afraid to experiment with different materials, colors, and embellishments to create a unique and personalized table setting. And most importantly, have fun with it! After all, the best tables are those that are filled with warmth, laughter, and good company.