
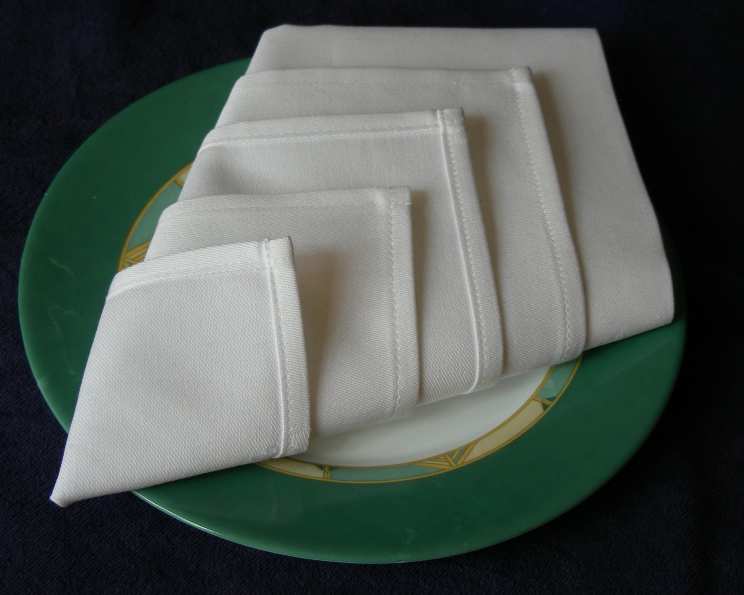
Serviette Folds: An Elegant Touch You Can Master
The clatter of silverware, the murmur of conversation, and the anticipation of a delicious meal – these are the sounds of a well-set table. But there’s one detail that often elevates the dining experience from ordinary to extraordinary: the humble serviette. I remember vividly, as a child, watching my grandmother transform simple squares of linen into miniature works of art. It wasn’t just about aesthetics; it was about showing care, attention to detail, and a touch of love. She’d let me help with ironing, and as we folded, she’d tell stories, each crease a memory etched into my mind. These make-ahead napkin folds became a tradition, a subtle but significant way to make every meal feel special.
Recipe Overview
- Prep Time: 4 minutes
- Ingredients: 2
- Serves: 2
Ingredients
- 1 paper serviette (large)
- 1 cloth serviette (large)
Equipment Needed
- Iron (optional, but recommended for a crisper finish)
- Ironing board (optional)
Instructions
- Begin by laying your serviette flat on a surface. Whether you choose paper or cloth, ensure it’s free from wrinkles for a more polished result.
- Fold the serviette in half horizontally, bringing the top edge to meet the bottom edge. Press the fold to create a neat crease.
- Now, take the folded serviette and fold it in half again, this time vertically. You should now have a smaller square, approximately one-quarter of the original size. Press this fold as well.
- Observe your square. One corner will have four loose edges. Rotate the square so that this corner – the one with all the loose points – is pointing downwards. You now have a diamond shape. For clarity, we’ll call the downward-pointing corner the South corner and the corner opposite it, at the top, the North corner.
- Take the uppermost loose point at the South corner and fold it upwards to meet the North point. Press the fold.
- Take the next loose point at the South corner and fold it upwards towards the North point. However, this time, stop slightly short of the North point. You should now have a smaller triangle visible within the larger triangle you created in the previous step. Press the fold firmly.
- Repeat step 6 with the remaining two loose points at the South corner. Each time, fold the point towards the North, but stopping a little bit shorter than the previous fold. This will create a series of ever-decreasing triangles cascading down the front of your serviette.
- Optional but Recommended: If you have the time and desire for a truly pristine finish, gently press these layered triangles with a warm iron. The sharper the creases, the more defined and elegant the final result will be. Be careful not to scorch the serviette, especially if it’s made of delicate paper.
- Carefully turn the entire serviette over so that the back is now facing upwards.
- Take the bottom right point of the serviette and bring it upwards to a central point along the edge between the bottom left point and the top (North) point. Imagine drawing a line from the bottom left corner to the top corner; you want to fold the bottom right corner to the midpoint of that line. Secure the fold with a press.
- Repeat step 10 with the remaining corner – the bottom left point. Bring it up to meet the same central point you identified in the previous step. Again, press the fold to create a crisp line.
- Finally, turn the serviette over once more to reveal the neat, beautifully layered front side you’ve created. Your folded serviette is now ready to grace your table!
Expert Tips & Tricks
- Starch is Your Friend: For cloth serviettes, a light starch spray before ironing can add significant crispness and structure to your folds.
- Color Coordination: Choose serviette colors that complement your table setting and the occasion. A deep jewel tone can add a touch of drama, while pastels offer a softer, more delicate feel.
- Practice Makes Perfect: Don’t be discouraged if your first few attempts aren’t flawless. Like any skill, serviette folding improves with practice. Start with simpler folds and gradually work your way up to more complex designs.
- Pressing is Key: Ironing each fold as you go is the single most important factor in achieving a professional-looking result. A well-pressed serviette simply looks more elegant and refined.
- Vary the Height: When arranging the folded serviettes on your table, consider varying the height slightly to create a more dynamic and visually appealing display. You can achieve this by subtly adjusting the final fold or by placing the serviettes on slightly different levels.
Serving & Storage Suggestions
The beauty of these serviette folds is that they can be made well in advance, saving you valuable time when preparing for a dinner party or special occasion. Once folded, store them flat in a cool, dry place, away from direct sunlight, to prevent fading. If using cloth serviettes, a linen closet or drawer is ideal. For paper serviettes, a storage box or decorative basket works well.
When serving, these folded serviettes can be placed directly on the dinner plate, to the left of the forks, or presented in a serviette ring. They also make a lovely addition to a buffet table.
Nutritional Information
Since this recipe involves folding serviettes rather than preparing food, there are virtually no nutritional components to consider. The nutritional content would depend on the material of the serviette itself.
| Nutrient | Amount per Serving | % Daily Value |
|---|---|---|
| Calories | 0 kcal | 0% |
| Total Fat | 0g | 0% |
| Saturated Fat | 0g | 0% |
| Cholesterol | 0mg | 0% |
| Sodium | 0mg | 0% |
| Total Carbohydrate | 0g | 0% |
| Dietary Fiber | 0g | 0% |
| Sugars | 0g | 0% |
| Protein | 0g | 0% |
Variations & Substitutions
While this particular fold is a classic and elegant choice, there are countless variations and substitutions you can explore to personalize your table setting.
- Fabric Variety: Experiment with different fabrics, such as silk, velvet, or even burlap, to create different textures and visual effects.
- Embellishments: Add embellishments such as ribbons, flowers, or small ornaments to further enhance the presentation.
- Alternative Folds: Explore different serviette folding techniques to discover new and exciting designs. There are many tutorials available online and in cookbooks.
FAQs (Frequently Asked Questions)
Q: Can I use small napkins for this fold?
A: While you can use smaller napkins, the resulting triangles will be smaller and less dramatic. This fold is best suited for large napkins.
Q: Is it necessary to iron the napkins?
A: While not strictly necessary, ironing the napkins, especially cloth ones, significantly improves the finished look. The crisp, sharp creases create a more polished and elegant presentation.
Q: Can I prepare these folds several days in advance?
A: Yes, absolutely! These folds can be prepared well in advance and stored flat until needed. This is a great time-saver when hosting a dinner party.
Q: What’s the best way to store the folded napkins?
A: Store the folded napkins flat in a cool, dry place, away from direct sunlight, to prevent fading. A linen closet or drawer is ideal for cloth napkins, while a storage box or decorative basket works well for paper napkins.
Q: Can I add a personal touch to the folds?
A: Absolutely! Get creative with embellishments like ribbons, flowers, or small ornaments. You can also choose napkins in colors that match your theme or the season.
Final Thoughts
Don’t underestimate the power of a beautifully folded serviette. It’s a small detail that can make a big difference, transforming an ordinary meal into a special occasion. Whether you choose crisp linen or elegant paper, mastering this simple fold is a rewarding way to add a touch of sophistication to your table. So, gather your serviettes, embrace the art of folding, and prepare to impress your guests with your attention to detail. I encourage you to experiment, have fun, and create a table setting that reflects your personal style. And if you try this fold, please share your results! I’d love to see your creative interpretations.