
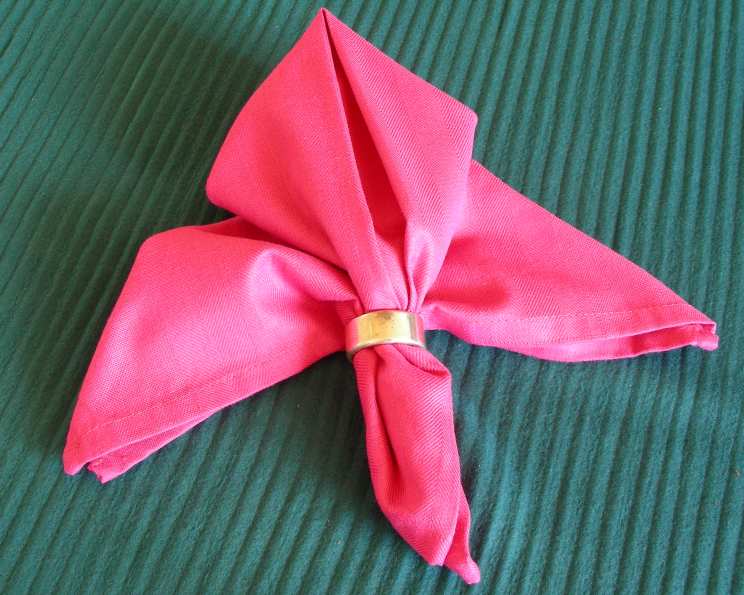
Serviette Folding: The Elegant Orchid
My grandmother, a woman of impeccable taste and quiet grace, always believed in the power of small, beautiful details. I remember, as a child, being utterly mesmerized by her meticulously set dining table. It wasn’t the fine china or gleaming silverware that captivated me, but the artful napkin folds she presented at each place setting. They were never ostentatious, but always elegant, a testament to her belief that even the simplest meal could be elevated with a touch of beauty. While I have never been as adept as she, I still practice napkin folds occasionally to carry on her tradition.
Recipe Overview
- Prep Time: 5 minutes
- Servings: 1
- Yield: 1 Orchid Fold
- Dietary Type: All (non-edible craft)
Ingredients
- 1 large paper serviette
- OR 1 large cloth serviette
- 1 serviette/napkin ring
Equipment Needed
- Flat, clean work surface
Instructions
- Begin by laying your serviette out flat before you on your work surface in a square shape. Ensure there are no wrinkles. If using cloth, consider pressing it lightly first.
- Fold the serviette in half so that you have a long, thin rectangle positioned in front of you. The fold should be neat and crisp.
- Take the top right corner of the rectangle and bring it down to meet the center bottom point of the serviette. This action will create a triangle shape on the right side of the rectangle. Make sure the edges are aligned neatly.
- Repeat this process with the left side. Take the top left corner and bring it down to meet the center bottom point. You should now have a triangle shape in front of you, with a gap running down the center where the original fold line was.
- Take the bottom right point of the triangle and fold it up to meet the main point at the center top of the triangle. Make a sharp crease.
- Repeat with the bottom left point. Fold it up to meet the main point at the center. You should now have a new diamond shape in front of you, with the loose points at the top.
- Take the right top flap of the diamond and bring it across and down. Position what was the center crease so that it is now aligned on top of the bottom right edge of the diamond shape. Essentially, you are folding this flap diagonally downwards.
- Repeat the previous step for the opposite side. Take the left top flap and bring it across and down so that the center crease aligns with the bottom left edge of the diamond. The top of your serviette should now resemble a somewhat stretched “W” shape in its outline.
- Gently take the two bottom points of that “W” shape and fold them backwards to meet each other. Your serviette will now have a thicker side on the left, comprising four layers of fabric or paper, and a single crease on the right. This is forming the base of the orchid.
- Slip your serviette ring onto the base of this folded serviette, pushing it approximately halfway up the structure. The ring should encircle the thicker, folded part.
- Rotate the napkin to face you, so you can see the “orchid” taking shape. Gently pull out the two side flaps from within the serviette ring, ensuring that they are extended evenly. This creates the “petals” of the orchid.
- The center part of the orchid fold will naturally have a pleat down the middle. Arrange the folds a little so that everything is as symmetrical and pleasing to the eye as possible. You may need to experiment with the position of the serviette ring to achieve the desired look.
Expert Tips & Tricks
- For a crisper fold, especially with cloth napkins, starching them lightly before ironing can make a big difference. The starch provides structure and helps the folds hold their shape.
- Practice makes perfect! Don’t be discouraged if your first attempt doesn’t look exactly like the picture. The more you practice, the easier it will become to create a beautiful orchid fold.
- Experiment with different types of serviettes. Thicker paper serviettes will hold their shape better, while linen or cotton serviettes offer a more luxurious feel.
- If you find the “W” shape difficult to achieve, try using a small piece of double-sided tape to secure the folds in place. This can be particularly helpful when working with slippery fabrics.
- Consider the color and pattern of your serviettes. Solid colors tend to showcase the folds better, but patterned serviettes can add a touch of whimsy.
Serving & Storage Suggestions
The folded orchid serviettes are best used immediately or shortly after folding to maintain their crisp shape.
- Serving: Place the folded serviette on each plate as part of your table setting. The elegant orchid design adds a touch of sophistication to any meal, from casual lunches to formal dinners.
- Storage: If you need to prepare the serviettes ahead of time, store them flat in a cool, dry place. Avoid stacking them too high, as this can crush the folds.
- Reusing: Paper serviettes are generally for single use. Cloth serviettes can be unfolded, laundered, and ironed for future use.
Nutritional Information
Since this is a non-edible craft, nutritional information is not applicable.
| Nutrient | Amount per Serving | % Daily Value |
|---|---|---|
| Calories | 0 kcal | 0% |
| Total Fat | 0g | 0% |
| Saturated Fat | 0g | 0% |
| Cholesterol | 0mg | 0% |
| Sodium | 0mg | 0% |
| Total Carbohydrate | 0g | 0% |
| Dietary Fiber | 0g | 0% |
| Sugars | 0g | 0% |
| Protein | 0g | 0% |
Variations & Substitutions
- Color Coordination: Choose serviettes that complement your table décor or the theme of your event.
- Fabric Variations: Experiment with different fabrics, such as silk or satin, for a more luxurious look. However, these materials may be more difficult to fold and require more patience.
- Napkin Ring Alternatives: If you don’t have serviette rings, you can use ribbon or twine to secure the base of the orchid fold.
FAQs (Frequently Asked Questions)
Q: What type of serviette works best for this fold?
A: Large, square serviettes work best. Cloth serviettes (linen or cotton) offer a more elegant look, while thicker paper serviettes are easier to work with for beginners.
Q: How can I keep the folds crisp and in place?
A: Starching cloth serviettes before ironing can help them hold their shape. For paper serviettes, avoid handling them excessively.
Q: Can I prepare these folds ahead of time?
A: Yes, you can fold the serviettes in advance, but store them flat in a cool, dry place to prevent crushing.
Q: What if I don’t have serviette rings?
A: You can use ribbon, twine, or even a small rubber band to secure the base of the fold. Just ensure the alternative is discreet and complements the overall aesthetic.
Q: Is this fold difficult to master?
A: It may take a few tries to get the hang of it, but with practice, the orchid fold is relatively easy to achieve. Follow the instructions carefully and don’t be afraid to experiment.
Final Thoughts
Napkin folding, like many of the culinary arts, is a labor of love. It’s about adding a touch of artistry and care to the everyday. So, take a moment to slow down, choose a beautiful serviette, and create an elegant orchid fold. Whether it’s for a special occasion or a simple weeknight dinner, this small detail will undoubtedly elevate your dining experience. I encourage you to try this fold, experiment with different materials and colors, and most importantly, have fun with it! Don’t forget to share your creations and any tips you discover along the way. Bon appétit, and happy folding!