
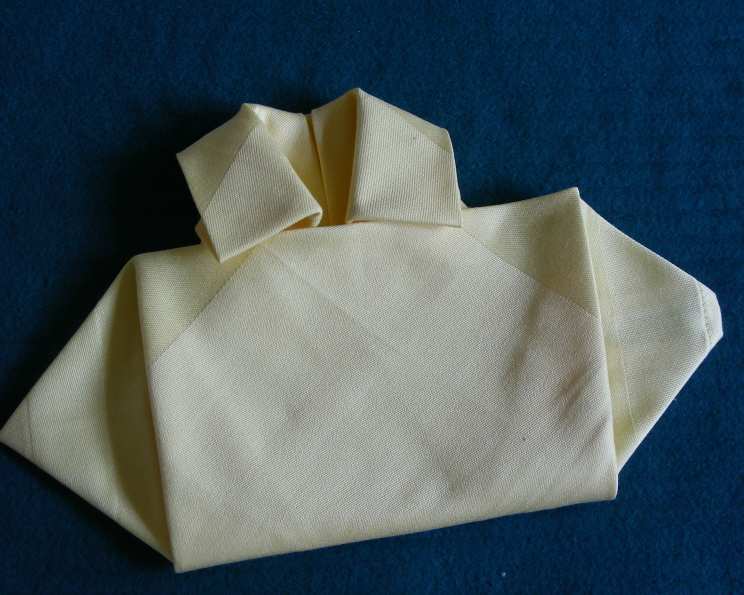
The Art of the Serviette: Folding a Classic Shirt
My grandmother, a woman of impeccable taste and boundless patience, always believed that the smallest details elevated the everyday. I remember, as a child, watching her transform simple linen napkins into elegant works of art. While I struggled to master the basic fan fold, she’d effortlessly craft swans, roses, and, my personal favorite, tiny shirts. These weren’t just napkins; they were declarations of care and attention, a silent language of love spoken at the dinner table. Now, I’m excited to share the Shirt Fold, a playful yet sophisticated design that’s sure to impress your guests. It’s intricate, yes, but with these step-by-step instructions, you’ll be folding like a pro in no time!
Recipe Overview
- Prep Time: 4 minutes
- Ingredients: 2
- Serves: 2
Ingredients
- 1 large paper serviette
- 1 large cloth serviette
Equipment Needed
- Iron (optional, but highly recommended)
Instructions
-
Begin by laying your serviette flat before you on a clean surface, oriented in a square shape.
-
Take the top right corner and fold the point into the center point of the square. Repeat this process with the other three corners. You should now have a diamond shape.
-
Reposition the diamond so that it is now a square in front of you.
-
Take the right top and bottom side corners and fold them vertically inward, towards the center of the serviette. You should now have a shape with a wide rectangle on the left side and a thinner rectangle on the right side.
-
Bring the top and bottom left corners in to the middle center, so that you have two even vertical rectangles before you.
-
Carefully turn the serviette over.
-
Fold approximately 1 inch (2.5cm) (or slightly less if you’re working with a smaller serviette) of the top edge towards you. Iron this fold firmly. This will form the shirt collar.
-
Gently turn the napkin over again.
-
Bring the top right corner inward to the top center of the serviette, positioning it about 1/2 inch (15mm) down the center line, mimicking the center of a collar.
-
Now take the right bottom flap and fold them up and out diagonally. The upside-down “V” shape in the center should semi-mirror the angle in the collar folds above it.
-
Repeat this step with the left bottom flap. You should now have a piece with the collar at the top and angled triangles at the bottom which will soon become the sleeves of the shirt.
-
Take the bottom left and right corners (these are also the bottom points of the triangles that stick out) and fold them upwards until the middle of the line between them is level with the center of the collar at the top. You should now have a square shape in the middle with the collar above it and two “sleeves” at either side.
-
Fold the center top of the square under the flaps of the collar so that it looks like a real shirt. This will require some gentle tucking and adjustment to achieve the desired effect.
-
Decorate with flowers, sweets, or other embellishments to resemble buttons, if desired.
Expert Tips & Tricks
-
Ironing is Key: Seriously, don’t skip the ironing! Ironing at each fold, especially the collar, will give your shirt fold crisp, clean lines and make it look infinitely more professional.
-
Fabric Matters: While you can use paper napkins, a higher-quality linen or cotton napkin will hold its shape better and create a more luxurious feel. If using paper, opt for a thicker, multi-ply option.
-
Practice Makes Perfect: Don’t be discouraged if your first attempt isn’t perfect. Like any skill, napkin folding improves with practice. Keep at it, and you’ll soon be churning out perfectly folded shirts in minutes.
-
Customize Your Collar: Experiment with different collar heights and angles to create unique looks. A wider collar adds a touch of formality, while a narrower collar feels more casual.
-
Secure the Sleeves: If the sleeves tend to flop forward, a tiny dab of fabric glue (or even a small piece of double-sided tape) can help secure them in place.
Serving & Storage Suggestions
These folded shirts are best served immediately, adorning each place setting at your table. They can be prepared a few hours in advance and stored flat in a cool, dry place to prevent wrinkling. Because they’re primarily decorative, there’s no need to worry about elaborate storage considerations! The real storage concern is where you store the idea in your head, ready for its moment to shine.
Nutritional Information
Since this is a non-edible item, there is no nutritional value.
| Nutrient | Amount per Serving | % Daily Value |
|---|---|---|
| Calories | 0 kcal | 0% |
| Total Fat | 0 g | 0% |
| Saturated Fat | 0 g | 0% |
| Cholesterol | 0 mg | 0% |
| Sodium | 0 mg | 0% |
| Total Carbohydrate | 0 g | 0% |
| Dietary Fiber | 0 g | 0% |
| Sugars | 0 g | 0% |
| Protein | 0 g | 0% |
Variations & Substitutions
-
Themed Colors: Use napkins in colors that match your event’s theme. For a baby shower, try pastel pink or blue. For a more formal dinner, opt for classic white or navy.
-
Pocket Square: Add a small square of contrasting fabric to the “pocket” area for a pop of color or pattern.
-
Button Embellishments: Get creative with your button decorations! Use small candies, pearl beads, miniature silk flowers, or even hand-drawn paper cutouts.
-
Bow Tie: Instead of folding a collar, create a small bow tie out of ribbon or fabric and attach it to the top of the napkin shirt for a playful twist.
-
Monogramming: For a truly personalized touch, consider monogramming each napkin with your guests’ initials. This adds a sophisticated and memorable element to your table setting.
FAQs (Frequently Asked Questions)
Q: What size napkin is best for the Shirt Fold?
A: A large napkin, approximately 18-20 inches square, works best. This provides enough material to create a well-proportioned shirt.
Q: Can I use paper napkins for this fold?
A: Yes, you can, but cloth napkins are easier to work with and create a more elegant result. If using paper, choose a thicker, multi-ply napkin for better durability.
Q: How do I keep the collar from unfolding?
A: Ironing the collar firmly is crucial. You can also use a tiny dab of fabric glue or double-sided tape to secure it in place.
Q: Is ironing really necessary?
A: While technically optional, ironing each fold makes a significant difference in the final appearance. It creates crisp lines and helps the shirt hold its shape better.
Q: Can I prepare these in advance?
A: Yes, you can fold the shirts a few hours before your event. Store them flat in a cool, dry place to prevent wrinkling.
Final Thoughts
Don’t let the intricate steps intimidate you; the Shirt Fold is a delightful way to add a touch of whimsy and elegance to any table setting. It’s a project that’s as enjoyable to create as it is to admire. So, gather your napkins, fire up your iron, and get ready to transform a simple square of fabric into a miniature masterpiece. I encourage you to try this fold and share your creations. And if you’re looking for the perfect complementary dish to showcase your newfound napkin-folding skills, why not consider a classic roast chicken or a vibrant spring salad? The possibilities are endless!