
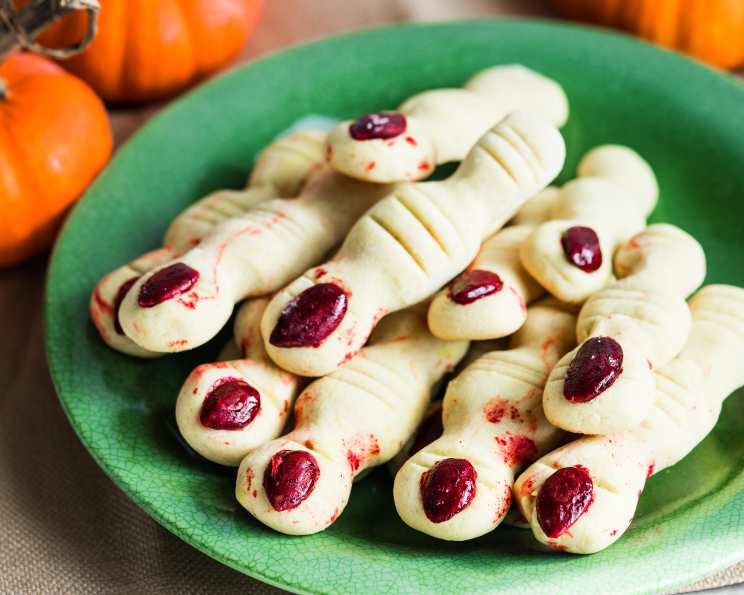
Severed Fingers Halloween Cookies: A Spooky Sweet Treat
The first time I saw these cookies, I was genuinely creeped out. My Aunt Millie, a master of macabre baking, had brought a platter to our family Halloween party. They looked so…realistic. I remember hesitating before finally grabbing one, the slightly gritty texture of the “skin” sending a shiver down my spine. But then, the taste! A delicate, buttery sweetness that completely contradicted the unsettling appearance. I’ve been hooked on these eerily delicious treats ever since. They’re the perfect balance of spooky and scrumptious, always a guaranteed conversation starter (and a crowd-pleaser, if you can get past the initial “eww”).
Recipe Overview
- Prep Time: 1 hour
- Cook Time: 12 minutes
- Total Time: 1 hour 12 minutes
- Yields: 30 cookies
- Serves: 15
- Dietary Type: Vegetarian
Ingredients
- 2 tablespoons red food coloring
- 30 blanched almonds
- 2 large eggs
- 1/4 teaspoon vanilla extract
- 1/2 cup (1 stick) butter, at room temperature
- 1/2 cup confectioners’ sugar
- 5 tablespoons granulated sugar
- 1 pinch salt
- 1 2/3 cups all-purpose flour
Equipment Needed
- Two baking sheets
- Silpats (French nonstick baking mats) or parchment paper
- Shallow bowl
- Small bowl
- Electric mixer with paddle attachment
- Plastic wrap
- Small knife
Instructions
-
Preheat your oven to 350°F (175°C). Line two baking sheets with Silpats (French nonstick baking mats) or parchment paper, and set aside. This prevents sticking and helps with even browning.
-
Prepare the “nails”: Place the red food coloring in a shallow bowl. Crack each blanched almond in half lengthwise. Toss the halved almonds into the bowl with the red food coloring and stir them until the color is evenly distributed. Leave them in the bowl and stir them every so often until the color is as dark as you like. The more you stir, the better the coverage. These will represent the bloody fingernails, so aim for a realistic hue.
-
Prepare the egg wash: Separate 1 egg. Set aside the white in a small bowl; this will be used as an egg wash for the cookies. In a separate small bowl, whisk together the egg yolk, the remaining whole egg, and the vanilla extract. Set this aside. The egg wash helps to give the cookies a shiny, golden-brown color.
-
Cream the butter and sugar: In the bowl of an electric mixer fitted with the paddle attachment, combine the softened butter, confectioners’ sugar, granulated sugar, and salt. Beat on medium speed until well combined, light, and fluffy. This process is crucial for achieving a tender cookie.
-
Add the egg mixture: Add the egg yolk/egg/vanilla extract mixture to the butter and sugar mixture, and beat until smooth, about 2 minutes. Ensure everything is fully incorporated for a consistent dough.
-
Incorporate the flour: Add the all-purpose flour to the wet ingredients, and mix on low speed just until incorporated. Be careful not to overmix, as this can develop the gluten and result in tough cookies.
-
Chill the dough: Wrap the dough in plastic wrap, and chill in the refrigerator until firm, about 20 to 30 minutes. Chilling the dough allows the gluten to relax and the butter to solidify, preventing the cookies from spreading too much during baking.
-
Shape the fingers: Divide the dough in half. Work with one piece at a time, keeping the remaining dough covered with plastic wrap and chilled. Divide the first half into fifteen pieces. On a lightly floured surface, roll each piece back and forth with your palms into finger shapes, about 3 to 4 inches long.
-
Create the knuckles: Pinch the dough in two places along the “finger” to form the knuckles. Score each knuckle lightly with the back of a small knife. This adds to the creepy realism.
-
Transfer to baking sheets: Transfer the formed fingers to the prepared baking sheets, spacing them evenly apart. Repeat steps 8 and 9 with the remaining dough.
-
Add the “nails”: When all the fingers are formed, brush them lightly with the reserved egg white. Position the almond “nails” at the end of each finger, pressing them gently into the dough to attach.
-
Bake: Bake the cookies until lightly browned, about 12 minutes. Watch them closely, as baking times may vary depending on your oven.
-
Cool completely: Remove the baking sheets from the oven and let the cookies cool completely on the sheets before transferring them to a wire rack. This prevents them from breaking.
Expert Tips & Tricks
- Creepier Knuckles: To make the knuckles look more grotesque, shape them big and uneven. Irregularity enhances the unsettling effect.
- Prevent Puffing: To keep the cookies from puffing up too much during baking, roll the fingers extra skinny—skinnier than you ultimately want them to look. This helps maintain their defined shape.
- Under-Baking for Softness: I also try to get them out of the oven just before they start to brown significantly. A slightly under-baked cookie will be softer.
- Almond Extract Boost: For an extra touch of flavor, add a few drops of almond extract to the dough. It complements the almond “nails” beautifully.
- “Bloody” Detail: For an extra gory touch, use a small brush to apply a little extra red food coloring around the base of the almond “nails” after baking.
- Uniformity Tip: Use a kitchen scale to divide the dough into equal portions for consistent finger sizes.
Serving & Storage Suggestions
Serve these Severed Finger Halloween Cookies on a platter lined with black or purple fabric for a truly spooky presentation. You can arrange them around a decorative skull or alongside other Halloween treats.
Store the cookies in an airtight container at room temperature for up to 3 days. They are best enjoyed within the first 24 hours for optimal freshness. You can also freeze the unbaked dough for up to 2 months. Thaw completely in the refrigerator before shaping and baking.
Nutritional Information
Note: Nutritional information is an estimate and may vary based on specific ingredients and portion sizes.
| Nutrient | Amount per Serving | % Daily Value |
|---|---|---|
| Calories | 160.5 kcal | – |
| Calories from Fat | 73 kcal | – |
| Total Fat | 8.2 g | 12% |
| Saturated Fat | 4.2 g | 21% |
| Cholesterol | 41.1 mg | 13% |
| Sodium | 74.7 mg | 3% |
| Total Carbohydrate | 19.3 g | 6% |
| Dietary Fiber | 0.6 g | 2% |
| Sugars | 8.3 g | – |
| Protein | 2.9 g | 5% |
Variations & Substitutions
- Gluten-Free: Substitute the all-purpose flour with a gluten-free all-purpose blend. Be sure to add a binder like xanthan gum to help with the texture.
- Vegan: Replace the butter with a vegan butter substitute. Use an egg replacer for the egg in the dough and a plant-based milk for the egg wash.
- Nut-Free: Use sunflower seeds or pumpkin seeds dyed red instead of almonds for a nut-free version.
- Flavor Variations: Add a pinch of cinnamon or nutmeg to the dough for a warm, spiced flavor.
- “Dirty” Fingers: Add a touch of cocoa powder to a portion of the dough to create a “dirty” or aged look.
FAQs (Frequently Asked Questions)
Q: Why is my cookie dough too sticky?
A: The dough might be too warm. Try chilling it for a longer period, about 45 minutes to an hour, until it’s firm enough to handle.
Q: Can I make these cookies ahead of time?
A: Yes, you can make the dough ahead of time and store it in the refrigerator for up to 2 days, or in the freezer for up to 2 months. Just thaw it before shaping.
Q: How do I prevent the almonds from falling off during baking?
A: Make sure to press the almonds firmly into the dough after brushing with the egg wash. A dab of melted chocolate can also help to secure them.
Q: My cookies spread too much during baking. What did I do wrong?
A: The butter may have been too soft or the dough wasn’t chilled enough. Ensure the butter is softened but not melted, and chill the dough thoroughly.
Q: Can I use gel food coloring instead of liquid?
A: Yes, gel food coloring is a great alternative. You may need to use a smaller amount, as it’s more concentrated.
Final Thoughts
These Severed Fingers Halloween Cookies are more than just a recipe; they’re an experience. A chance to embrace the spooky spirit of Halloween and impress your friends and family with your culinary creativity (and slightly disturbing artistic skills). Don’t be afraid to experiment with different variations and make them your own. And most importantly, have fun with it! After all, it’s Halloween – a time for frights, delights, and delicious, creepy treats. Share your creations and feedback, and let’s make this Halloween the spookiest and tastiest one yet!