
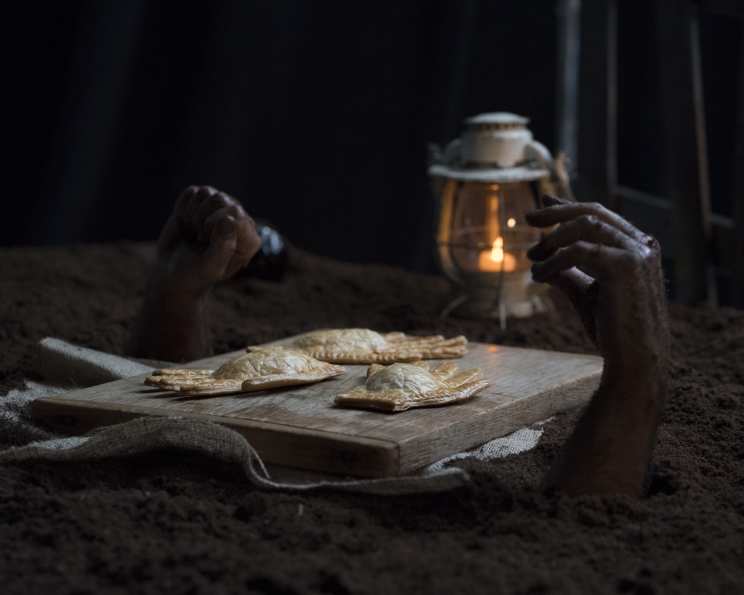
Severed Hand Pies: A Surprisingly Delicious Bite
I’ll never forget the Halloween party where I first encountered these delightfully macabre hand pies. My friend Sarah, a true culinary artist with a wonderfully dark sense of humor, presented a platter piled high with what looked like, well, severed hands. A collective gasp rippled through the room, followed by nervous laughter. Then, someone tentatively took a bite. The shock on their face as they realized it was a savory, cheesy, utterly delicious pie filling was pure gold. From that moment on, these hand pies became a Halloween tradition, a testament to Sarah’s ingenuity and a reminder that sometimes, the most unexpected things can be surprisingly delightful.
Recipe Overview
- Prep Time: 30 minutes
- Cook Time: 14 minutes
- Total Time: 44 minutes
- Servings: 4
- Yield: 4 hand pies
- Dietary Type: Adaptable
Ingredients
Filling
- 1 tablespoon olive oil
- ½ yellow onion, thinly sliced
- 1 lb hamburger
- 1 (8 ounce) can tomato sauce
- 2 tablespoons Worcestershire sauce
- ½ tablespoon brown sugar
- ½ teaspoon vinegar
- ¼ cup ketchup
- 1 teaspoon chili powder
- Salt and pepper to taste
Pastry Assembly
- 2 (14 1/8 ounce) packages pie crusts
- Flour, for surface
- 1 large egg, lightly beaten
- ½ cup shredded cheddar cheese
Equipment Needed
- Sauté pan
- Cardboard for stencil
- Paring knife
- Fork
- Baking sheet
Instructions
-
Begin by preparing the savory filling. Heat the olive oil in a sauté pan over medium heat. Add the thinly sliced yellow onion and cook until it becomes slightly translucent, approximately 4 minutes. This softens the onion and releases its sweetness, laying the foundation for a flavorful filling.
-
Add the ground beef to the pan and cook, breaking it up with a spoon, until it is browned. Ensure the beef is cooked through and no longer pink. Once browned, drain off any excess grease to prevent a soggy pie filling.
-
Introduce the remaining filling ingredients: tomato sauce, Worcestershire sauce, brown sugar, vinegar, ketchup, and chili powder. Season generously with salt and pepper to your liking. The Worcestershire sauce adds a savory depth, while the brown sugar and ketchup provide a touch of sweetness and tanginess. The chili powder gives it a subtle kick.
-
Stir all the ingredients together thoroughly and bring the mixture to a simmer. Cover the pan with a lid and allow the filling to simmer for 15-20 minutes, stirring occasionally. This allows the flavors to meld together and deepen, creating a rich and complex filling.
-
While the filling is simmering, preheat your oven to 425 degrees F (220 degrees C). This ensures the pie crusts will bake to a golden-brown perfection.
-
Now, it’s time to create the hand stencil. Trace your hand onto a piece of cardboard and carefully cut it out to create a hand-shaped stencil. This will be your guide for cutting the pie crusts. A clear, defined stencil will ensure uniform hand shapes.
-
Lightly flour a clean, flat surface. Roll out one of the pie crusts onto the floured surface. This prevents the dough from sticking and makes it easier to work with.
-
Place the hand stencil on the rolled-out pie crust and use a paring knife to carefully cut around the stencil. Repeat this process to cut out two hand shapes from each sheet of pie crust. You will need a total of 8 hand shapes – 4 for the base of the pies and 4 for the tops.
-
Prepare the egg wash by lightly beating the egg in a small bowl.
-
Assemble the hand pies. Brush the edges of the 4 base hand shapes with the egg wash. This acts as a glue, helping the top and bottom crusts to seal together.
-
Place approximately 2 tablespoons of the prepared filling in the center of each of the base hand shapes. Then, sprinkle about 2 tablespoons of shredded cheddar cheese over the filling. The cheese adds a creamy, melty element to the savory filling.
-
Carefully place the remaining 4 hand shapes on top of the filled bases. Gently press around the edges to seal the pies.
-
Crimp the edges of each pie with a fork to create a decorative seal. This also helps to prevent the filling from leaking out during baking.
-
Brush the tops of the hand pies with the remaining egg wash. This gives them a beautiful golden-brown sheen as they bake.
-
Place the assembled hand pies on a baking sheet. Bake in the preheated oven for 14 minutes, or until the crusts are golden brown and the filling is heated through.
-
Remove the hand pies from the oven and let them cool slightly before serving.
Expert Tips & Tricks
- Spice It Up: For an extra kick, add a pinch of cayenne pepper to the filling.
- Make-Ahead Prep: The filling can be made a day in advance and stored in the refrigerator. This allows the flavors to meld even further.
- Dough Perfection: Keep the pie crusts cold until ready to use. Cold dough is easier to handle and will result in a flakier crust.
- Cheese Variations: Experiment with different types of cheese, such as pepper jack for a spicy twist, or a blend of cheddar and Monterey Jack for a milder flavor.
- Preventing Soggy Bottoms: Place the hand pies on a preheated baking stone or pizza stone for the first few minutes of baking to ensure a crispy bottom crust.
Serving & Storage Suggestions
Serve the Severed Hand Pies warm, as a frighteningly fun appetizer or a quirky main course, especially perfect for a Halloween feast. Garnish with a drizzle of ketchup for a bloody effect, if you dare! Leftovers can be stored in an airtight container in the refrigerator for up to 3 days. To reheat, simply bake in a preheated oven at 350°F (175°C) until warmed through, or microwave in short intervals. For longer storage, freeze the baked hand pies. Thaw completely before reheating.
Nutritional Information
| Nutrient | Amount per Serving | % Daily Value |
|---|---|---|
| Calories | 1310 kcal | N/A |
| Total Fat | 84g | 129% |
| Saturated Fat | 24g | 120% |
| Cholesterol | 137mg | 45% |
| Sodium | 1709mg | 71% |
| Total Carbohydrate | 97g | 32% |
| Dietary Fiber | 8g | 32% |
| Sugars | 9g | N/A |
| Protein | 41g | 82% |
Variations & Substitutions
- Vegetarian Option: Substitute the ground beef with a plant-based ground meat alternative or a mixture of lentils and finely diced vegetables.
- Gluten-Free: Use gluten-free pie crusts for a gluten-free version.
- Spicy Filling: Add chopped jalapeños or a dash of hot sauce to the filling for extra heat.
- Different Shapes: While hand shapes are thematic and fun, feel free to use other cookie cutters or shapes for different occasions.
- Crust Alternative: Puff pastry sheets can be used in place of pie crust for a flakier result.
FAQs (Frequently Asked Questions)
Q: Can I make the pie crust from scratch?
A: Absolutely! While pre-made pie crusts are convenient, homemade pie crust will always result in a flakier, more flavorful pie.
Q: Can I use a different type of meat in the filling?
A: Yes, you can substitute the ground beef with ground turkey, chicken, or even sausage for a different flavor profile.
Q: How can I prevent the filling from leaking out of the pies?
A: Ensure the edges are properly sealed by pressing them firmly with a fork. You can also brush the edges with egg wash before sealing to create a stronger bond.
Q: Can I freeze the unbaked hand pies?
A: Yes, you can freeze the unbaked hand pies. Place them on a baking sheet lined with parchment paper and freeze until solid. Then, transfer them to a freezer-safe bag or container. Bake directly from frozen, adding a few extra minutes to the baking time.
Q: What if my pie crusts are tearing when I try to cut them?
A: Make sure your pie crusts are cold but not frozen. Allow them to thaw slightly in the refrigerator before rolling them out. Also, ensure your work surface is well-floured to prevent sticking.
Final Thoughts
So, summon your inner mad scientist, gather your ingredients, and prepare to create these delightfully disturbing Severed Hand Pies. Whether you’re hosting a spooky Halloween party or simply looking for a fun and unique culinary adventure, these pies are sure to impress (and maybe even frighten!) your guests. Don’t be afraid to get creative with the filling and decorations. And most importantly, have fun! I’d love to hear your experiences and variations. Share your creations and let me know how they turned out. Happy baking!