
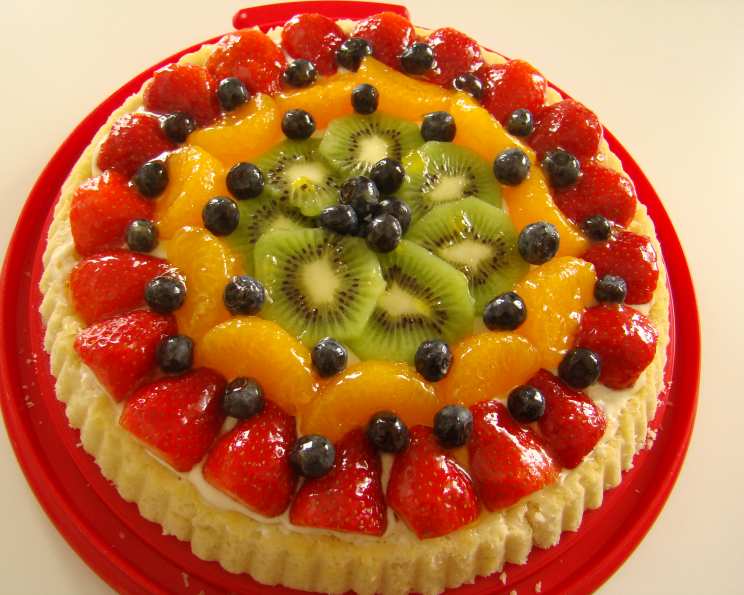
Perfect Shortbread Crust for Exquisite Custard Tarts
The first time I tasted a truly spectacular custard tart was at a tiny patisserie in Paris. The golden custard, smooth as silk, was delightful, but it was the crust that truly captivated me. Buttery, crumbly, and just a touch sweet, it provided the perfect textural contrast to the creamy filling. It wasn’t just a crust; it was an experience, and I knew then I had to master the art of the perfect shortbread pastry. This recipe brings that Parisian memory to life, offering a foolproof base for any custard creation.
Recipe Overview
- Prep Time: 20 minutes
- Cook Time: 15-20 minutes
- Total Time: 1 hour 35-40 minutes (includes chilling time)
- Servings: 8
- Yield: 1 tart crust (10-inch)
- Dietary Type: Not specified (contains dairy)
Ingredients
For the Crust:
- ½ cup (1 stick) salted butter, at room temperature
- ¼ cup confectioners’ sugar
- ½ teaspoon orange extract
- 1 cup all-purpose flour, sifted
Equipment Needed
- Mixing bowl
- Electric mixer
- Plastic wrap
- Rolling pin
- Lightly floured board
- 10-inch tart pan with removable bottom
Instructions
-
In a mixing bowl, cream the room temperature butter and confectioners’ sugar together using an electric mixer until the mixture is light and fluffy. This should take approximately 3 minutes. The goal is to incorporate air, creating a tender crust. Be sure to scrape down the sides of the bowl periodically to ensure even mixing.
-
Add the orange extract to the butter and sugar mixture. Mix thoroughly for about 1 minute to ensure the extract is evenly distributed. The orange extract adds a subtle citrus note that complements the richness of the shortbread. You can experiment with other extracts like vanilla or almond, but the orange provides a unique touch.
-
Gradually incorporate the sifted flour into the wet ingredients, adding it little by little while mixing on low speed. Continue mixing until the dough is thoroughly combined and forms a cohesive ball. Be careful not to overmix the dough, as this can develop the gluten in the flour and result in a tough crust. Stop mixing as soon as the dough comes together.
-
Cover the bowl with plastic wrap and chill the dough in the refrigerator for at least 1 hour. This chilling period is crucial, as it allows the gluten to relax and the butter to firm up, preventing the crust from shrinking during baking.
-
After chilling, turn the dough out onto a lightly floured board. Use a rolling pin to roll out the dough to a thickness of approximately 1/3 inch. Aim for an even thickness to ensure the crust bakes uniformly.
-
Carefully line a 10-inch tart pan (with a 1-inch high removable bottom) with the rolled-out pastry dough. Gently press the dough into the bottom and up the sides of the pan, ensuring there are no air pockets. Trim any excess dough from the edges of the pan.
-
Prick the bottom of the dough with a fork several times. This prevents the crust from puffing up during baking.
-
Place the tart pan in a preheated oven at 350 degrees Fahrenheit (175 degrees Celsius). Bake for 15-20 minutes, or until the crust is golden brown. Keep a close eye on the crust during the last few minutes of baking to prevent it from burning.
-
Remove the baked crust from the oven and allow it to cool completely before filling it with your favorite pastry cream or custard.
-
Fill the cooled crust with your choice of pastry cream, custard or other filling and then top with fresh fruit such as kiwi, banana, strawberries, green seedless grapes, and blueberries.
Expert Tips & Tricks
- Room temperature butter is key: Make sure your butter is truly softened but not melted. It should yield easily to pressure but still hold its shape. This will ensure proper creaming with the sugar.
- Don’t overmix: Overmixing develops the gluten in the flour, resulting in a tough crust. Mix just until the dough comes together.
- Chill time is essential: Don’t skip the chilling step! It prevents shrinkage during baking.
- Blind baking (optional): For an extra-crisp crust, you can blind bake the crust. Line the dough with parchment paper and fill it with pie weights or dried beans. Bake for 15 minutes, then remove the weights and parchment paper and bake for another 5-10 minutes, or until golden brown.
- Patching cracks: If you notice any cracks in the crust after baking, you can easily patch them with a little extra dough. Just dampen the area with a bit of water and gently press the dough into the crack.
Serving & Storage Suggestions
Serve your custard tart chilled. The shortbread crust is best enjoyed fresh, but it can be stored in an airtight container at room temperature for up to 2 days or in the refrigerator for up to 5 days. If you’ve already filled the tart with custard, it must be refrigerated.
For longer storage, you can freeze the baked, unfilled crust. Wrap it tightly in plastic wrap and then in foil. It can be stored in the freezer for up to 2 months. Thaw completely before filling.
Nutritional Information
| Nutrient | Amount per Serving | % Daily Value |
|---|---|---|
| Calories | 250 kcal | 13% |
| Total Fat | 15g | 23% |
| Saturated Fat | 9g | 45% |
| Cholesterol | 40mg | 13% |
| Sodium | 100mg | 4% |
| Total Carbohydrate | 25g | 8% |
| Dietary Fiber | 1g | 4% |
| Sugars | 8g | |
| Protein | 2g | 4% |
Note: Nutritional information is an estimate and may vary based on specific ingredients and preparation methods.
Variations & Substitutions
- Gluten-free: Substitute the all-purpose flour with a gluten-free flour blend designed for baking. You may need to add a binder like xanthan gum to improve the texture.
- Lemon zest: Add 1 teaspoon of lemon zest to the dough for a brighter, more citrusy flavor.
- Almond flour: Replace up to 1/4 cup of the all-purpose flour with almond flour for a nutty flavor and slightly more delicate texture.
- Different extracts: Experiment with other extracts like vanilla, almond, or even lavender for a unique twist.
- Chocolate shortbread: Add 2 tablespoons of unsweetened cocoa powder to the dry ingredients for a chocolate shortbread crust.
FAQs (Frequently Asked Questions)
Q: Why is my shortbread crust tough?
A: Overmixing the dough develops the gluten in the flour, resulting in a tough crust. Mix just until the ingredients come together.
Q: Why did my crust shrink during baking?
A: Insufficient chilling time is a common cause of shrinkage. Make sure to chill the dough for at least 1 hour, or even longer. Also, be careful not to stretch the dough too much when lining the tart pan.
Q: Can I make this crust ahead of time?
A: Yes! The unbaked dough can be stored in the refrigerator for up to 2 days or in the freezer for up to 1 month. The baked crust can also be stored at room temperature for a day or two, or frozen for longer storage.
Q: My crust is browning too quickly. What should I do?
A: If the crust is browning too quickly, tent it with foil to protect it from the heat.
Q: Can I use unsalted butter instead of salted butter?
A: Yes, you can use unsalted butter. Just add a pinch of salt (about 1/4 teaspoon) to the dry ingredients.
Final Thoughts
Creating the perfect custard tart starts with a foundation of delicious shortbread. This recipe is your key to unlocking a buttery, crumbly crust that will elevate any filling. Don’t be afraid to experiment with flavors and fillings to create your own signature tart. Share your creations with friends and family, and let the compliments roll in. Pair your masterpiece with a cup of Earl Grey tea for a truly delightful experience. Happy baking!