
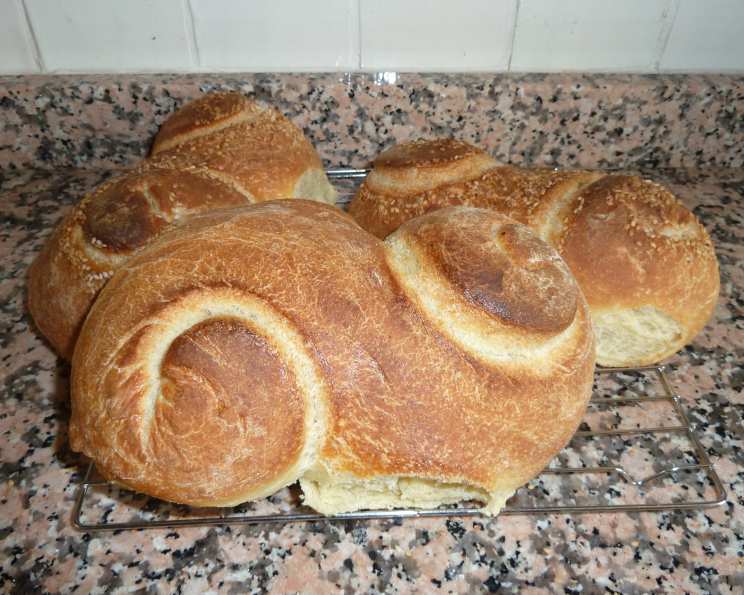
The Soul of Sicily: Crafting Authentic Semolina Bread
The scent of baking bread has always been more than just an aroma to me; it’s a direct line to my Nonna’s sun-drenched kitchen in Palermo. I remember as a child, the magic of watching her strong hands knead and shape dough, the rhythmic thud a comforting counterpoint to her lilting Sicilian stories. The air would be thick with the smell of yeast, warm flour, and the faintest hint of the orange blossoms that grew just outside her window. This Sicilian bread, with its golden crust and nutty semolina flavor, is my attempt to capture that very essence, that piece of home.
Recipe Overview
- Prep Time: 60 hours 30 minutes (includes pre-ferment and bulk fermentation)
- Cook Time: 25-30 minutes
- Total Time: 60 hours 55-60 minutes
- Yields: 3 loaves
- Dietary Type: Vegetarian
Ingredients
For the Pre-Ferment:
- 1 1/8 cups unbleached all-purpose flour
- 1 1/8 cups unbleached bread flour
- 3/4 teaspoon salt
- 1/2 teaspoon instant yeast
- 3/4 cup water, approximately, at room temperature
For the Bread:
- 1 3/4 cups unbleached bread flour
- 1 3/4 cups coarse semolina flour (crucial for authentic texture)
- 1 1/4 teaspoons salt
- 1 1/4 teaspoons instant yeast
- 2 tablespoons olive oil
- 1 tablespoon honey
- 1 1/4 cups lukewarm water, approximately
- 2 tablespoons sesame seeds (optional, for topping)
Equipment Needed
- Large mixing bowl or stand mixer with paddle and dough hook attachments
- Measuring cups and spoons
- Plastic wrap
- Lightly oiled bowl
- Kitchen shears or knife
- Work surface
- Baking sheets
- Parchment paper
- Vegetable oil spray
- Cooling rack
- Steam pan (oven-safe dish)
Instructions
-
Prepare the Pre-Ferment: In a large bowl or the bowl of an electric stand mixer, stir together the all-purpose flour, bread flour, salt, and yeast.
-
Add Water: Add 3/4 cup water, stirring until everything comes together and forms a coarse ball. If using a stand mixer, the paddle attachment works well for this step, but doing it by hand is perfectly acceptable. Adjust the amount of flour or water as needed; the dough should be soft but not overly sticky or stiff.
-
Knead the Pre-Ferment: Lightly flour your work surface. Transfer the dough and knead it for 4-6 minutes (or mix with the dough hook for 4 minutes), until it is soft and pliable, “tacky but not sticky.”
-
First Fermentation of Pre-Ferment: Transfer the dough to a lightly oiled bowl and roll it around to coat it with oil. Cover the bowl with plastic wrap and ferment at room temperature for one hour, or until it swells to about 1 1/2 times its original size.
-
Second Fermentation of Pre-Ferment: Remove the dough from the bowl, knead it lightly to degas, and return it to the bowl, covered with plastic wrap. Refrigerate for up to three days or freeze in an air-tight plastic bag for up to three months. This slow, cold fermentation is key to developing the bread’s complex flavor.
-
Prepare the Main Dough: The next day, remove the pre-ferment from the refrigerator and cut it into approximately 10 small pieces using kitchen shears or a knife. Cover with plastic wrap and let it sit for about an hour to take off the chill.
-
Combine Dry Ingredients: In a large bowl or the bowl of an electric stand mixer, stir together the bread flour, semolina flour, salt, and yeast.
-
Incorporate Wet Ingredients and Pre-Ferment: Add the pre-ferment pieces, olive oil, honey, and 1 1/4 cups lukewarm water. Stir until the dough forms a ball. If using a stand mixer, use the paddle attachment at low speed. Add water in dribbles as needed to achieve a soft and pliable dough.
-
Knead the Dough: Lightly flour your work surface and knead the dough (or use a dough hook at low speed), adding flour as needed to achieve a soft but not sticky dough, for about 10 minutes. The dough should be smooth and elastic.
-
First Bulk Fermentation: Form the dough into a ball, lightly oil a large bowl, and roll the dough around in the bowl to coat with oil. Cover the bowl with plastic wrap.
-
Cold Bulk Fermentation: Refrigerate the dough overnight. This long, cold fermentation develops the bread’s flavor and texture.
-
Divide and Shape: The next morning, remove the dough from the refrigerator (it will have grown) and divide it gently into 3 pieces. Gently shape the dough as desired, taking care to degas as little as possible. For the classic S-shape, extend each dough piece to about 24 inches. Working from each end simultaneously, coil the dough (in opposite directions) towards the center.
-
Proofing: Place the shaped doughs on parchment-lined pans, mist with water, sprinkle with sesame seeds if desired, mist with vegetable oil spray, and cover with plastic wrap. Proof the dough for an hour or two; it is ready for the oven when it stays dimpled when poked gently. The loaves should be about twice as large as when first shaped, but be careful not to let them over-proof.
-
Preheat the Oven: Preheat the oven to 500°F (or as high as your oven reliably reaches).
-
Bake: Uncover the doughs and place them in the oven. Pour 1 cup of water into the steam pan to create a steamy environment, which is crucial for a good crust. Spray the oven walls with water three times at 30-second intervals, and then reduce the heat to 450°F.
-
Rotate and Continue Baking: Bake for about 15 minutes and then rotate the pans 180 degrees. Gently separate the loaves if they are touching. Continue baking for 10-15 minutes, or until the loaves achieve a rich golden-brown color. The internal temperature of the bread should be about 200-205°F.
-
Cool: Transfer the loaves to a cooling rack and cool for at least 45 minutes before slicing and serving.
-
Freeze (Optional): To freeze, when cooled completely, wrap each loaf tightly in a freezer bag and close with a wire twist.
Expert Tips & Tricks
- Semolina Flour is Key: Using coarse semolina flour is essential for the bread’s characteristic texture and nutty flavor. Don’t substitute with regular bread flour.
- Cold Fermentation Matters: The long, cold fermentation in the refrigerator is what truly develops the bread’s complex flavors. Don’t rush this step.
- Steam is Your Friend: Creating a steamy environment in the oven is crucial for achieving a crispy, golden-brown crust. If you don’t have a steam pan, you can try placing a cast-iron skillet on the bottom rack of the oven and pouring hot water into it when you put the bread in.
- Don’t Over-Proof: Be careful not to let the dough over-proof during the final proofing stage. Over-proofed dough will collapse in the oven.
- Oven Temperatures May Vary: Keep a close eye on your bread while baking. Ovens vary, and you may need to adjust the baking time to achieve the desired color and internal temperature.
Serving & Storage Suggestions
This Sicilian bread is delicious served warm with a drizzle of olive oil, alongside cheeses and cured meats, or as a base for bruschetta. It also makes excellent sandwiches.
- Room Temperature: Store cooled loaves in a breadbox or loosely wrapped at room temperature for up to 2 days.
- Refrigerator: For longer storage, wrap the loaves tightly in plastic wrap and store them in the refrigerator for up to 5 days.
- Freezer: Freeze wrapped loaves for up to 3 months. Thaw completely before serving. To reheat, wrap the bread in foil and warm in a 350°F oven for 15-20 minutes, or until heated through.
Nutritional Information
(Estimated, per slice – depends on loaf size)
| Nutrient | Amount per Serving | % Daily Value |
|---|---|---|
| Calories | 275 kcal | 14% |
| Total Fat | 5g | 6% |
| Saturated Fat | 1g | 5% |
| Cholesterol | 0mg | 0% |
| Sodium | 380mg | 16% |
| Total Carbohydrate | 50g | 18% |
| Dietary Fiber | 3g | 11% |
| Sugars | 1.5g | – |
| Protein | 8g | 16% |
Variations & Substitutions
- Herb Infusion: Add chopped fresh herbs, such as rosemary, thyme, or oregano, to the dough for added flavor.
- Cheese Swirl: Incorporate grated Parmesan or Pecorino Romano cheese into the dough before shaping for a savory twist.
- Olive Bread: Add chopped Kalamata olives to the dough for a Mediterranean-inspired variation.
- Spicy Bread: Add a pinch of red pepper flakes to the dough for a touch of heat.
- Gluten-Free Version: While achieving the exact same texture with gluten-free flours is challenging, you can experiment with a blend of gluten-free bread flour, tapioca starch, and xanthan gum. Be sure to adjust the hydration levels as needed.
FAQs (Frequently Asked Questions)
Q: What is semolina flour, and why is it important in this recipe?
A: Semolina flour is a coarse flour milled from durum wheat. It gives the bread a distinctive nutty flavor and a slightly chewy texture that’s characteristic of Sicilian bread.
Q: Can I skip the pre-ferment step?
A: While you can technically skip it, the pre-ferment is crucial for developing the bread’s complex flavor and texture. It’s highly recommended that you include it for the best results.
Q: How do I know when the dough is properly proofed?
A: The dough is properly proofed when it has doubled in size and gently springs back when poked with a finger, leaving a slight indentation. If the indentation disappears quickly, it needs more time to proof.
Q: My bread is browning too quickly. What should I do?
A: If your bread is browning too quickly, reduce the oven temperature by 25 degrees Fahrenheit and cover the loaves loosely with foil.
Q: Can I make this dough in a bread machine?
A: While it’s possible, the results may not be the same as with traditional kneading and fermentation methods. If you do use a bread machine, select the dough setting and follow the manufacturer’s instructions.
Final Thoughts
This Sicilian bread is more than just a recipe; it’s a connection to a heritage, a celebration of simple ingredients transformed into something truly special. Don’t be intimidated by the long fermentation times – the hands-on effort is minimal, and the results are well worth the wait. I encourage you to try this recipe, experiment with different variations, and share your creations with loved ones. And don’t forget to let me know what you think! Buon appetito!