
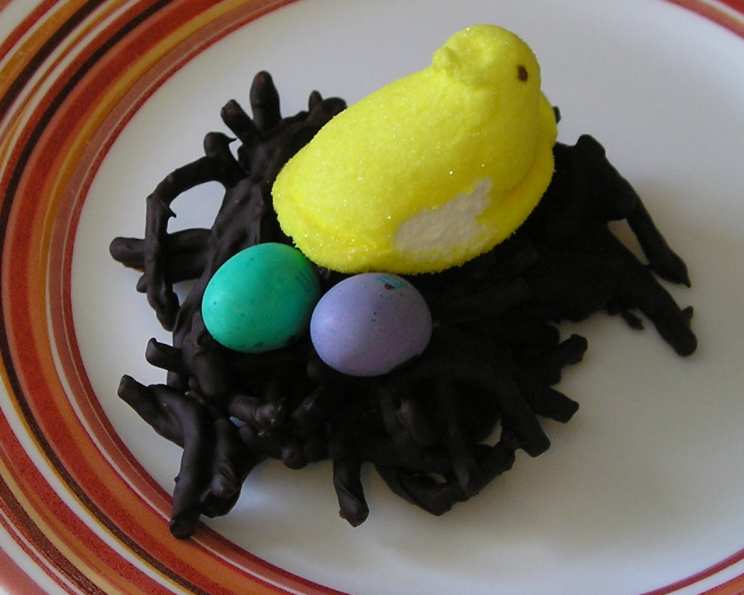
Simple Easter Nests: A Sweet & Crunchy Spring Treat
The scent of melting chocolate always takes me back to childhood Easters. My grandmother, a master of simple pleasures, would gather us grandkids around her ancient double boiler to craft these very nests. We’d snap chow mein noodles with gleeful abandon, stirring them into pools of warm, glossy chocolate. The best part? Decorating each nest with pastel-colored candies, transforming them into miniature edible landscapes. These weren’t just treats; they were edible memories, and I’m thrilled to share this cherished recipe with you.
Recipe Overview
- Prep Time: 15 minutes
- Cook Time: 0 minutes (plus chilling time)
- Total Time: 1 hour 15 minutes
- Servings: Varies
- Yield: Approximately 14 assorted size nests
- Dietary Type: Can be Gluten-Free (check noodle ingredients)
Ingredients
- 2 cups chocolate chips (semi-sweet or milk, your preference!)
- 2 tablespoons creamy peanut butter
- 4 cups chow mein noodles, broken into smaller pieces
- Cooking spray, for greasing
Equipment Needed
- Double boiler or heat-safe bowl and saucepan
- Spatula or spoon for stirring
- Muffin tins (large and/or small)
- Towel (for under the double boiler)
Instructions
- Prepare the Double Boiler: Fill the bottom portion of your double boiler with water and bring it to a gentle simmer over medium heat. If you don’t have a double boiler, you can use a heat-safe bowl set over a saucepan of simmering water, ensuring the bottom of the bowl doesn’t touch the water.
- Melt the Chocolate: Add the chocolate chips to the top portion of the double boiler (or your heat-safe bowl). As the chocolate begins to melt from the steam, start stirring gently. This will help ensure even melting and prevent scorching.
- Incorporate the Peanut Butter: Once the chocolate is partially melted, add the creamy peanut butter. Continue to stir until the chocolate and peanut butter are completely melted and form a smooth, creamy mixture. The peanut butter adds a delightful flavor and helps to keep the chocolate from becoming too brittle when it cools.
- Coat the Noodles: Remove the top portion of the double boiler (or bowl) from the heat and place it on a folded towel. This will insulate the bowl and help maintain the chocolate’s temperature. Add the broken chow mein noodles to the melted chocolate mixture. Gently stir until the noodles are completely coated in chocolate. Be careful not to crush the noodles too much during this process; you want them to maintain some of their shape.
- Prepare the Muffin Tins: While the chocolate-covered noodles are cooling slightly, prepare your muffin tins. Generously spray each muffin cup with cooking spray. I find that a mix of large and small muffin tins creates a nice variety of nest sizes, but you can use whatever you have on hand.
- Form the Nests: Spoon a generous amount of the chocolate-covered noodle mixture into each muffin cup. As you fill each cup, use the back of a spoon or your fingers (slightly dampened to prevent sticking) to create a well in the center of the nest. This well will hold your candy “eggs” later.
- Decorate and Chill: Once all the muffin cups are filled, decorate the nests with your favorite candies! Jelly beans, M&M’s, Peeps, or any other Easter-themed candies work well. Get creative and let your artistic side shine!
- Chill to Set: Place the muffin tins in the refrigerator and chill for at least 1 hour, or until the chocolate has completely hardened. This is crucial for the nests to hold their shape.
- Remove and Serve: Once the chocolate is firm, carefully remove the nests from the muffin tins. A thin spatula or knife can help loosen them if they are stuck.
- Garnish (Optional): For an extra touch of Easter flair, consider serving the nests on a bed of dyed green coconut. You can also package them in cellophane bags tied with ribbons to give as gifts.
Expert Tips & Tricks
- Chocolate Choice Matters: Using high-quality chocolate chips will significantly impact the flavor of your nests. Experiment with different types of chocolate to find your favorite.
- Noodle Prep is Key: Breaking the chow mein noodles into smaller pieces before adding them to the chocolate makes the nests easier to form and eat.
- Temperature Control: Be careful not to overheat the chocolate, as it can seize up and become grainy. If this happens, try adding a tablespoon of vegetable oil or shortening to the chocolate and stirring until smooth.
- Release with Ease: If you’re having trouble removing the nests from the muffin tins, try running a warm, damp cloth over the bottom of the tin for a few seconds to loosen the chocolate.
- Peanut Butter Alternative: If you have allergies, substitute sunflower seed butter, almond butter, or tahini.
- Noodle alternative: If you cannot find or do not like Chow Mein noodles, use pretzel sticks or broken up potato chips.
Serving & Storage Suggestions
These Easter nests are best served chilled or at room temperature. They can be stored in an airtight container at room temperature for up to 2 days, or in the refrigerator for up to a week. If you live in a very warm climate, refrigerating them is recommended to prevent the chocolate from melting. While freezing is not recommended (as it can affect the texture of the noodles), you can store in a freezer safe bag or container for up to 2 months. Thaw in the refrigerator and consume immediately.
Nutritional Information
(Estimated per serving, based on 14 servings and using semi-sweet chocolate chips)
| Nutrient | Amount per Serving | % Daily Value |
|---|---|---|
| Calories | 196 kcal | 10% |
| Total Fat | 12.3 g | 16% |
| Saturated Fat | 5.1 g | 26% |
| Cholesterol | 0 mg | 0% |
| Sodium | 69.6 mg | 3% |
| Total Carbohydrate | 23.2 g | 8% |
| Dietary Fiber | 2 g | 7% |
| Sugars | 13.3 g | N/A |
| Protein | 2.7 g | 5% |
Variations & Substitutions
- Gluten-Free Nests: Use gluten-free chow mein noodles or substitute with crushed gluten-free pretzels for a completely gluten-free treat.
- Dairy-Free Delight: Opt for dairy-free chocolate chips to make these nests dairy-free.
- Nut-Free Option: Skip the peanut butter and add a dash of vanilla extract for a subtle flavor enhancement.
- White Chocolate Wonders: Use white chocolate chips instead of milk or semi-sweet chocolate for a different flavor profile.
- Spiced Chocolate: Add a pinch of cinnamon or nutmeg to the melted chocolate for a warm, spiced flavor.
- Citrus Zest: Add orange or lemon zest to brighten the flavor
FAQs (Frequently Asked Questions)
Q: Can I use a microwave to melt the chocolate?
A: Yes, you can melt the chocolate in the microwave in 30-second intervals, stirring in between, to prevent burning.
Q: Do I have to use chow mein noodles?
A: No, you can substitute with pretzel sticks, crushed potato chips, or even rice cereal for a different texture and flavor.
Q: Can I make these nests ahead of time?
A: Absolutely! These nests can be made a day or two in advance and stored in an airtight container in the refrigerator.
Q: What if my chocolate seizes up when melting?
A: Try adding a teaspoon of vegetable oil or shortening and stirring vigorously until smooth.
Q: Can I use different types of candy to decorate the nests?
A: Of course! Get creative and use any candies you like. Mini marshmallows, sprinkles, and chocolate eggs all work well.
Final Thoughts
These Simple Easter Nests are more than just a recipe; they’re a chance to create lasting memories with loved ones. Gather your family, get creative with your decorations, and enjoy the process of making these sweet and crunchy treats. I encourage you to try this recipe and make it your own by experimenting with different variations and flavor combinations. Please share your feedback and let me know how your nests turned out – I can’t wait to hear about your Easter baking adventures!