
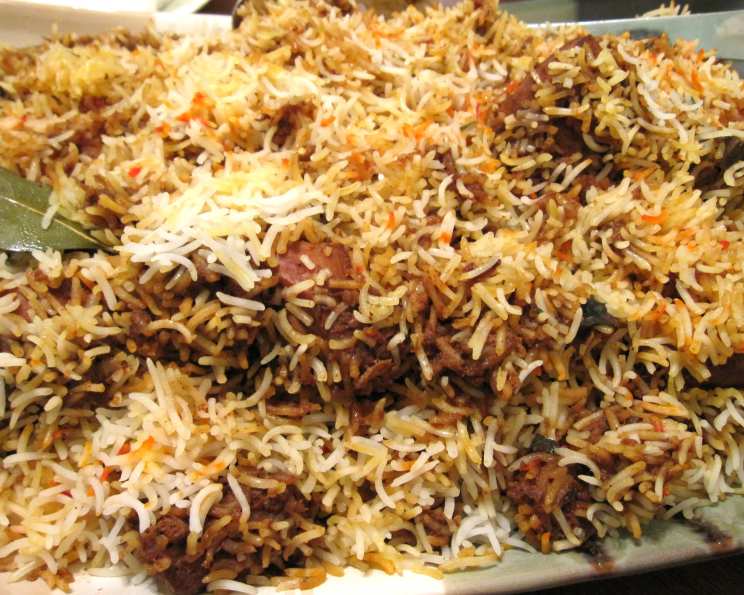
Sindhi Biryani: Aromatic Layers of Tradition
The memory is etched in my mind: the heady aroma of spices swirling through my auntie’s kitchen, a vibrant tapestry of colors emerging from a massive pot. It was always Sindhi Biryani – a dish that, for me, transcends mere sustenance. It represents family gatherings, boisterous laughter, and the comforting embrace of home. The slightly tart, deeply savory flavors, mingled with the fluffiness of perfectly cooked rice, are a direct line to my childhood, a culinary legacy passed down through generations. Even now, years later and continents away, a single whiff transports me back to that kitchen, to the warmth and love that only a home-cooked meal can provide.
Recipe Overview
- Prep Time: 30 minutes
- Cook Time: 1 hour
- Total Time: 1 hour 30 minutes
- Servings: 20
- Yield: 20 3/4 cup rice servings (plus potatoes and meat)
- Dietary Type: Varies based on meat selection
Ingredients
- 1 – 1 ½ kg mutton (or chicken)
- 5 cups basmati rice (soaked in water for at least 30 minutes)
- ½ kg potatoes (cut into large chunks, optional for chicken)
- 1 ½ cups oil
- 3 medium onions (sliced)
- 2 teaspoons garlic paste (Lehsan)
- 2 teaspoons ginger (Adrak)
- ½ kg tomatoes (chopped)
- 10-15 prunes (Aaloobukharay)
- 2 teaspoons salt
- 4 teaspoons red chili powder
- 10 cloves (Laung)
- 8 green cardamoms (Chhoti Ilaichi)
- 10 pieces black pepper (Kali Mirch)
- 2 teaspoons cumin seeds (Zeera)
- 2 cinnamon sticks (Dalchini)
- 4 black cardamom pods (Bari Ilaichi)
- 2 bay leaves (Tez Patta)
- 250 g yogurt
- 6 green chilies
- 2 tablespoons coriander leaves (Dhaniya)
- 2 tablespoons mint leaves (Podina)
For Boiling Rice:
- 3 teaspoons salt
- 3 bay leaves
- 3 cinnamon sticks
- 2 black cardamom pods
For Garnishing:
- 2 pinches orange food coloring
- 1 tablespoon mint leaf (chopped)
Equipment Needed
- Large pot with lid
- Large pan or wok
- Colander or strainer
- Mixing bowls
Instructions
- Begin by slicing the onions and frying them in the oil in a large pan or wok over medium heat until they turn a light brown color. Be patient and stir frequently to ensure even browning and prevent burning.
- Remove approximately ¼ of the fried onions and set aside for garnishing later.
- To the remaining fried onions in the pan, add the garlic paste (Lehsan), ginger (Adrak), chopped tomatoes, prunes (Aaloobukharay), salt, red chili powder, cloves (Laung), green cardamoms (Chhoti Ilaichi), black pepper (Kali Mirch), cumin seeds (Zeera), cinnamon sticks, black cardamom pods, and bay leaves.
- Fry this mixture, stirring frequently, until the tomatoes are completely tender and the water from the tomatoes has evaporated, leaving a thick masala. This step is crucial for developing the rich flavor base of the biryani.
- Add the mutton (or chicken), yogurt, and a little water (if needed to prevent sticking) to the masala. Cook on medium heat, stirring occasionally, until the mutton is tender and the water has evaporated. Ensure the mutton is cooked through, but not so much that it falls apart. If using chicken, cooking time will be significantly shorter.
- While the mutton is cooking, boil the potatoes (if using) in a separate pot until they are about half-cooked. They should be slightly firm to the touch. Drain the potatoes and set aside.
- Once the mutton is tender and the masala is thick, add the green chilies, coriander leaves (Dhaniya), mint leaves (Podina), and the half-boiled potatoes (if using) to the mutton mixture. Simmer for 2-3 minutes to allow the flavors to meld together. Your mutton curry is now complete.
- In a separate large pot, bring a generous amount of water to a boil. Add salt, bay leaves, cinnamon sticks, and black cardamom pods. This aromatically infused water will impart flavor to the rice as it cooks.
- Add the soaked basmati rice to the boiling water. Cook the rice until it is approximately half-done. It should still have a slight bite to it. The key here is to avoid overcooking the rice, as it will continue to cook during the layering process. Check frequently and drain the rice immediately once it reaches the desired consistency.
- Now, the layering begins! In a large pot (the same one you used to boil the rice is ideal), layer the mutton curry and the half-cooked rice in alternating layers. Start with a layer of the mutton curry, followed by a layer of the rice. Repeat this process until all the mutton curry and rice are used, ending with a layer of rice on top.
- Sprinkle the orange food coloring (dissolved in a little water), the reserved fried onions, and the chopped mint leaves evenly over the top layer of rice.
- Cover the pot tightly with a lid, ensuring that no steam can escape. You can use a clean kitchen towel or foil under the lid to create a tighter seal.
- Cook the biryani on very low heat (a simmer) until the rice is fully cooked and tender. This usually takes about 20-30 minutes. The goal is to steam the rice and allow the flavors to meld together.
- Before serving, gently mix the biryani to distribute the mutton and rice evenly. Be careful not to mash the rice.
Expert Tips & Tricks
- Soaking the Rice: Don’t skip the soaking step! Soaking the basmati rice for at least 30 minutes helps it cook evenly and prevents it from breaking.
- Browning the Onions: The color and flavor of the fried onions significantly impact the final taste of the biryani. Aim for a light golden brown, not burnt, for the best flavor.
- Don’t Overcook the Rice: Remember that the rice will continue to cook while steaming. Ensure that you drain it while it’s still slightly undercooked. This prevents a mushy final product. Adding a teaspoon of vinegar to the water while boiling the rice will also prevent it from sticking together.
- Saffron Infusion: For an even more luxurious flavor, infuse a few strands of saffron in warm milk and drizzle it over the biryani before steaming.
Serving & Storage Suggestions
Serve the Sindhi Biryani hot, accompanied by a cooling Raita (yogurt-based dip) and fresh salad. Leftovers can be stored in an airtight container in the refrigerator for up to 3 days. To reheat, add a splash of water or broth to prevent drying and microwave or heat gently on the stovetop. The biryani can also be frozen for longer storage (up to 2 months). Thaw completely before reheating.
Nutritional Information
Please note that these are estimated values and may vary based on specific ingredients and portion sizes.
| Nutrient | Amount per Serving | % Daily Value |
|---|---|---|
| Calories | 510 kcal | N/A |
| Total Fat | 27 g | 42% |
| Saturated Fat | 6 g | 32% |
| Cholesterol | 50 mg | 16% |
| Sodium | 640 mg | 26% |
| Total Carbohydrate | 48 g | 16% |
| Dietary Fiber | 4 g | 14% |
| Sugars | 5 g | N/A |
| Protein | 18 g | 36% |
Variations & Substitutions
- Vegetarian Sindhi Biryani: Substitute the mutton with mixed vegetables like carrots, peas, cauliflower, and paneer (Indian cheese).
- Chicken Sindhi Biryani: As the original notes, chicken can be used instead of mutton. Reduce the cooking time accordingly. You may also skip the potatoes if you prefer.
- Spice Level Adjustment: Adjust the amount of red chili powder according to your spice preference.
- Vegan Sindhi Biryani: Use a plant-based yogurt substitute and mixed vegetables instead of meat.
FAQs (Frequently Asked Questions)
Q: What makes Sindhi Biryani different from other biryanis?
A: Sindhi Biryani is known for its unique blend of spices, the use of prunes (Aaloobukharay), and the slightly tangy flavor profile.
Q: Can I make this ahead of time?
A: Yes, you can prepare the mutton curry a day in advance and store it in the refrigerator. Assemble and steam the biryani just before serving.
Q: How do I prevent the rice from sticking to the bottom of the pot?
A: Use a heavy-bottomed pot and ensure the heat is very low while steaming. You can also place a flat pan or griddle under the pot to distribute the heat evenly.
Q: Can I use brown rice instead of basmati rice?
A: While you can substitute with brown rice, the cooking time will need to be adjusted, and the texture will be different. Brown rice requires more water and a longer cooking time.
Q: What is Raita, and how do I make it?
A: Raita is a yogurt-based condiment. To make it, whisk plain yogurt with chopped cucumber, tomato, onion, coriander, and a pinch of cumin and salt.
Final Thoughts
Now it’s your turn to experience the magic of Sindhi Biryani. Don’t be intimidated by the ingredient list or the layering process – each step contributes to the symphony of flavors that make this dish so special. Gather your ingredients, put on some good music, and let the aromas transport you to a place of warmth and comfort. Whether you’re sharing it with family, friends, or simply treating yourself, I encourage you to embrace the process, savor the flavors, and create your own memories with this aromatic treasure. Don’t hesitate to adjust the recipe to your preferences, and please share your feedback and variations. Consider pairing it with a refreshing mint lemonade or a spicy mango lassi for the ultimate culinary experience. Happy cooking!