
Siopao: A Taste of Home, Pinoy Style
The aroma of freshly steamed buns always transports me back to my childhood in Manila. Every Sunday, after church, my Lola (grandmother) would treat us to siopao from our local bakery. The soft, pillowy dough, filled with a savory, slightly sweet meat filling, was the perfect comfort food. Those warm, delicious buns weren’t just a snack; they were a symbol of family, love, and the simple joys of life. Now, years later, I’ve learned to recreate that cherished memory in my own kitchen with this Pinoy-style siopao recipe.
Recipe Overview
- Prep Time: 2 hours
- Cook Time: 20 minutes
- Total Time: 2 hours 20 minutes
- Servings: 24
- Yield: 24 Siopao
- Dietary Type: Varies depending on filling
Ingredients
For the Chili Pepper Oil:
- 4 scallions
- 1 large fresh gingerroot, unpeeled
- 2 cups corn oil
- 1/3 cup dried chili pepper flakes
For the Soy Sauce and Chili Pepper Oil Dip:
- 1/2 cup soy sauce
- 3 tablespoons chili hot pepper oil
For the Siopao Filling:
- 1 lb pork or chicken, cut into small pea-sized pieces
- 3 tablespoons sesame oil
- 1 cup onion, chopped
- 2 garlic cloves, chopped finely
- 3 tablespoons soy sauce
- 3 tablespoons hoisin sauce
- 3 tablespoons oyster sauce
- 1/2 cup chicken stock
- 3 tablespoons sugar or brown sugar
- 1 tablespoon shaoxing wine or dry sherry
- 1/2 teaspoon black pepper, ground
- 1 tablespoon cornstarch, plus 1 teaspoon cornstarch
- 4 hard-boiled eggs, cut into small cubes (optional)
For the Basic Siopao Bun Dough (makes dough for 24 siopao):
- 1/4 ounce active dry yeast
- 1 1/4 cups tepid water
- 6 cups all-purpose flour
- 1/3 cup sugar
- 1/2 teaspoon salt
- 3 tablespoons lard, softened at room temperature (can substitute with vegetable shortening)
- 1/2 cup milk
- 2 teaspoons baking powder
Equipment Needed
- Wok or large pot
- Bowls
- Steamer (bamboo or metal)
- Cookie sheet
- Small, oblong pastry rolling pin (optional)
- Wax paper squares
Instructions
-
Prepare the Chili Pepper Oil (optional): This adds a delightful kick to your siopao. Cut each scallion into 3-inch lengths. Smash the ginger root with the side of a cleaver. Heat the corn oil in a wok over high heat. Add the scallions and ginger. Immediately turn off the heat. After 5 minutes, discard the scallions and ginger. Cool for 5 more minutes. Place the chili flakes in a bowl and ladle the cooled oil over them. Cover and leave overnight at room temperature. Strain the oil and bottle it. Store the chili flakes in a covered jar. Both will keep indefinitely if refrigerated.
-
Make the Soy Sauce – Chili Pepper Oil Dip (optional): This provides a flavorful dipping sauce. The soy sauce and chili pepper oil can be mixed in advance in the proportions listed, or left in separate containers to be mixed by your guests to their desired preference.
-
Prepare the Siopao Filling: Making the filling first allows it to cool, which makes it easier to handle when assembling the siopao. Heat the sesame oil in a wok at high heat. Using a spatula, coat the sides of the wok about halfway up with the hot oil. Sauté the garlic and onion in the sesame oil until fragrant and translucent.
-
Add the pork or chicken and stir-fry until lightly browned. In a small bowl, combine the soy sauce, hoisin sauce, oyster sauce, chicken stock, sugar (or brown sugar), shaoxing wine (or dry sherry), black pepper, and 1 tablespoon of cornstarch. Pour this mixture into the wok and stir-fry until it thickens. Taste and adjust seasonings, adding more soy sauce, hoisin sauce, oyster sauce, or sugar to taste.
-
Remove from heat and add the hard-boiled eggs (if using). Set aside to cool completely or refrigerate. It’s easier to handle when cold.
-
Prepare the Dough: Check to make sure the yeast is active by sprinkling it over ½ cup of the tepid water. Let stand until completely dissolved and the mixture begins to bubble (about 5 minutes). If the yeast doesn’t bubble, it’s no longer active, and you’ll need to start with fresh yeast.
-
In a large bowl, mix together the flour, sugar, salt, and baking powder, whisking to mix evenly. Add the softened lard, the dissolved yeast mixture, milk, and the remaining tepid water. Mix with a wooden spoon until a shaggy dough forms.
-
Turn the dough out onto a lightly floured surface and knead until it loses most of its stickiness and becomes smooth and elastic. This may take 8-10 minutes. If the dough is too sticky, add a little more flour, one tablespoon at a time.
-
Place the dough ball into an oiled ceramic bowl (or similar) and cover with a damp towel. Warm your oven on its lowest setting for 2 minutes, then turn off. Place the covered dough in the oven for 1 hour or until the dough has doubled in volume. The warm, draft-free environment helps the dough rise effectively.
-
Shape the Siopao: Punch down the dough to release the air and divide it in half. Reserve one half in the bowl and cover with the damp towel to prevent it from drying out. Roll the other half into a cylindrical dough stick about 1.5 to 2 inches in diameter.
-
Cut the dough stick into 12 equal portions and cover with a damp towel to prevent them from drying out. Roll and flatten one of the small dough balls in the palm of your hand, then place it on your prep surface and roll the disk out to 4 inches in diameter. Roll the edge thinner than the center. This will make it easier to pleat and close the bun.
-
Hold the dough disk in your hand and place a tablespoon of the cooled filling at the center. Begin pleating the edges of the dough at the top, forming a pocket for the filling with your other hand. Gently guide the filling into the pocket with your holding hand’s thumb if needed.
-
Continue pleating around to complete the pocket and close it off by twisting the pleats together. Pinch firmly to seal the bun.
-
Cut up 24 – 30, 2-inch square pieces of waxed paper prior to filling the dough balls with the siopao filling. Attach a wax paper square to the sealed end and place, paper side down, on an oiled cookie sheet, giving enough room for the dough to rise a little more. Cover the prepared buns with a lightly damp towel until ready to cook. Let the buns rise again for 20 – 45 minutes. This second rise is crucial for achieving a light and fluffy texture.
-
Continue the rolling and filling procedures until you have made the first 12 siopao buns. Repeat the procedures with the remaining ingredients.
-
Steam the Siopao: Soak your bamboo steamers for 10 minutes in warm water, pat dry, and lightly oil the bottom and sides before using to cook the Siopao. This prevents sticking. Place hot water in a wok to come within an inch of the bottom of the steamer. Boil the water in a controlled fashion so that the water is not trying to leap out of your wok or pot, but with plenty of hot steam. Keep a pot of water boiling off to the side in case you need to replenish the water in the wok.
-
Arrange the siopao, paper side down, in the oiled steamer basket, allowing room between each. I’ve cooked siopao in two sets of dual-stacked steamers with great results.
-
Set the steamer over the wok for 10 – 15 minutes. Resist the urge to lift the lid while steaming. It will stop the dough from rising properly. The siopao are done when the dough is puffed up and feels firm to the touch.
-
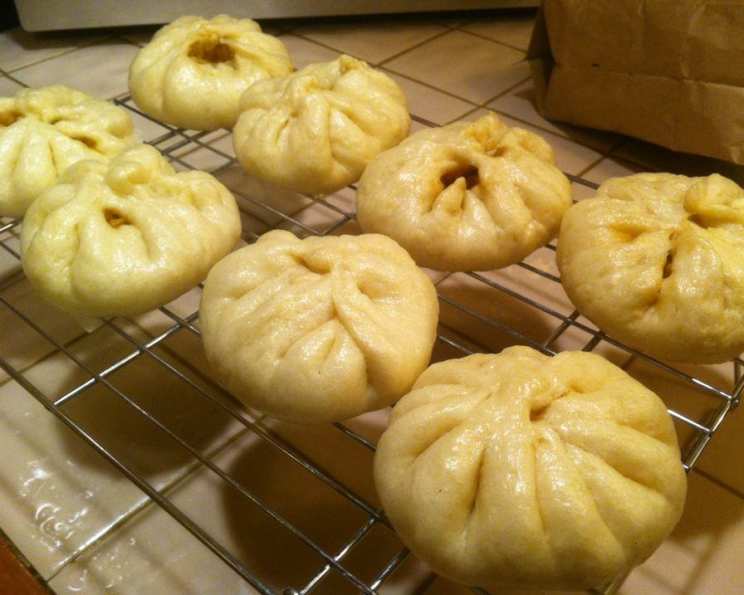
Remove the steamers and allow the siopao to cool a little before moving them to a wire cooling rack. Serve warm with the soy sauce and chili pepper oil dip.
Expert Tips & Tricks
- Dough Consistency: The dough should be soft and slightly sticky. If it’s too dry, add a little more water, one tablespoon at a time. If it’s too sticky, add a little more flour, one tablespoon at a time.
- Filling Variation: Experiment with different fillings! Asado (braised pork), bola-bola (meatballs), or even vegetarian fillings work well.
- Pleating Technique: Don’t worry if your pleats aren’t perfect. The most important thing is to seal the bun tightly to prevent the filling from leaking out during steaming.
- Proofing Time: The rising time for the dough will vary depending on the temperature of your kitchen. If it’s a cold day, it may take longer for the dough to double in volume.
- Restaurants and bakeries like to color code their siopao with small dots of food coloring to indicate the filling ingredients, i.e. chicken, pork, beef, etc. If you’re making a variety of fillings and flavors, decide upon your color code and when the siopao is formed and placed on a oiled cookie sheet during the prep phase, paint your small dot to indicate filling. My chicken filling usually has no dot, pork filling red.
Serving & Storage Suggestions
Serve the siopao warm, accompanied by the soy sauce and chili pepper oil dip. These are best enjoyed fresh out of the steamer.
Leftover siopao can be stored in an airtight container in the refrigerator for up to 3 days. For longer storage, freeze them in a single layer on a baking sheet, then transfer them to a freezer bag. Frozen siopao can be reheated by steaming them again for 5-10 minutes, or microwaving them for about a minute on high.
Nutritional Information
(Estimated, based on pork filling)
| Nutrient | Amount per Serving | % Daily Value |
|---|---|---|
| Calories | 402 kcal | N/A |
| Total Fat | 24.8 g | 38% |
| Saturated Fat | 4.3 g | 21% |
| Cholesterol | 49.4 mg | 16% |
| Sodium | 666.6 mg | 27% |
| Total Carbohydrate | 33.9 g | 11% |
| Dietary Fiber | 1.4 g | 5% |
| Sugars | 7.5 g | N/A |
| Protein | 11.1 g | 22% |
Variations & Substitutions
- Gluten-Free: Use a gluten-free flour blend for the dough. You may need to add a binder like xanthan gum to improve the texture.
- Vegan: Replace the pork or chicken with seasoned tofu or mushrooms. Use vegetable broth instead of chicken stock. Substitute lard with vegetable shortening and milk with non-dairy milk (soy, almond, or oat).
- Sweet Siopao: Add a sweet filling like red bean paste or custard.
- Asado Filling: Use traditional Filipino asado (braised pork) for the filling.
FAQs (Frequently Asked Questions)
Q: Can I make the dough ahead of time?
A: Yes, you can make the dough a day in advance. After the first rise, punch it down, wrap it tightly in plastic wrap, and refrigerate it. Let it come to room temperature before shaping the siopao.
Q: My siopao are not rising properly. What could be the reason?
A: Make sure your yeast is fresh and active. Also, ensure that the dough is kept in a warm place during the rising process. Avoid drafts, which can inhibit rising.
Q: How do I prevent the siopao from sticking to the steamer?
A: Use parchment paper squares under each bun, and lightly oil the steamer basket.
Q: Can I bake the siopao instead of steaming them?
A: While steaming is the traditional method, you can bake them at 350°F (175°C) for about 20-25 minutes. However, the texture will be slightly different, resulting in a drier bun.
Q: Can I use a different type of meat for the filling?
A: Absolutely! Beef, shrimp, or even a combination of meats can be used. Adjust the seasonings to complement the chosen meat.
Final Thoughts
Making siopao at home might seem daunting at first, but trust me, the results are well worth the effort. Each fluffy, savory bun is a little piece of Filipino heritage, a reminder of family traditions, and a delicious taste of home. So, gather your ingredients, put on some music, and get ready to create a batch of these delightful treats. Don’t be afraid to experiment with different fillings and flavors to make them your own. And most importantly, share your siopao with loved ones and enjoy the warmth and happiness they bring. Mabuhay!