
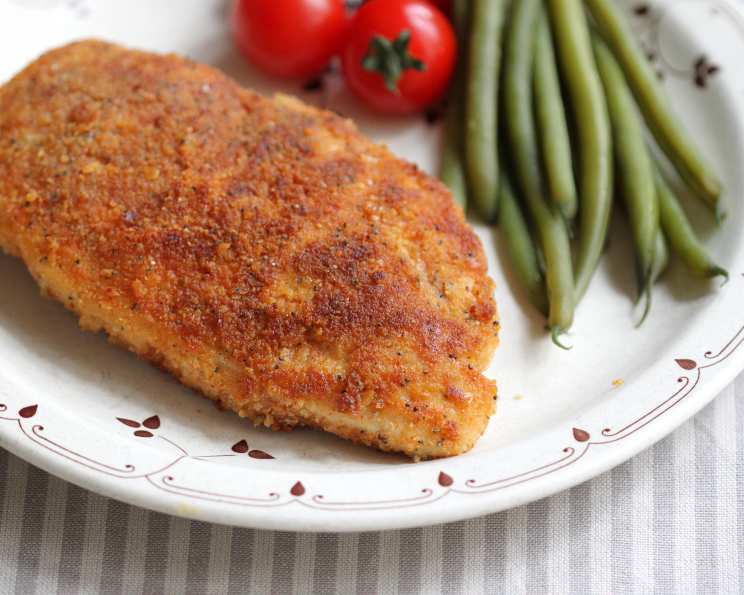
Skillet Fried Chicken Breast (Lower Fat)
There’s a particular sizzle that brings me right back to my grandmother’s kitchen. It wasn’t the deep fryer kind of sizzle, but the gentle, persuasive song of chicken browning beautifully in a skillet. She made the most amazing fried chicken, but what I loved was how she’d always make a smaller portion just for me, using boneless, skinless breasts. It wasn’t about sacrificing flavor, it was about making sure her little granddaughter had a healthier option she’d still adore. Now, I’ve taken that heartwarming memory and tweaked it to create this recipe – lighter, quicker, and just as delicious.
Recipe Overview
- Prep Time: 10 minutes
- Cook Time: 12 minutes
- Total Time: 22 minutes
- Servings: 6
- Yield: 6 chicken breasts
- Dietary Type: Lower Fat
Ingredients
- 6 boneless skinless chicken breasts (pounded only slightly, or to desired thickness)
- 30 saltine crackers (or use Ritz butter crackers)
- 2 tablespoons all-purpose flour
- 2 tablespoons dry potato flakes
- 2 teaspoons seasoning salt
- 1 teaspoon garlic powder
- 1⁄2 teaspoon paprika
- 1⁄2 teaspoon fresh ground black pepper (can use more)
- 1 pinch cayenne pepper (optional)
- 1 large egg
- 1⁄4 cup low-fat milk (can use full fat milk)
- 1⁄4 – 1⁄3 cup vegetable oil
Equipment Needed
- Food processor
- Resealable plastic bag
- Mixing bowl
- Whisk
- Heavy skillet
- Wax paper or plastic wrap
Instructions
-
Begin by preparing the cracker crumb mixture. Crush the saltine crackers in a food processor until coarse crumbs form. If you don’t have a food processor, you can place the crackers in a large resealable bag and crush them with a rolling pin or mallet.
-
Transfer the cracker crumbs to a resealable plastic bag. Add the all-purpose flour, dry potato flakes, seasoning salt, garlic powder, paprika, black pepper, and cayenne pepper (if using). Seal the bag tightly and shake vigorously to thoroughly combine all the ingredients. This ensures even distribution of the spices and a consistent flavor in the coating.
-
In a separate bowl, prepare the egg wash. Whisk the egg until it is light and frothy. Add the low-fat milk (or full fat milk, if preferred) and continue to whisk until the egg and milk are well combined and form a smooth mixture. Set aside.
-
Prepare the chicken breasts. Place each chicken breast between two pieces of wax paper or plastic wrap. Using a meat mallet or rolling pin, gently pound the chicken breasts to an even thickness – about ½ inch is ideal. Avoid pounding them too thin, as this can result in dry chicken. Slightly pounding tenderizes the chicken, but is mostly done to even the thickness of the breasts, thereby helping to cook them evenly.
-
Heat the vegetable oil in a heavy skillet over medium heat. You’ll want the oil hot enough to sizzle gently when a breadcrumb is dropped in, but not so hot that it burns the coating. Approximately ¼ cup to ⅓ cup of oil should be enough to coat the pan lightly, ensuring the chicken cooks evenly and develops a golden-brown crust.
-
Now, it’s time to coat the chicken breasts. Dip each chicken breast into the egg/milk mixture, ensuring it is fully coated. Allow any excess egg wash to drip off, which helps prevent the coating from becoming soggy.
-
Immediately transfer the coated chicken breast to the bag with the cracker crumb mixture. Seal the bag and shake well, ensuring the chicken is completely coated with the crumbs. Press the crumbs gently onto the chicken to help them adhere.
-
Carefully place the coated chicken breasts in the hot oil in the skillet, being careful not to overcrowd the pan. Cook the chicken breasts for about 12 minutes total, turning them frequently – about every 2-3 minutes – to ensure they cook evenly and develop a beautiful golden-brown crust on all sides.
-
To check for doneness, insert a meat thermometer into the thickest part of the chicken breast. The internal temperature should reach 165°F (74°C). Alternatively, you can cut into the thickest part of the chicken; the juices should run clear, and there should be no pink meat visible. If necessary, continue cooking for a few more minutes until fully cooked.
-
Once the chicken breasts are fully cooked, remove them from the skillet and place them on a wire rack lined with paper towels to drain any excess oil. This will help maintain the crispiness of the coating.
Expert Tips & Tricks
- Cracker Choice: Don’t be afraid to experiment with different types of crackers. Ritz crackers add a buttery richness, while other flavored crackers can add a unique twist.
- Spice It Up: Adjust the seasoning to your liking. Add a pinch of smoked paprika for a smoky flavor, or increase the amount of cayenne pepper for extra heat.
- Even Cooking: Ensure the chicken breasts are of uniform thickness for even cooking. Pound them gently to achieve this.
- Pan Temperature: Maintain a consistent medium heat to prevent the coating from burning before the chicken is cooked through.
- Resting is Key: After cooking, allow the chicken to rest for a few minutes on a wire rack before serving. This helps the juices redistribute, resulting in a more tender and flavorful chicken.
Serving & Storage Suggestions
Serve the skillet fried chicken breasts hot, straight from the skillet, for the best flavor and texture. They are delicious on their own or as part of a meal.
Serving Suggestions:
- Pair with a side of mashed potatoes and gravy for a classic comfort meal.
- Serve with a fresh garden salad and a light vinaigrette for a lighter option.
- Slice the chicken and use it to top a Caesar salad.
- Make chicken sandwiches with your favorite toppings.
Storage:
- Room Temperature: Do not leave cooked chicken at room temperature for more than 2 hours.
- Refrigerator: Store leftover chicken in an airtight container in the refrigerator for up to 3-4 days.
- Freezer: For longer storage, freeze the chicken in an airtight container for up to 2-3 months. Thaw it in the refrigerator overnight before reheating.
Reheating:
- Oven: Preheat the oven to 350°F (175°C). Place the chicken on a baking sheet and bake for 10-15 minutes, or until heated through.
- Skillet: Reheat the chicken in a skillet over medium heat, adding a little oil to prevent sticking. Cook for 5-7 minutes, turning occasionally, until heated through.
- Microwave: While not ideal for maintaining crispness, the microwave can be used for quick reheating. Heat in short intervals, checking frequently to avoid overcooking.
Nutritional Information
| Nutrient | Amount per Serving | % Daily Value |
|---|---|---|
| Calories | 310 kcal | – |
| Calories from Fat | 129 g | 42% |
| Total Fat | 14.4 g | 22% |
| Saturated Fat | 2.5 g | 12% |
| Cholesterol | 107 mg | 35% |
| Sodium | 322.4 mg | 13% |
| Total Carbohydrate | 15.2 g | 5% |
| Dietary Fiber | 0.7 g | 2% |
| Sugars | 1 g | – |
| Protein | 28.4 g | 56% |
Note: Nutritional information is an estimate and may vary based on specific ingredients and preparation methods.
Variations & Substitutions
- Gluten-Free: Use gluten-free crackers and gluten-free all-purpose flour for a gluten-free version.
- Spice Level: Adjust the amount of cayenne pepper to control the heat level. Omit it entirely for a milder flavor.
- Dairy-Free: Use a dairy-free milk alternative, such as almond milk or soy milk, instead of low-fat milk.
- Cracker Alternatives: Experiment with using crushed potato chips or cornflakes for a different texture and flavor.
- Herb Infusion: Add dried herbs, such as thyme or rosemary, to the cracker crumb mixture for an herbaceous twist.
FAQs (Frequently Asked Questions)
Q: Can I use bone-in chicken for this recipe?
A: While you can use bone-in chicken, it will require a longer cooking time and may not cook as evenly in a skillet. Boneless, skinless breasts are preferred for this recipe.
Q: What if I don’t have potato flakes?
A: If you don’t have potato flakes, you can simply omit them or substitute them with an equal amount of cornstarch. The potato flakes add a subtle flavor and help create a crispier crust, but the recipe will still work without them.
Q: How do I prevent the coating from falling off during cooking?
A: Ensuring the chicken is properly coated with both the egg wash and cracker crumbs, and that the oil is hot enough, is crucial to keeping the coating intact. Press the crumbs firmly onto the chicken.
Q: Can I bake this chicken instead of frying it in a skillet?
A: Yes, you can bake the chicken. Place the coated chicken breasts on a baking sheet lined with parchment paper and bake at 375°F (190°C) for 20-25 minutes, or until the internal temperature reaches 165°F (74°C). The texture will be different than skillet frying.
Q: How can I tell if the oil is hot enough for frying?
A: A reliable way to test the oil temperature is to drop a small breadcrumb into the skillet. If it sizzles gently and turns golden brown within a few seconds, the oil is ready. You can also use a kitchen thermometer to ensure the oil is at the correct temperature, around 325-350°F (160-175°C).
Final Thoughts
This skillet fried chicken breast recipe is a wonderful way to enjoy the comforting flavors of fried chicken without the extra fat and fuss of deep frying. It’s a dish that’s quick enough for a weeknight meal, yet delicious enough to impress guests. Don’t hesitate to experiment with different spices and seasonings to create your own signature version. I encourage you to try this recipe and share your feedback! Serve it alongside some creamy coleslaw and a slice of watermelon for the perfect summer meal. Enjoy!