
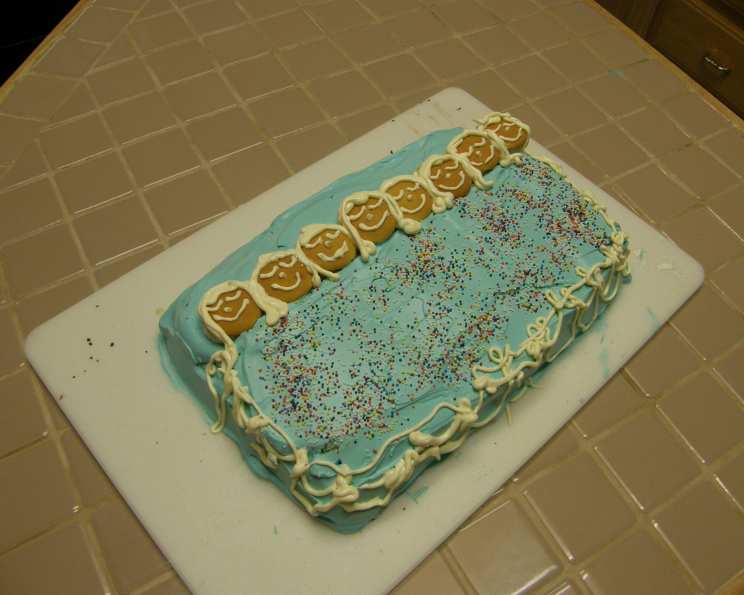
Slumber Party Cake: Sweet Dreams on a Platter
The scent of baking cake always transports me back to childhood. I remember countless sleepovers fueled by sugary snacks and whispered secrets. More than once, the ambitious baking project we attempted ended in a slightly burnt, ridiculously decorated mess, but the joy of creating (and devouring) something sweet together remains a vivid, happy memory. This Slumber Party Cake evokes that same spirit of fun and collaborative creativity, a delightful centerpiece for making memories.
Recipe Overview
- Prep Time: 1 hour
- Cook Time: 40 minutes
- Total Time: 1 hour 40 minutes
- Servings: 12-15
- Yields: 10 Slumbering Guests
- Dietary Type: Not specified, but contains gluten and dairy.
Ingredients
-
Cake Mix
- 1 (18 1/4 ounce) package white cake mix, prepared according to package directions (*see note)
- 3 eggs (*see note)
- 1 cup water (*see note)
- 1/3 cup oil (*see note)
-
Decorations
- 1/8 teaspoon green food coloring, plus
- 4 drops green food coloring
- 2 (16 ounce) containers cream cheese frosting
- 5 Hostess Twinkies (see Note)
- 5 large marshmallows, flattened to 1-1/2″ x 2-inch
- 5 vanilla wafers or 5 chocolate wafers
- Assorted decorative icing or cake decorating gel
- Decorative candy sprinkles
Note: The eggs, water, and oil are listed separately because many cake mix recipes require them. Your mix may have different requirements, so follow the instructions on your specific cake mix. Feel free to use your favorite brand of cream cheese frosting, or even homemade!
Equipment Needed
- 9″ x 13″ baking pan
- Nonstick cooking spray
- Small bowl
- Medium bowl
- Knife
- Spatula or frosting knife
- Toothpicks (optional)
Instructions
- Preheat your oven to 350°F (175°C). Coat a 9″ x 13″ baking pan generously with nonstick cooking spray. This will ensure your cake releases easily.
- Important Note: Prepare the white cake mix according to the package directions. I’ve listed common ingredients here (the eggs, water, and oil), but follow the exact instructions on your cake mix. Ingredient ratios can differ between brands, and we want a perfectly baked cake!
- In a small bowl, place 1 cup of the prepared cake batter. Add 1/8 teaspoon of green food coloring to this smaller portion. Mix thoroughly until the batter is uniformly colored.
- Pour the remaining, uncolored cake batter into the prepared baking pan.
- Drop spoonfuls of the green-tinted batter randomly over the surface of the plain batter in the pan.
- Use a knife to swirl the green batter into the plain batter, creating a marbled effect. Be careful not to over-mix; a few defined swirls are more visually appealing than a homogenous green-tinged cake.
- Bake the cake according to the package directions. Baking times will vary, but a good starting point is around 30-40 minutes. To check for doneness, insert a toothpick into the center of the cake. If it comes out clean or with a few moist crumbs attached, the cake is done. If there’s wet batter, bake for a few more minutes and check again.
- Once baked, remove the cake from the oven and let it cool completely in the pan. This is crucial! Trying to frost a warm cake will result in a melty, messy disaster.
- After the cake is completely cool, carefully invert it onto a serving platter. If it sticks, gently run a knife around the edges to loosen it.
- In a medium bowl, combine one container of cream cheese frosting with the remaining 4 drops of green food coloring. Mix well until you achieve an even shade of green. The shade will be slightly different than the first green batter.
- Lightly frost the entire cake with the lighter green frosting. This serves as a base for the “blanket.”
- With the remaining lighter green frosting, heavily frost the top one-third of the cake lengthwise. This area will be partially covered by our “slumbering guests.”
- Cut each Twinkie in half lengthwise.
- Place the top halves of the Twinkies on the lightly frosted cake section, slightly overlapping the heavily frosted area. These are our sleeping “bodies” under the blanket.
- Frost the exposed Twinkies and the bottom two-thirds and sides of the cake with the remaining container of cream cheese frosting, creating the “blanket” effect. Make it look like the blanket is covering the bodies.
- Flatten the marshmallows slightly. You can do this with a rolling pin or simply by pressing them down with your hand. The goal is to create a pillow shape, roughly 1-1/2″ x 2 inches.
- Place a flattened marshmallow above each Twinkie, on the green frosted part of the cake, to serve as a “pillow.”
- Decorate the vanilla wafers or chocolate wafers with decorative icing or cake decorating gel to create faces (hair, eyes, mouths).
- Attach the decorated wafers to the marshmallow pillows with a dab of leftover frosting.
- Using more decorative icing, create a ruffle around the edges of the “blanket.”
- Sprinkle the “blanket” generously with decorative candy sprinkles.
- Serve immediately and enjoy!
(Optional): If making ahead of time, insert toothpicks in the corners of the cake and lightly cover with plastic wrap until ready to serve. This will help prevent the frosting from sticking to the plastic wrap.
Note: Feel free to adjust the number of Twinkies based on how many “slumbering guests” you want on your cake. You can easily add more or fewer depending on your needs.
Expert Tips & Tricks
- For a more vibrant green color, use gel food coloring instead of liquid. Gel colors are more concentrated, so you’ll need less to achieve the desired shade.
- If you’re short on time, consider using store-bought sugar cookies instead of wafers for the faces. Just decorate them and attach them to the marshmallows.
- To prevent the frosting from becoming too soft while you decorate, chill the cake in the refrigerator for about 15-20 minutes after frosting the base. This will firm up the frosting and make it easier to work with.
- For a fun variation, use different colors of food coloring to create a rainbow-colored “blanket.”
- If you don’t have cream cheese frosting on hand, you can substitute with vanilla buttercream frosting.
- Use piping tips to create more elaborate designs on the frosting, such as stars, swirls, or flowers.
- If you want to add some “dreams” to the cake, draw a speech bubble over each Twinkie and decorate with piped frosting.
Serving & Storage Suggestions
Serve the Slumber Party Cake chilled or at room temperature. It’s best enjoyed on the day it’s made, but leftovers can be stored in an airtight container in the refrigerator for up to 3 days. The cake may become slightly drier over time, but it will still be delicious.
To prevent the cake from drying out, you can also wrap individual slices in plastic wrap before storing them in the refrigerator.
Freezing is not recommended, as the frosting and Twinkies may change texture upon thawing.
Nutritional Information
| Nutrient | Amount per Serving | % Daily Value |
|---|---|---|
| Calories | 591.8 kcal | N/A |
| Calories from Fat | 230 g | 39% |
| Total Fat | 25.6 g | 39% |
| Saturated Fat | 5.6 g | 27% |
| Cholesterol | 52.9 mg | 17% |
| Sodium | 460.8 mg | 19% |
| Total Carbohydrate | 89 g | 29% |
| Dietary Fiber | 0.4 g | 1% |
| Sugars | 73.5 g | 294% |
| Protein | 3.8 g | 7% |
Note: These values are estimates and may vary depending on the specific ingredients used.
Variations & Substitutions
- Chocolate Lover’s Dream: Use a chocolate cake mix instead of white, and chocolate frosting instead of cream cheese.
- Tropical Getaway: Add shredded coconut to the cake batter and frosting, and decorate with pineapple chunks and maraschino cherries.
- Birthday Celebration: Use a confetti cake mix and decorate with colorful sprinkles and candles.
- Vegan Version: Use a vegan cake mix and frosting, and substitute the Twinkies with vegan cream-filled sponge cakes. Find vegan marshmallows and wafers as well.
- Gluten-Free Option: Use a gluten-free cake mix and ensure all other ingredients are also gluten-free.
FAQs (Frequently Asked Questions)
Q: Can I use a different size baking pan?
A: While a 9×13 inch pan is ideal for achieving the right proportions, you can use a slightly smaller or larger pan. Adjust the baking time accordingly, checking for doneness frequently.
Q: Can I make the cake ahead of time?
A: Yes, you can bake the cake a day in advance and store it covered at room temperature. Frost and decorate it on the day you plan to serve it for the best results.
Q: My frosting is too thin. What can I do?
A: Add powdered sugar, one tablespoon at a time, until the frosting reaches your desired consistency.
Q: Can I use homemade frosting instead of store-bought?
A: Absolutely! Homemade frosting can add an extra touch of deliciousness. Just make sure it’s firm enough to hold its shape when decorating.
Q: The faces keep falling off the marshmallows. How can I fix this?
A: Ensure the frosting you’re using to attach the faces is thick enough. You can also try chilling the faces and marshmallows in the refrigerator for a few minutes before attaching them.
Final Thoughts
This Slumber Party Cake is more than just a dessert; it’s a celebration of friendship, creativity, and sweet memories. Gather your friends or family, get creative with the decorations, and enjoy the process of making this delightful cake together. Don’t be afraid to experiment with different flavors and decorations to make it your own. I hope this cake brings as much joy to your gatherings as it has to mine. Don’t forget to share your creations and ideas!