
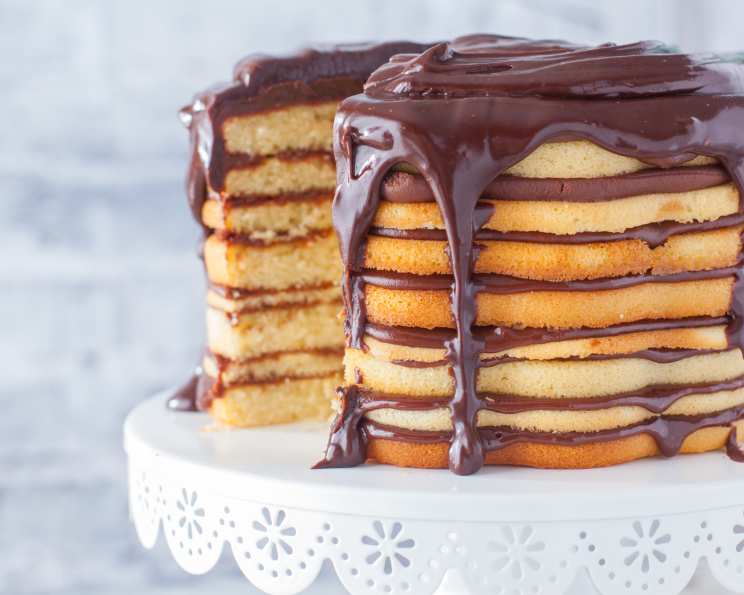
Smith Island Ten-Layer Cake: A Slice of Maryland Tradition
My grandmother, a true Maryland Eastern Shore woman, always said the best things in life are worth the effort. And nothing embodies that sentiment more than a Smith Island Cake. I remember watching her in her tiny kitchen, a flurry of flour and sugar, as she meticulously baked each thin layer, the aroma of chocolate filling the air. It wasn’t just a cake; it was a labor of love, a symbol of family and tradition that she proudly shared with everyone who walked through her door. Every bite of that incredibly thin layer of cake with chocolate frosting was like a warm hug from her.
Recipe Overview
- Prep Time: 45 minutes
- Cook Time: 1 hour 20 minutes (approximately, depending on layer thickness)
- Total Time: 2 hours 5 minutes (plus cooling time)
- Servings: 16
- Yield: 1 cake
- Dietary Type: Not specified
Ingredients
For the Cake:
- 2 cups sugar
- 1 cup unsalted butter, cut into chunks
- 5 eggs
- 3 cups flour
- 1/4 teaspoon salt
- 1 teaspoon baking powder
- 1 cup evaporated milk
- 2 teaspoons vanilla
- 1/2 cup water
For the Chocolate Icing:
- 2 cups sugar
- 1 cup evaporated milk
- 5 ounces unsweetened chocolate
- 1/2 cup unsalted butter
- 1/2 – 1 teaspoon vanilla
Equipment Needed
- Ten 9-inch cake pans
- Mixer (stand or hand mixer)
- Spatula
- Medium saucepan
Instructions
-
Preheat your oven to 350°F (175°C). Lightly grease ten 9-inch cake pans. This is crucial for easy release of the delicate layers.
-
Cream together the sugar and butter in a large mixing bowl until light and fluffy. This step is vital for creating a tender cake. Ensure the butter is at room temperature for optimal creaming.
-
Add the eggs one at a time, beating well after each addition until the mixture is smooth. Incorporating each egg fully will help emulsify the batter and prevent curdling.
-
In a separate bowl, sift together the flour, salt, and baking powder. Sifting ensures that the dry ingredients are evenly distributed and prevents lumps, resulting in a lighter cake.
-
Gradually mix the dry ingredients into the egg mixture, one cup at a time. Mix until just combined. Be careful not to overmix, as this can develop the gluten in the flour and lead to a tough cake.
-
With the mixer running on low speed, slowly pour in the evaporated milk, then the vanilla, and finally the water. Mix just until uniform. Avoid overmixing; a smooth, just-combined batter is what you’re aiming for.
-
Divide the batter evenly among the ten prepared cake pans. Use approximately three serving spoonfuls of batter per pan, and use the back of a spoon to spread the batter evenly across the bottom of each pan. The layers should be very thin.
-
Bake three layers at a time on the middle rack of the preheated oven for approximately 8 minutes. Baking time can vary depending on your oven and the thickness of the layers.
-
Check for doneness by holding a baked layer near your ear; if you don’t hear it sizzle, it’s done. The edges should be lightly golden, and the cake should spring back slightly when touched.
-
Begin making the icing when the first cake layers go into the oven. This ensures the icing is ready when the layers are cooled and ready for assembly.
For the Icing:
-
In a medium saucepan, combine the sugar and evaporated milk.
-
Cook and stir over medium-low heat until warm.
-
Add the unsweetened chocolate and cook, stirring constantly, until the chocolate is melted and smooth.
-
Add the butter and melt, stirring until fully incorporated.
-
Cook over medium heat at a slow boil for 10 to 15 minutes, stirring occasionally to prevent sticking and burning.
-
Remove from heat and add the vanilla. The icing will be thin at first but will thicken as it cools.
Cake Assembly:
-
Let the baked cake layers cool for a couple of minutes in the pans. This allows them to firm up slightly, making them easier to handle.
-
Run a spatula around the edge of each pan to loosen the layer. Gently ease the layer out of the pan. Don’t worry if the layers tear; the icing will cover any imperfections.
-
Place one cake layer on a serving plate.
-
Spread between two and three serving spoonfuls of icing evenly over the layer.
-
Repeat with the remaining layers, stacking them and icing between each.
-
Cover the top and sides of the assembled cake with the remaining icing.
-
Push any icing that runs onto the plate back onto the cake for a rustic, traditional look.
Expert Tips & Tricks
- Even Layer Thickness: For consistent baking and a visually appealing cake, try using a kitchen scale to measure out an equal amount of batter for each pan.
- Parchment Paper: Line the bottom of each cake pan with a circle of parchment paper for extra insurance against sticking.
- Icing Consistency: If the icing becomes too thick while assembling the cake, gently reheat it over low heat, adding a tablespoon of milk at a time until you reach the desired consistency.
- Make-Ahead Option: The cake layers can be baked a day ahead of time and stored in an airtight container at room temperature. The icing can also be made ahead and stored in the refrigerator; simply reheat before using.
- Flavor Variation: Infuse the evaporated milk for the icing with cinnamon sticks or vanilla beans while heating for an added layer of flavor.
Serving & Storage Suggestions
Serve the Smith Island Cake at room temperature for the best flavor and texture. The cake is traditionally served in thin slices to showcase the beautiful layers.
Store leftover cake in an airtight container at room temperature for up to 3 days or in the refrigerator for up to 5 days. For longer storage, freeze the cake, well-wrapped, for up to 2 months. Thaw overnight in the refrigerator before serving.
Nutritional Information
Note: Nutritional information is an estimate and may vary based on specific ingredients and portion sizes.
| Nutrient | Amount per Serving | % Daily Value |
|---|---|---|
| Calories | 475 kcal | 24% |
| Total Fat | 22g | 34% |
| Saturated Fat | 14g | 70% |
| Cholesterol | 95mg | 32% |
| Sodium | 90mg | 4% |
| Total Carbohydrate | 65g | 22% |
| Dietary Fiber | 1g | 4% |
| Sugars | 40g | N/A |
| Protein | 5g | 10% |
Variations & Substitutions
- Other Frosting Flavors: While chocolate is traditional, feel free to experiment with other frostings like vanilla, caramel, or even fruit-flavored frostings like strawberry or peach.
- Cake Flavor Variations: Add a teaspoon of lemon or orange zest to the cake batter for a citrusy twist.
- Gluten-Free Option: Substitute the all-purpose flour with a gluten-free flour blend for a gluten-free version. Be sure to add a binder like xanthan gum to help with the structure.
- Dairy-Free Option: Use dairy-free butter and plant-based milk alternatives such as almond or oat milk in both the cake and the icing.
FAQs (Frequently Asked Questions)
Q: Why are the cake layers so thin?
A: The thin layers are a hallmark of Smith Island Cake. They allow for a higher frosting-to-cake ratio, which is a key characteristic of this dessert.
Q: How do I prevent the cake layers from sticking to the pan?
A: Thoroughly greasing the pans and even lining them with parchment paper will prevent sticking.
Q: Can I use different sized cake pans?
A: While 9-inch pans are traditional, you can use smaller pans. You’ll need to adjust the baking time accordingly, and you may end up with more layers.
Q: My icing is too thin. How can I thicken it?
A: Continue cooking the icing over low heat, stirring constantly, until it reaches your desired consistency. You can also add a small amount of cornstarch mixed with cold water (slurry) to thicken it quickly.
Q: How do I keep the layers from breaking when removing them from the pan?
A: Let the layers cool slightly in the pan before removing them. Use a thin spatula to loosen the edges gently, and be patient.
Final Thoughts
The Smith Island Cake may seem daunting with its numerous layers, but the end result is well worth the effort. This cake is more than just a dessert; it’s a piece of Maryland history, a symbol of tradition, and a delicious treat to be shared with loved ones. I encourage you to gather your ingredients, embrace the process, and create your own version of this iconic cake. Don’t be afraid to put your own spin on it. And please, share your photos and stories with me; I’d love to see what you create! Pair it with a cup of strong black coffee or a scoop of vanilla ice cream for the perfect ending to any meal.