
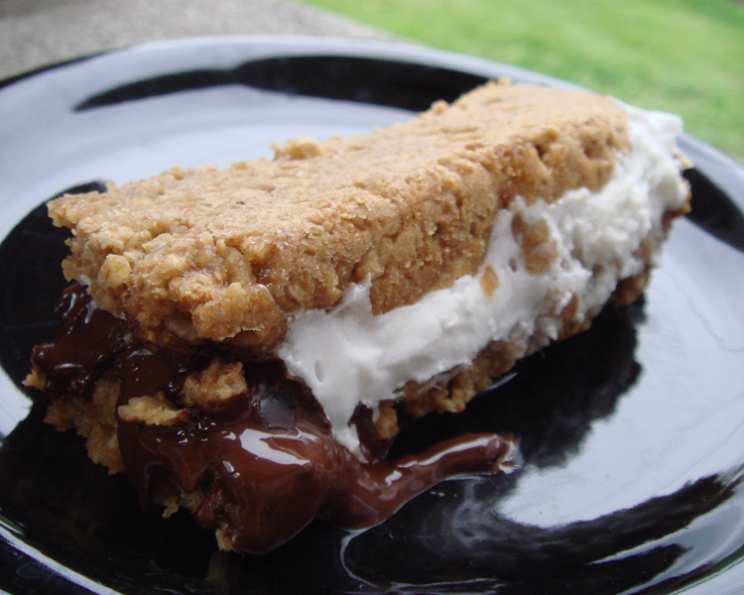
S’more Granola Bars: A Taste of Campfire in Every Bite
My earliest memories are filled with the sticky sweetness of summer nights spent huddled around a crackling campfire. As the embers glowed, we’d meticulously toast marshmallows to golden perfection, sandwiching them between squares of chocolate and crisp graham crackers. The resulting s’more was always a messy, joyful explosion of flavors. These S’more Granola Bars capture that same nostalgic magic, but in a portable, lunchbox-friendly form, perfect for reliving those memories any time of year. They’re a little bit of summer, a little bit of childhood, all wrapped up in a chewy, delicious bar.
Recipe Overview
- Prep Time: 30 minutes
- Cook Time: 15-20 minutes
- Total Time: 45-50 minutes
- Yields: 9 bars
- Dietary Type: Vegetarian
Ingredients
- 6 tablespoons unsalted butter
- 1/4 cup firmly packed light brown sugar
- 6 tablespoons golden syrup, maple syrup or dark corn syrup
- 2 1/4 cups rolled oats
- 1/2 cup unbleached flour
- 1/2 teaspoon salt
- 1 cup graham cracker crumbs
- 1 cup semi-sweet chocolate chips
- 1 1/4 cups mini marshmallows
Equipment Needed
- Medium-sized saucepan
- 9×9-inch baking pan
- Lightly greased cooking spray
- Mixing spoon
- Measuring cups and spoons
Instructions
- Begin by preparing the base. In a medium-sized saucepan set over medium heat, combine the butter, brown sugar, and syrup (golden, maple, or dark corn syrup, depending on your preference).
- Melt and stir the mixture continuously until the sugar has completely dissolved. This is crucial for a smooth and evenly textured base. Don’t let it burn!
- Remove the saucepan from the heat and add the rolled oats, flour, salt, and graham cracker crumbs.
- Stir thoroughly until all the dry ingredients are evenly coated with the wet mixture. Make sure there are no dry pockets of flour. This is your granola bar base.
- Lightly grease a 9×9-inch pan with cooking spray. This prevents the bars from sticking and makes them easy to remove after baking.
- Press slightly more than half of the oat mixture into the prepared pan. Use your fingers or the back of a spoon to firmly and evenly press the mixture into the bottom of the pan, creating a solid base.
- Let the pressed base cool completely. This step is important because it helps the base firm up and prevents the chocolate chips from melting completely when they’re added. You can speed this up by placing it in the refrigerator for about 15 minutes.
- Preheat your oven to 350°F (175°C). Ensure your oven is properly preheated for even baking.
- Once the base is cooled and the oven is preheated, sprinkle the chocolate chips evenly over the top of the granola base.
- Spread the mini marshmallows evenly over the chocolate chips. Try to cover the entire surface for that classic s’more experience.
- Crumble the remaining granola mixture over the marshmallows. This will be the top layer of your granola bars. Press lightly to secure it.
- Bake the bars for 15-20 minutes. The bars are done when the top is golden brown and the marshmallows are lightly toasted.
- Remove the pan from the oven and let the bars rest for 20 minutes. This resting period is crucial as it allows the bars to set properly and prevents them from crumbling when cut.
- While the bars are still slightly warm, cut them into squares. Use a sharp knife for clean cuts.
Expert Tips & Tricks
- Syrup Selection: The type of syrup you use will slightly affect the flavor. Golden syrup will provide a rich, caramel-like flavor, while maple syrup will add a distinct, woodsy sweetness. Dark corn syrup will give a more neutral sweetness.
- Even Pressing: For uniformly thick bars, use the bottom of a measuring cup or a piece of parchment paper to press the base and the topping firmly into the pan.
- Marshmallow Toasting: For extra toasted marshmallows, broil the bars for the last minute of baking, but watch them closely to prevent burning!
- Cooling Completely: Resist the urge to cut into the bars before they’ve cooled slightly. Allowing them to set will prevent them from crumbling.
- Sharp Knife: Use a large, sharp knife to cut the bars cleanly. You can also run the knife under hot water between cuts for extra-clean edges.
- Grease the Pan Well: Make sure the pan is well-greased. You can also line the pan with parchment paper, leaving an overhang on the sides, to easily lift the bars out after baking.
- Add-ins: Feel free to experiment with other add-ins! Consider adding chopped nuts, dried fruit, or even a swirl of peanut butter for a different flavor profile.
Serving & Storage Suggestions
Serve these S’more Granola Bars as a sweet snack, a lunchbox treat, or a hiking energy boost. They are delicious on their own or paired with a glass of cold milk or a cup of hot coffee.
To store, cut the bars into individual squares and wrap them tightly in plastic wrap or store them in an airtight container. They will keep at room temperature for up to 3 days, in the refrigerator for up to a week, or in the freezer for up to a month. If freezing, wrap each bar individually to prevent freezer burn.
To reheat, if desired, you can microwave them for a few seconds or let them come to room temperature. Freezing can affect the texture slightly, but they’ll still be delicious!
Nutritional Information
Estimated values, may vary based on specific ingredients used.
| Nutrient | Amount per Serving | % Daily Value |
|---|---|---|
| Calories | 385 kcal | 19% |
| Total Fat | 16g | 25% |
| Saturated Fat | 9g | 45% |
| Cholesterol | 20mg | 7% |
| Sodium | 195mg | 8% |
| Total Carbohydrate | 61g | 20% |
| Dietary Fiber | 4g | 15% |
| Sugars | 27g | 54% |
| Protein | 5g | 10% |
Variations & Substitutions
- Gluten-Free: Use gluten-free certified rolled oats and a gluten-free flour blend in place of the unbleached flour.
- Vegan: Substitute the butter with vegan butter, ensure your chocolate chips are dairy-free, and use maple or dark corn syrup instead of golden syrup (as some golden syrups may not be vegan).
- Nutty S’mores: Add 1/2 cup of chopped pecans or walnuts to the oat mixture for a nutty crunch.
- Peanut Butter Swirl: Drizzle peanut butter over the marshmallow layer before adding the remaining oat mixture.
- Dark Chocolate Delight: Use dark chocolate chips instead of semi-sweet for a richer, more intense chocolate flavor.
- S’mores Trail Mix Bars: Add 1/2 cup of your favorite trail mix ingredients, such as dried cranberries, sunflower seeds, or chopped almonds.
FAQs (Frequently Asked Questions)
Q: Can I use quick-cooking oats instead of rolled oats?
A: While you can use quick-cooking oats, the texture of the bars will be different. Rolled oats provide a chewier, more substantial texture.
Q: My bars are too crumbly. What did I do wrong?
A: This is likely due to not pressing the base firmly enough or not allowing the bars to cool completely before cutting. Ensure you press the mixture firmly into the pan and allow the bars to set for at least 20 minutes.
Q: Can I make these bars ahead of time?
A: Absolutely! These bars are great for making ahead of time. They can be stored at room temperature for a few days or in the refrigerator for up to a week.
Q: My marshmallows burned during baking. What can I do to prevent this?
A: If your marshmallows are browning too quickly, cover the pan loosely with aluminum foil during the last few minutes of baking.
Q: Can I add a layer of graham crackers in the middle for extra graham cracker flavor?
A: Yes, you can layer graham crackers between the chocolate chips and marshmallows for an even more authentic s’mores taste. Just be sure to break the crackers into smaller pieces so they fit well.
Final Thoughts
These S’more Granola Bars are a guaranteed crowd-pleaser, perfect for bringing a touch of campfire nostalgia into your everyday life. Whether you’re packing them for a picnic, a hike, or simply enjoying a sweet treat at home, they are sure to bring a smile to your face. So, gather your ingredients, preheat your oven, and get ready to create a batch of these irresistible bars. Don’t be afraid to experiment with different variations and make them your own. And please, share your creations and feedback – I’d love to hear how they turned out! Perhaps, serve them with a scoop of vanilla ice cream for an extra indulgent experience!