
S’more Thumbprint Cookies: A Taste of Campfire Nostalgia
I can almost smell the woodsmoke now. Summers at my family’s cabin always involved a nightly ritual: gathering around the crackling fire, roasting marshmallows until they were golden-brown and gooey, and assembling the perfect s’more. The combination of melty chocolate, sweet marshmallow, and crisp graham cracker was pure magic. These S’more Thumbprint Cookies capture that same comforting essence in a bite-sized treat, bringing back cherished memories with every bite.
Recipe Overview
- Prep Time: 20 minutes
- Cook Time: 12-15 minutes
- Total Time: 35 minutes
- Yields: 5 dozen
- Serves: 1
- Dietary Type: Not specified
Ingredients
- 1 cup butter, softened
- 1/2 cup packed brown sugar
- 1 egg
- 1 teaspoon vanilla
- 1 1/3 cups flour
- 1 cup graham cracker crumbs
- 1/8 teaspoon salt
- 1 1/4 cups mini marshmallows, about 120
- 6 1/4 ounces milk chocolate candy bars
Equipment Needed
- Large bowl
- Electric mixer
- Cookie sheets
- Knife
Instructions
-
Begin by preheating your oven to 325°F (160°C). This lower temperature helps prevent the cookies from spreading too much and ensures even baking.
-
In a large bowl, cream together the softened butter and packed brown sugar using an electric mixer until the mixture is light and fluffy. This process, called creaming, incorporates air into the butter and sugar, which contributes to the cookies’ tender texture.
-
Add the egg and vanilla to the creamed mixture. Beat until everything is thoroughly blended. Make sure to scrape down the sides of the bowl to ensure all ingredients are fully incorporated.
-
In a separate bowl, whisk together the flour, graham cracker crumbs, and salt. This ensures that the salt is evenly distributed throughout the dry ingredients, preventing pockets of saltiness in the finished cookies.
-
Gradually add the dry ingredients to the wet ingredients, beating on low speed for about 1 minute, or until a stiff dough forms. Be careful not to overmix the dough, as this can develop the gluten in the flour and result in tough cookies.
-
Shape the dough into small balls using a heaping teaspoonful of dough for each. You should aim for approximately 60 balls. Roll them gently between your palms to form a uniform shape.
-
Place the dough balls onto ungreased cookie sheets, spacing them about 2 inches apart. This allows for adequate air circulation and prevents the cookies from sticking together as they bake.
-
Using your thumb, gently make an indention in the center of each cookie. These indentions will hold the marshmallows and chocolate later.
-
Bake the cookies for 10-12 minutes, or until they are firm and the edges are just beginning to brown. Keep a close eye on them during the last few minutes of baking to prevent them from burning.
-
Remove the cookies from the oven and lightly press 2 mini marshmallows into the center of each cookie’s indention.
-
Return the cookies to the oven and bake for an additional 2-3 minutes, or until the marshmallows are slightly softened.
-
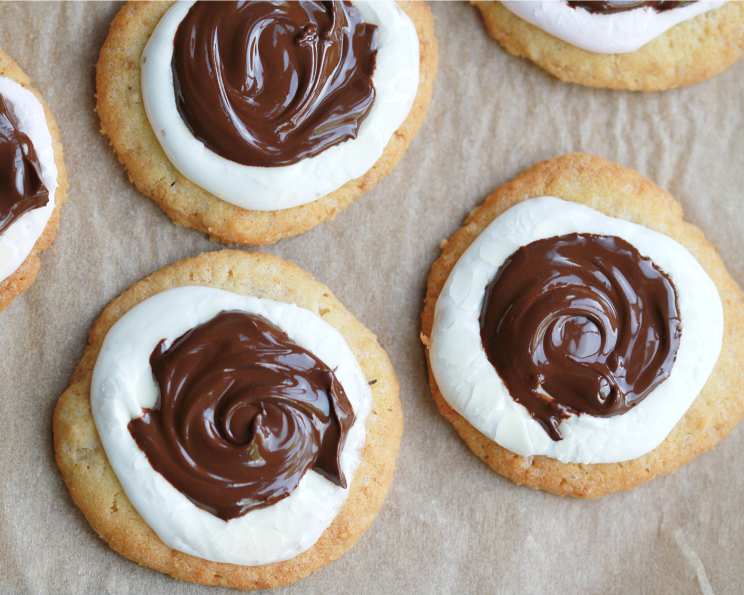
Remove the cookies from the oven once more. Top the marshmallows on each cookie with one rectangle of milk chocolate from the candy bars.
-
Let the cookies stand for a few minutes until the chocolate begins to soften. Then, use a knife to smear the softened chocolate over the marshmallows. This creates that classic s’more effect.
-
Finally, let the cookies stand until the chocolate is completely set before serving. This will prevent a sticky mess!
Expert Tips & Tricks
- Soft Butter is Key: Ensure your butter is truly softened before creaming it with the sugar. Cold butter won’t incorporate air properly, resulting in dense cookies.
- Graham Cracker Finesse: If you don’t have pre-made graham cracker crumbs, simply pulse graham crackers in a food processor until finely ground.
- Chocolate Choices: Feel free to experiment with different types of chocolate. Dark chocolate adds a more sophisticated flavor, while white chocolate creates a sweeter treat.
- Make-Ahead Magic: The cookie dough can be made ahead of time and stored in the refrigerator for up to 2 days. Just be sure to bring it to room temperature slightly before shaping into balls.
- Marshmallow Placement: Press the marshmallows gently but firmly into the dough to ensure they adhere properly during baking.
- Preventing Spreading: If your cookies tend to spread too much, try chilling the dough for 30 minutes before baking.
Serving & Storage Suggestions
These S’more Thumbprint Cookies are best enjoyed warm, when the chocolate is still slightly melty and the marshmallows are gooey. They’re perfect with a glass of cold milk or a cup of hot cocoa.
To store leftover cookies, place them in an airtight container at room temperature. They will stay fresh for up to 3 days. For longer storage, you can freeze the cookies for up to 2 months. Thaw them at room temperature before serving. Reheat the cookies in a preheated oven at 300°F (150°C) for a few minutes to restore their warm, gooey texture.
Nutritional Information
| Nutrient | Amount per Serving | % Daily Value |
|---|---|---|
| Calories | 4239 kcal | N/A |
| Calories from Fat | 2265 g | 53% |
| Total Fat | 251.7 g | 387% |
| Saturated Fat | 152.6 g | 762% |
| Cholesterol | 714.9 mg | 238% |
| Sodium | 2607.8 mg | 108% |
| Total Carbohydrate | 456.8 g | 152% |
| Dietary Fiber | 12.9 g | 51% |
| Sugars | 261.5 g | 1045% |
| Protein | 46 g | 92% |
Note: Nutritional information is an estimate and may vary depending on specific ingredients and portion sizes.
Variations & Substitutions
- Gluten-Free S’mores: Substitute the all-purpose flour with a gluten-free blend and use gluten-free graham crackers for the crumbs.
- Dark Chocolate Delight: Replace the milk chocolate with dark chocolate for a richer, more intense flavor.
- Peanut Butter Cup S’mores: Instead of milk chocolate, use miniature peanut butter cups for a peanut butter twist.
- Seasonal Spice: Add a pinch of cinnamon or nutmeg to the dough for a cozy, autumnal flavor.
- Nutty Nibbles: Incorporate chopped pecans or walnuts into the dough for added texture and flavor.
- Vegan S’mores: Substitute the butter with a vegan butter alternative, the egg with a flax egg, and the milk chocolate with a vegan chocolate. Ensure the marshmallows are also vegan, as many contain gelatin.
FAQs (Frequently Asked Questions)
Q: Can I use regular-sized marshmallows instead of mini marshmallows?
A: Yes, you can. However, you may need to cut them into smaller pieces to fit in the center of the cookies.
Q: Can I freeze the baked cookies?
A: Yes, you can freeze the baked cookies in an airtight container for up to 2 months. Thaw them at room temperature before serving.
Q: My cookies are spreading too much. What am I doing wrong?
A: The butter may be too soft or the oven temperature may be too high. Try chilling the dough for 30 minutes before baking and ensuring your oven is accurately calibrated.
Q: Can I make these cookies without graham cracker crumbs?
A: While the graham cracker crumbs add a distinct s’more flavor, you can substitute them with finely crushed vanilla wafers or almond flour if needed.
Q: How do I prevent the marshmallows from burning in the oven?
A: Keep a close eye on the cookies during the last few minutes of baking and remove them from the oven as soon as the marshmallows are slightly softened but not burnt.
Final Thoughts
These S’more Thumbprint Cookies are more than just a sweet treat; they’re a little bite of happiness, nostalgia, and shared memories. Whether you’re baking them for a summer barbecue, a cozy winter evening, or simply to satisfy a craving, I hope they bring you as much joy as they bring me. So gather your ingredients, preheat your oven, and get ready to create some delicious, campfire-inspired magic. Don’t forget to share your creations and feedback with me – I can’t wait to hear what you think!