
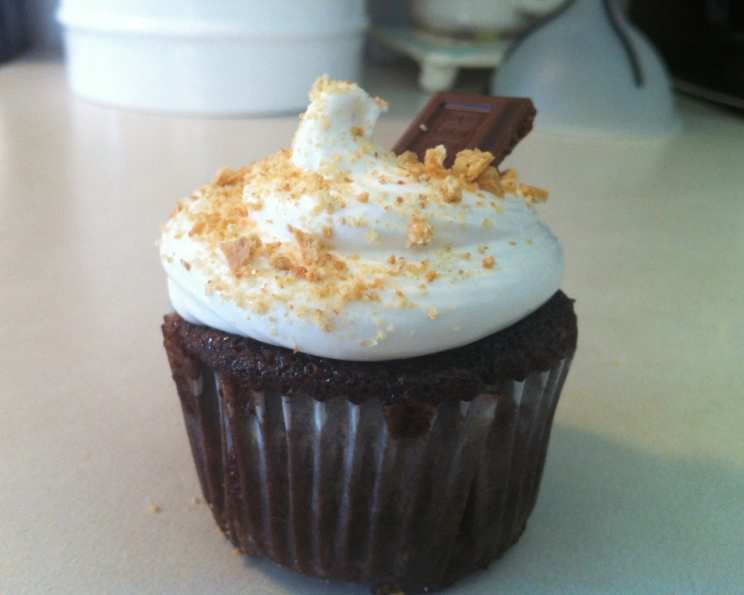
S’mores Cupcakes: A Campfire Classic in Every Bite
The first time I tasted a s’more, I was a clumsy kid at summer camp, more interested in catching frogs than crafting the perfect toasted marshmallow. My counselor, a wizened teenager named Sarah, patiently showed me the ropes – the gentle roasting, the strategic placement between graham crackers and melting chocolate. That gooey, smoky, sweet bite was pure magic, and it instantly cemented the s’more as my ultimate comfort food. Now, these S’mores Cupcakes bring that same nostalgic joy, but with a little extra finesse perfect for any occasion.
Recipe Overview
- Prep Time: 30 minutes
- Cook Time: 25 minutes
- Total Time: 55 minutes
- Yields: 24 cupcakes
- Serves: 24
- Dietary Type: Not specified
Ingredients
For the Graham Cracker Crust:
- 1 1/2 cups graham cracker crumbs
- 1/4 cup sugar
- 5 1/3 tablespoons unsalted butter, melted
- 8 ounces bittersweet chocolate, finely chopped
For the Cake:
- 2 cups sugar
- 2 tablespoons sugar
- 1 3/4 cups all-purpose flour
- 3/4 cup cocoa powder, plus 1 tablespoon cocoa powder
- 1 1/2 teaspoons baking powder
- 1 1/2 teaspoons baking soda
- 1 teaspoon salt
- 2 large eggs
- 1 cup whole milk
- 1/2 cup vegetable oil
- 2 teaspoons vanilla extract
- 1 cup boiling water
For the Frosting:
- 8 large egg whites, at room temperature
- 2 cups sugar
- 1/2 teaspoon cream of tartar
- 2 teaspoons vanilla extract
Equipment Needed
- Two 12-cup muffin tins
- Paper liners
- Small mixing bowl
- Fork
- Electric mixer (stand or hand-held)
- Double boiler (or heatproof bowl and saucepan)
- Whisk
- Instant-read thermometer
- Kitchen torch (optional)
Instructions
-
Preheat your oven to 350°F (175°C). Line two cupcake pans with paper liners.
-
Prepare the graham cracker crust: In a small mixing bowl, combine the graham cracker crumbs, sugar, and melted butter. Mix well with a fork until the mixture resembles wet sand.
-
Portion the crust: Drop about 1 tablespoon of the graham cracker mixture into the bottom of each cupcake liner. Press down firmly to create an even layer. A flat-bottomed measuring cup or the bottom of a small jar can be helpful for this.
-
Add chocolate: Sprinkle a small amount of the finely chopped bittersweet chocolate on top of each graham cracker crust.
-
Bake the crust: Bake the cupcake pans in the preheated oven for 5 minutes. Remove from the oven, but maintain the oven temperature.
-
Prepare the cake batter: In the bowl of an electric mixer fitted with the paddle attachment, sift together the sugar, flour, cocoa powder, baking powder, baking soda, and salt. Mix on low speed until just combined.
-
In a separate mixing bowl, combine the eggs, milk, vegetable oil, and vanilla extract. Whisk together until well blended.
-
Combine wet and dry ingredients: Add the wet ingredients to the dry ingredients in the mixer bowl. Mix on low speed for 30 seconds to incorporate. Scrape down the sides of the bowl, then increase the speed to medium and beat for 2 minutes. The batter will lighten in color and become smoother.
-
Add boiling water: With the mixer on low speed, slowly pour in the boiling water and stir just until combined. The batter will be thin, but don’t worry, this is expected.
-
Fill the cupcake liners: Divide the batter evenly between the prepared cupcake liners, filling each about ¾ of the way full.
-
Bake the cupcakes: Return the pans to the oven and bake for 18-20 minutes, or until a toothpick inserted in the center comes out clean. Rotate the pans halfway through baking to ensure even browning.
-
Cool the cupcakes: Allow the cupcakes to cool in the pans for 5-10 minutes before removing them and transferring them to a wire rack to cool completely. It’s essential that the cupcakes are completely cool before frosting.
-
Prepare the frosting: In the top of a double boiler (or a heatproof bowl set over a saucepan of simmering water), combine the egg whites, sugar, and cream of tartar. Make sure the bowl doesn’t touch the water.
-
Heat the frosting mixture: Heat the mixture, whisking frequently, until it reaches 160°F (71°C) on an instant-read thermometer. This step is crucial for ensuring the egg whites are cooked and safe to consume.
-
Whip the frosting: Transfer the mixture to the bowl of an electric mixer fitted with the whisk attachment. Start whisking on low speed, gradually increasing to medium-high speed, until stiff, glossy peaks form. This may take several minutes.
-
Add vanilla: Mix in the vanilla extract until combined. The frosting should be smooth, stable, and hold its shape well.
-
Frost the cupcakes: Once the cupcakes are completely cool, frost them generously with the meringue frosting. You can use a piping bag for a decorative swirl or simply spread it on with a knife.
-
Toast the frosting (optional): For that classic s’mores look and flavor, use a kitchen torch to lightly brown the frosting. Be careful not to burn it – a quick pass is all you need.
-
Garnish (optional): Garnish with additional chopped chocolate and graham cracker segments for an extra touch of s’mores authenticity.
Expert Tips & Tricks
- Room Temperature Matters: Ensure your egg whites are truly at room temperature for the frosting. This will help them whip up to their full volume.
- Don’t Overbake: Overbaked cupcakes will be dry. Start checking for doneness around 18 minutes with a toothpick. A few moist crumbs are okay, but you don’t want wet batter.
- Frosting Stability: The key to a stable meringue frosting is reaching the correct temperature (160°F/71°C) and whipping it until stiff, glossy peaks form. If the frosting seems loose, keep whipping!
- Torch Technique: When torching the frosting, keep the flame moving and avoid holding it in one spot for too long. You want a gentle browning, not a burnt flavor.
- Make Ahead: The graham cracker crust can be made a day in advance. Store it in an airtight container at room temperature.
Serving & Storage Suggestions
Serve these S’mores Cupcakes immediately for the best texture and flavor, especially if you’ve torched the frosting. The toasted marshmallow flavor is most prominent right away.
Store leftover cupcakes in an airtight container at room temperature for up to 2 days, or in the refrigerator for up to 5 days. The frosting may soften slightly in the refrigerator.
While freezing is not recommended (the frosting can become icy), you can freeze the unfrosted cupcakes. Wrap them individually in plastic wrap and then place them in a freezer bag. Thaw completely before frosting.
Nutritional Information
(Note: These values are estimates and can vary based on specific ingredient brands and portion sizes.)
| Nutrient | Amount per Serving | % Daily Value |
|---|---|---|
| Calories | 320 kcal | 16% |
| Total Fat | 14g | 22% |
| Saturated Fat | 6g | 30% |
| Cholesterol | 35mg | 12% |
| Sodium | 280mg | 12% |
| Total Carbohydrate | 45g | 15% |
| Dietary Fiber | 2g | 8% |
| Sugars | 30g | N/A |
| Protein | 4g | 8% |
Variations & Substitutions
- Gluten-Free: Use gluten-free graham crackers and gluten-free all-purpose flour blend in the cake.
- Dairy-Free: Substitute the whole milk with almond milk or soy milk. Use a dairy-free butter substitute in the crust. Ensure the chocolate is also dairy-free.
- Chocolate Variations: Experiment with different types of chocolate in the crust, such as milk chocolate or white chocolate.
- Marshmallow Swirl: For an extra layer of marshmallow flavor, swirl marshmallow fluff into the cake batter before baking.
- Seasonal Adaptations: In the fall, add a pinch of cinnamon to the graham cracker crust for a warm, cozy twist.
FAQs (Frequently Asked Questions)
Q: Can I use store-bought frosting instead of making meringue?
A: Yes, but the meringue frosting really captures the “marshmallow” element of a s’more. If you substitute, look for a marshmallow-flavored frosting or a very light and fluffy vanilla frosting.
Q: My frosting is runny. What did I do wrong?
A: Most likely, the egg whites weren’t heated to a high enough temperature, or they weren’t whipped long enough. Ensure the mixture reaches 160°F (71°C) and continue whipping until stiff, glossy peaks form.
Q: Can I make these without a kitchen torch?
A: Absolutely! The kitchen torch adds visual appeal and a subtle toasted flavor, but it’s not essential. You can skip the torching altogether.
Q: How do I prevent the cupcake liners from sticking to the cupcakes?
A: Make sure the cupcakes are completely cool before attempting to remove the liners. You can also try using a higher-quality cupcake liner.
Q: Can I add chocolate chips to the cake batter?
A: Definitely! Chocolate chips would be a delicious addition to these S’mores Cupcakes. Fold them into the batter just before filling the liners.
Final Thoughts
These S’mores Cupcakes are more than just a dessert; they’re a mini vacation back to childhood, a reminder of campfire stories and sticky fingers. Whether you’re a seasoned baker or just starting out, this recipe is sure to impress. So, gather your ingredients, preheat your oven, and get ready to create a little bit of campfire magic in your kitchen. And please, share your creations – I can’t wait to see your photos and hear about your own s’mores adventures! Consider serving them with a glass of cold milk or a steaming mug of hot chocolate for the ultimate cozy experience.