
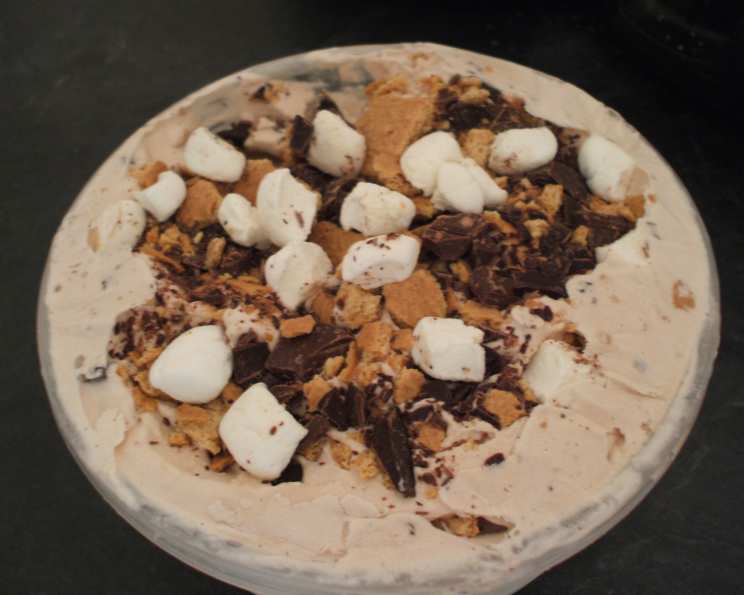
Homemade S’mores Ice Cream: A Campfire Classic in Every Scoop
My summers as a kid were defined by two things: the crackling warmth of a campfire and the gooey, chocolatey, marshmallowy goodness of s’mores. There’s something magical about roasting a marshmallow until it’s perfectly golden brown, sandwiching it between graham crackers and a square of Hershey’s chocolate, and watching it all melt together. Now, imagine that experience transformed into a cool, creamy, utterly irresistible ice cream. This recipe captures the essence of those childhood memories in every single spoonful.
Recipe Overview
- Prep Time: 20 minutes
- Cook Time: 5 minutes (for initial egg mixture)
- Total Time: 40 minutes (plus freezing time)
- Servings: Approximately 1 quart
- Yield: Approximately 1 quart
- Dietary Type: Not specified (Contains Dairy, Eggs)
Ingredients
- 2 large eggs
- ¾ cup sugar
- 1 tablespoon unsweetened cocoa powder
- 2 cups heavy cream
- 1 cup milk
- 1 teaspoon vanilla
- Honey graham crackers, broken up (approximately 1 sleeve, or 10 sheets)
- 1 (1.55 oz) Hershey Bar, chopped (approximately 4 squares)
- ¾ cup miniature marshmallows
Equipment Needed
- Mixer (handheld or stand mixer)
- Ice cream maker
- Measuring cups and spoons
- Small saucepan (optional, for heating egg mixture)
- Container for freezing ice cream
Instructions
-
In a large bowl, using a mixer, beat the eggs for 2 minutes until they become light in color and slightly fluffy. This step is crucial for creating a smooth and creamy base for the ice cream.
-
In a separate small bowl, thoroughly mix the cocoa powder into the sugar. This prevents clumping and ensures the cocoa powder is evenly distributed throughout the ice cream base.
-
Slowly add the sugar-cocoa mixture to the beaten eggs, mixing for approximately 1 minute longer, or until well blended. Incorporate it gradually to avoid deflating the eggs.
-
Add the heavy cream, milk, and vanilla to the mixture. Mix again until all ingredients are well incorporated. This creates the liquid base for the ice cream.
-
(Optional Step for Tempering Eggs): For a richer and potentially safer ice cream base, consider gently tempering the eggs. Pour the cream and milk into a saucepan and heat over medium-low heat until just steaming, but not boiling. Slowly drizzle a small amount of the warm cream mixture into the egg mixture, whisking constantly to prevent the eggs from curdling. Repeat this process a few times until the egg mixture is warmed. Then, pour the warmed egg mixture back into the saucepan with the remaining cream. Cook over low heat, stirring constantly, until the mixture thickens slightly and coats the back of a spoon (about 5 minutes). Do not boil. Remove from heat and let cool completely before proceeding to the next step. This step helps to pasteurize the eggs and creates a smoother final product.
-
Pour the mixture into your ice cream maker and freeze according to the manufacturer’s directions. The freezing time will vary depending on your machine, but it usually takes about 20-30 minutes.
-
About 2 minutes before the ice cream is finished churning, add the remaining ingredients: the broken-up graham crackers, chopped Hershey Bar, and miniature marshmallows. This ensures that the mix-ins are evenly distributed throughout the ice cream without becoming completely pulverized.
-
When finished churning, scoop the ice cream into a freezer-safe container.
-
If desired, top with additional crushed graham crackers, marshmallows, and chopped or shaved chocolate for an extra layer of s’mores goodness.
-
Freeze for at least 2 hours to allow the ice cream to fully harden before serving. This will improve the texture and prevent it from being too soft.
Expert Tips & Tricks
- Toast the marshmallows: For an even more authentic s’mores flavor, lightly toast the miniature marshmallows before adding them to the ice cream maker. You can do this quickly under the broiler or with a kitchen torch.
- Graham Cracker Dust: Pulse a few graham crackers in a food processor until finely ground to create a graham cracker dust. Swirl this into the ice cream for an extra layer of graham cracker flavor.
- Chocolate Shavings: Instead of chopping the Hershey Bar, use a vegetable peeler to create chocolate shavings for a more elegant presentation.
- Salted Chocolate: Use salted chocolate instead of regular Hershey’s to enhance the sweetness and create a more complex flavor profile.
- Make it Ahead: The ice cream base can be made up to 24 hours in advance and stored in the refrigerator. This will save you time when you’re ready to churn.
Serving & Storage Suggestions
Serve the s’mores ice cream in bowls or cones, garnished with extra graham cracker crumbs, marshmallows, and chocolate shavings. For a fun presentation, drizzle with a little chocolate syrup or marshmallow fluff.
Store leftover ice cream in an airtight container in the freezer. Homemade ice cream is best consumed within 1-2 weeks for optimal texture and flavor. After this time, it may develop ice crystals.
Avoid letting the ice cream melt and refreeze, as this will negatively impact the texture. If the ice cream becomes too hard to scoop, let it sit at room temperature for a few minutes to soften slightly.
Nutritional Information
Note: Nutritional information is an estimate and may vary based on specific ingredients and serving size.
| Nutrient | Amount per Serving (approx. ½ cup) | % Daily Value (Based on 2000 Calorie Diet) |
|---|---|---|
| Calories | 350 kcal | 18% |
| Total Fat | 25g | 38% |
| Saturated Fat | 15g | 75% |
| Cholesterol | 100mg | 33% |
| Sodium | 50mg | 2% |
| Total Carbohydrate | 30g | 10% |
| Dietary Fiber | 1g | 4% |
| Sugars | 25g | N/A |
| Protein | 5g | 10% |
Variations & Substitutions
- Dairy-Free S’mores Ice Cream: Substitute the heavy cream and milk with full-fat coconut milk for a dairy-free version.
- Vegan S’mores Ice Cream: In addition to using coconut milk, replace the eggs with a vegan egg substitute or a mixture of cornstarch and water. Ensure the chocolate is also dairy-free.
- Gluten-Free S’mores Ice Cream: Use gluten-free graham crackers. Many brands are now available.
- Spicy S’mores Ice Cream: Add a pinch of cayenne pepper to the chocolate for a spicy kick.
- Peanut Butter S’mores Ice Cream: Swirl in peanut butter or use peanut butter cups instead of Hershey’s bars.
- Mint Chocolate Chip S’mores Ice Cream: Add mint extract and mini chocolate chips.
FAQs (Frequently Asked Questions)
Q: My ice cream is too hard to scoop straight from the freezer. What can I do?
A: Let the ice cream sit at room temperature for 5-10 minutes to soften slightly before scooping. You can also try running your ice cream scoop under warm water.
Q: Can I make this ice cream without an ice cream maker?
A: While an ice cream maker provides the best results, you can try the “no-churn” method. After preparing the base, pour it into a freezer-safe container and freeze for 30 minutes. Then, using a fork, break up any ice crystals that have formed. Repeat this process every 30 minutes for 2-3 hours, or until the ice cream is firm enough to scoop.
Q: The marshmallows in my ice cream became hard and icy. How can I prevent this?
A: Adding the marshmallows towards the end of the churning process helps prevent them from becoming too hard. You can also try using marshmallow fluff instead of miniature marshmallows, which tends to stay softer in the freezer.
Q: Can I use regular chocolate instead of Hershey’s?
A: Yes, you can use any type of chocolate you prefer. Milk chocolate, dark chocolate, or even flavored chocolate would work well.
Q: How long does this ice cream last in the freezer?
A: Homemade ice cream is best consumed within 1-2 weeks for optimal texture and flavor. After this time, it may develop ice crystals and lose some of its creaminess.
Final Thoughts
This S’mores Ice Cream is more than just a dessert; it’s a nostalgic trip back to summer nights spent around a crackling campfire. The combination of creamy ice cream, crunchy graham crackers, gooey marshmallows, and rich chocolate is simply irresistible. So, gather your ingredients, fire up your ice cream maker, and prepare to indulge in a taste of pure childhood bliss. Don’t be afraid to experiment with different variations and make it your own. And most importantly, enjoy every single spoonful!