
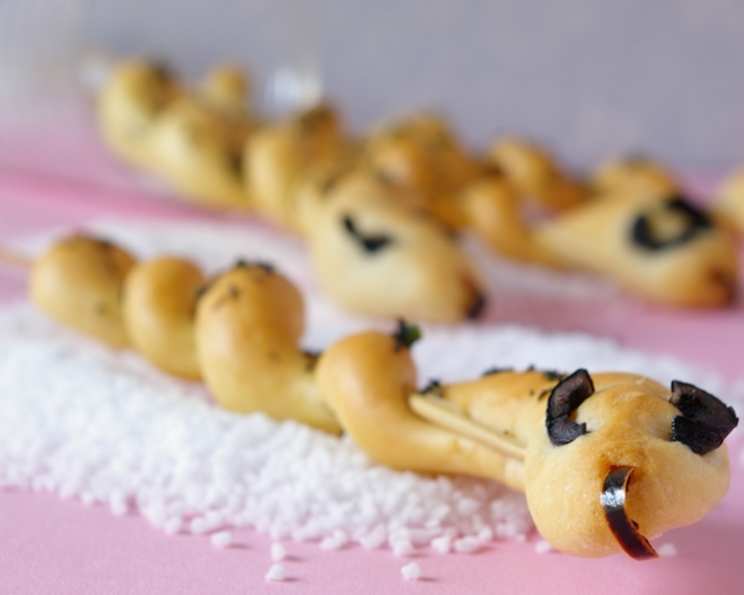
Snakes on a Stick: A Spooky and Savory Treat
There’s something magical about the anticipation of Halloween, especially when I was a kid. The crisp autumn air, the costumes, and, of course, the treats! One year, my mom decided to get creative with the Halloween snacks. Instead of the usual candy corn and store-bought cookies, she crafted these delightful “Snakes on a Stick.” I remember being both slightly spooked and incredibly excited by these savory serpents. The combination of warm, doughy bread and those beady olive eyes was just too much fun. To this day, the memory of those snakes brings a smile to my face, and I’m thrilled to share the recipe with you!
Recipe Overview
- Prep Time: 10 minutes
- Cook Time: 20 minutes
- Total Time: 30 minutes
- Servings: 12
- Yield: 12 snakes
- Dietary Type: Vegetarian
Ingredients
- 1 (11 ounce) can refrigerated breadstick dough
- ¼ teaspoon butter, melted
- Herbs or spices, to taste
- Pimiento, for tongue
- Sliced black olives, for eyes
Equipment Needed
- Wooden BBQ skewers
- Baking sheet
- Non-stick cooking spray
- Small bowl
- Pastry brush
Instructions
-
Begin by preheating your oven to 350 degrees Fahrenheit (175 degrees Celsius). This ensures the breadsticks will bake evenly and achieve a golden-brown hue.
-
Prepare your baking sheet by lightly coating it with non-stick cooking spray. This will prevent the snakes from sticking and make cleanup a breeze.
-
Now, take each wooden skewer and spray it with non-stick cooking spray. This will allow for easy removal of the baked breadsticks later.
-
Open the can of refrigerated breadstick dough. Carefully unroll the dough and separate the individual breadsticks.
-
Take one breadstick and begin wrapping it around a skewer. Gently stretch and manipulate the dough to resemble a snake, leaving a small portion of the skewer exposed at one end for easy handling. Flatten out the end a bit to create a wider “head” for your snake. Repeat this process with the remaining breadsticks and skewers.
-
This step requires a bit of artistic flair! Place two black olive slices on the top of each snake’s head to serve as eyes. Then, carefully insert a small piece of pimiento into the “mouth” area to create a tongue. Don’t be afraid to adjust the placement until you’re satisfied with the look.
-
Arrange the prepared snakes on the prepared baking sheet, making sure they are spaced evenly to allow for proper air circulation.
-
Bake in the preheated oven for approximately 20 minutes, or until the breadsticks are golden brown and cooked through. The cooking time may vary slightly depending on your oven, so keep a close eye on them.
-
Once the snakes are golden brown, remove them from the oven. Immediately brush them with the melted butter using a pastry brush.
-
Sprinkle the buttered snakes with your favorite herbs and spices. Options like garlic powder, onion powder, Italian seasoning, or even a sprinkle of cayenne pepper can add a delicious flavor dimension.
-
Allow the snakes to cool on the baking sheet for a few minutes before handling.
-
If desired, carefully slide the skewers out of the breadsticks before serving. Alternatively, you can leave the skewers in for easy handling, especially for younger guests.
NOTE: For a fun twist, you can make the dough from scratch and add food coloring to create vibrant green snakes. Simply knead in paste food coloring (using gloves to protect your hands from staining) until you achieve the desired shade.
Expert Tips & Tricks
- Dough Consistency: If the breadstick dough is too sticky to work with, lightly dust your hands and the work surface with flour.
- Eye Placement: Secure the olive eyes by gently pressing them into the dough before baking.
- Herb Infusion: For a more intense flavor, infuse the melted butter with minced garlic or herbs before brushing it onto the baked snakes.
- Creative Tongues: Instead of pimiento, try using small pieces of red bell pepper for a slightly different flavor and texture.
- Preventing Over-Browning: If the snakes start to brown too quickly, tent the baking sheet loosely with aluminum foil.
Serving & Storage Suggestions
Serve these spooky snakes warm or at room temperature. They are a perfect addition to any Halloween party spread and pair well with dips like marinara sauce, ranch dressing, or even a spooky green spinach dip.
To store leftovers, allow the snakes to cool completely before placing them in an airtight container. They will keep at room temperature for up to 2 days or in the refrigerator for up to 4 days. To reheat, simply warm them in a preheated oven or microwave until heated through.
Nutritional Information
| Nutrient | Amount per Serving | % Daily Value |
|---|---|---|
| Calories | 90 kcal | 5% |
| Total Fat | 3g | 4% |
| Saturated Fat | 1.5g | 8% |
| Cholesterol | 5mg | 2% |
| Sodium | 250mg | 11% |
| Total Carbohydrate | 13g | 5% |
| Dietary Fiber | 0g | 0% |
| Sugars | 1g | 2% |
| Protein | 2g | 4% |
Note: Nutritional information is an estimate and may vary based on specific ingredients and serving sizes.
Variations & Substitutions
- Gluten-Free Snakes: Use gluten-free breadstick dough for a gluten-free option.
- Vegan Snakes: Use vegan breadstick dough and substitute olive oil for butter. Ensure your herbs and spices are also vegan-friendly.
- Cheesy Snakes: Sprinkle shredded cheese over the snakes before baking for a cheesy, savory treat.
- Spicy Snakes: Add a pinch of cayenne pepper or red pepper flakes to the dough for a spicy kick.
- Sweet Snakes: Brush the baked snakes with melted butter and sprinkle with cinnamon sugar for a sweet twist.
FAQs (Frequently Asked Questions)
Q: Can I make the dough from scratch?
A: Absolutely! Making the dough from scratch allows for more control over ingredients and flavors. Just be sure to adjust the baking time accordingly.
Q: How do I prevent the snakes from drying out during baking?
A: Brushing the snakes with melted butter before and after baking helps to retain moisture and add flavor.
Q: Can I use different types of olives for the eyes?
A: Yes, you can use any type of olive you prefer, such as green olives or Kalamata olives, for a unique look.
Q: What if I don’t have skewers?
A: You can still make the snakes without skewers! Simply shape the breadstick dough into snake-like forms and bake them on a baking sheet.
Q: Can I freeze the baked snakes?
A: Yes, you can freeze the baked snakes for up to 2 months. Wrap them tightly in plastic wrap and then place them in a freezer-safe bag. Thaw completely before reheating.
Final Thoughts
I hope you enjoy making these fun and festive Snakes on a Stick! This recipe is a fantastic way to get creative in the kitchen and add a spooky touch to your Halloween celebrations. Don’t be afraid to experiment with different flavors and decorations to make them your own. Happy Halloween, and happy baking! I’d love to see your creations, so please share your feedback and photos!