
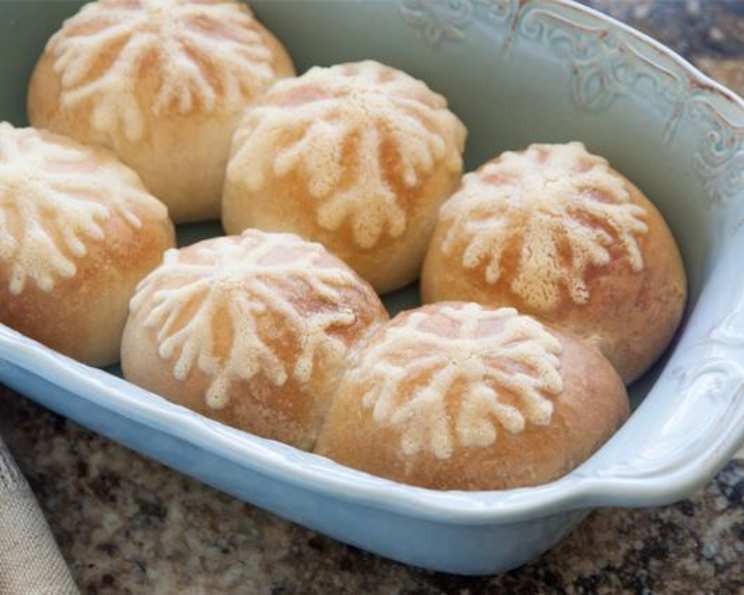
Snowflake Rolls: A Winter Baking Delight
The first time I made these rolls, it was a particularly gray December day. The sky was heavy with snow, and the air had that sharp, clean bite of winter. The aroma of baking bread slowly filled the house, chasing away the chill, and when I pulled those golden, snowflake-adorned rolls from the oven, I knew I had created something truly special. They weren’t just rolls; they were a warm hug on a cold day, a little piece of winter magic on a plate.
Recipe Overview
- Prep Time: 20 minutes
- Cook Time: 15 minutes
- Total Time: 35 minutes
- Servings: 12
- Yield: 12 rolls
- Dietary Type: Vegetarian
Ingredients
- 12 frozen Texas rolls or 12 warm-n-serv soft dinner rolls
- 4 tablespoons butter, softened
- 4 tablespoons flour
- 1 teaspoon hot water
Equipment Needed
- Round cake pan
- Small bowl
- Sandwich bag
Instructions
- Begin by preparing your baking pan. Lightly spray a round cake pan with non-stick cooking spray. This will prevent the rolls from sticking and ensure easy removal after baking.
- Arrange the rolls evenly spaced in the prepared round cake pan. If using frozen rolls, ensure they have adequate space to rise.
- Cover the pan with plastic wrap that has been sprayed with cooking spray. This prevents the wrap from sticking to the rolls as they rise.
- Let the rolls rise in a warm place until they have nearly doubled in size. The rising time will vary depending on the temperature of your kitchen and whether you’re using frozen or pre-made rolls. Frozen rolls will take significantly longer to rise.
- While the rolls are rising, prepare the snowflake drizzle. In a small bowl, combine the softened butter, flour, and hot water.
- Mix the ingredients until they form a smooth paste. The hot water helps to create a smooth, workable consistency.
- Transfer the butter mixture to a sandwich bag.
- Push the mixture down into one corner of the bag.
- Carefully snip off a very tiny corner of the bag with scissors. This will create a makeshift piping bag for creating the snowflake designs. Make sure the hole is small for better control.
- Once the rolls have risen adequately, remove the plastic wrap.
- Using the bag with the butter mixture, draw a snowflake design on the top of each roll. Be creative with your designs! A simple snowflake can be made by drawing two intersecting lines and then adding smaller lines branching off.
- Bake the rolls in a preheated oven at 350°F (175°C) for 15 minutes, or until the tops of the rolls are golden brown.
- Adjust the number of rolls for different pan sizes as needed, ensuring they have enough room to rise and bake evenly.
- Once baked, let cool slightly before serving.
Expert Tips & Tricks
- For a richer flavor, use salted butter in the snowflake drizzle. The salt enhances the sweetness of the rolls.
- If your rolls are browning too quickly, tent the pan with aluminum foil during the last few minutes of baking. This will prevent the tops from burning.
- To speed up the rising process for frozen rolls, place the covered pan in a warm oven (turned off) with a pan of hot water underneath. The steam will create a warm, humid environment that encourages rising.
- Don’t overmix the butter mixture. Overmixing can result in a tough drizzle.
- For a shinier finish, brush the tops of the baked rolls with melted butter immediately after removing them from the oven.
- If you find that the butter mixture is too thick to pipe easily, add a tiny drop more of hot water until it reaches a workable consistency.
- For extra flavor, add a pinch of cinnamon or nutmeg to the butter mixture before piping.
- If you want to get ahead, you can prepare the butter mixture the day before and store it in the refrigerator. Bring it to room temperature before piping.
Serving & Storage Suggestions
Serve these Snowflake Rolls warm, straight from the oven, for the best taste and texture. They are the perfect accompaniment to soups, stews, salads, or simply enjoyed on their own with a pat of butter.
To store leftover rolls, allow them to cool completely before placing them in an airtight container. They will keep at room temperature for up to 2 days, in the refrigerator for up to 5 days, or in the freezer for up to 2 months. To reheat, wrap the rolls in foil and warm them in a preheated oven at 350°F (175°C) for 5-10 minutes, or until heated through. You can also microwave them for a few seconds, but be careful not to overcook them, as they can become tough.
Nutritional Information
| Nutrient | Amount per Serving | % Daily Value |
|---|---|---|
| Calories | 310 kcal | – |
| Calories from Fat | – | 27% |
| Total Fat | 9.4 g | 14% |
| Saturated Fat | 3.6 g | 18% |
| Cholesterol | 13.6 mg | 4% |
| Sodium | 494.8 mg | 20% |
| Total Carbohydrate | 46.7 g | 15% |
| Dietary Fiber | 1.8 g | 7% |
| Sugars | 4.8 g | – |
| Protein | 9.7 g | 19% |
Note: Nutritional information is an estimate and may vary based on specific ingredients and portion sizes.
Variations & Substitutions
- Garlic Herb Snowflake Rolls: Add a teaspoon of garlic powder and a tablespoon of finely chopped fresh herbs (such as rosemary, thyme, or parsley) to the butter mixture for a savory twist.
- Sweet Snowflake Rolls: Add a tablespoon of powdered sugar and a pinch of cinnamon to the butter mixture for a sweeter, dessert-like roll.
- Dairy-Free Snowflake Rolls: Use a dairy-free butter substitute for the butter in the drizzle. Ensure your rolls are also dairy-free.
- Gluten-Free Snowflake Rolls: Use gluten-free dinner rolls and substitute the flour in the drizzle with a gluten-free all-purpose flour blend.
- Cheesy Snowflake Rolls: Sprinkle shredded Parmesan or Asiago cheese over the rolls before baking for a savory, cheesy flavor.
FAQs (Frequently Asked Questions)
Q: Can I use regular frozen bread dough instead of dinner rolls?
A: Yes, you can use frozen bread dough. Thaw it according to package directions, then shape it into small rolls before proceeding with the recipe. You may need to adjust the baking time slightly.
Q: What if I don’t have a round cake pan?
A: You can use a square baking pan or even a baking sheet. Just arrange the rolls evenly spaced, ensuring they have enough room to rise.
Q: Can I make the dough from scratch?
A: Absolutely! If you have a favorite dinner roll recipe, feel free to use it in place of the store-bought rolls. Just ensure the rolls are similar in size and consistency.
Q: How do I prevent the plastic wrap from sticking to the rolls while rising?
A: Spraying the plastic wrap with cooking spray before covering the rolls will prevent it from sticking as they rise.
Q: Can I make these rolls ahead of time and bake them later?
A: You can prepare the rolls and let them rise in the refrigerator overnight. In the morning, bring them to room temperature for about 30 minutes before baking. This will allow them to rise fully before going into the oven.
Final Thoughts
These Snowflake Rolls are more than just bread; they are a celebration of winter, a testament to the simple joys of baking, and a delicious way to bring warmth and cheer to your table. Don’t be afraid to get creative with your snowflake designs and personalize them to your liking. I encourage you to try this recipe and share the warmth and joy with your loved ones. And of course, I’d love to hear about your experience and see your beautiful snowflake creations!