
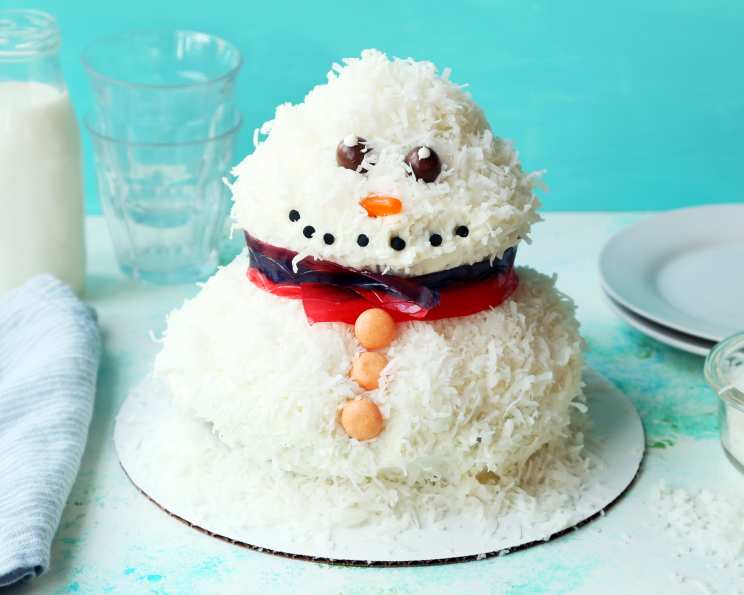
Snowman Snowball Cake: A Winter Wonderland Dessert
I’ll never forget the year my little sister, Lily, decided that snowmen needed to be edible. Our first attempt involved way too much real snow (don’t ask!), but the pure joy on her face as she proudly presented her melting creation sparked a tradition. Now, every year, instead of building snowmen outside, we gather in the kitchen to craft this Snowman Snowball Cake, a sweet and delightful centerpiece that captures the magic of winter without the frostbite. This charming dessert, with its fluffy coconut “snow” and sweet marshmallow frosting, is guaranteed to bring smiles to everyone who gathers around your holiday table.
Recipe Overview
- Prep Time: 30 minutes
- Cook Time: 60 minutes for the large cake, 30 minutes for the small cake
- Total Time: 1 hour 40 minutes
- Servings: 6-8
- Yield: 1 Snowman Cake
- Dietary Type: Not specified (Contains dairy, eggs, and gluten)
Ingredients
Cake
- 1 ½ packages chocolate cake mix
- 4 eggs
- 1 ½ cups water
- ½ cup oil
Frosting
- ½ cup butter
- 1 (8 ounce) jar marshmallow cream
- 1 cup powdered sugar
Decoration and Assembly
- 1 ½ cups coconut flakes
- 2 candy-coated chocolates (for eyes)
- 2 drops white icing (for eyes)
- 1 orange chewy candy (for nose)
- 5-6 candies (mini chocolate balls) (for mouth)
- 3-4 candies (yellow sweet tart chews) (for buttons)
- 2 candies (strawberry sour belts) (for scarf)
Equipment Needed
- Large (8-inch) baking bowl
- Medium (5-inch) baking bowl
- Mixing bowls
- Stand mixer or hand mixer
- Cake stand
- Small round cardboard (optional)
- Piping bag or small plastic bag
Instructions
-
Preheat your oven to 350°F (175°C). Grease and flour both the 8-inch and 5-inch baking bowls. This will ensure the cakes release easily after baking.
-
In a large mixing bowl, combine the chocolate cake mix, eggs, water, and oil. Use a hand mixer or whisk to gently mix until just combined. Be careful not to overmix, as this can result in a tough cake.
-
Pour a majority of the cake batter into the prepared 8-inch baking bowl. Pour the remaining batter into the prepared 5-inch baking bowl. Aim for a 2/3 to 1/3 split; the larger bowl will be the base of the snowman.
-
Bake the cakes at 350°F (175°C). The larger cake will need to bake for approximately 60 minutes, while the smaller cake will take about 30 minutes. To check for doneness, insert a toothpick into the center of each cake. If it comes out clean or with just a few moist crumbs, the cakes are ready.
-
Let the cakes cool in their bowls for about 10-15 minutes before inverting them onto a wire rack to cool completely. This prevents them from breaking.
-
Once the larger cake is completely cool, carefully cut a hole into the center. The hole should be large enough to hold a generous amount of frosting. You can use a small knife or a cookie cutter to create the hole.
-
Fill the hole in the larger cake with some of the marshmallow cream frosting (recipe follows). This adds extra moisture and flavor to the base of the snowman.
-
To prepare the frosting, in a stand mixer fitted with the paddle attachment (or using a hand mixer), cream the ½ cup of butter until light and fluffy.
-
Add the 8-ounce jar of marshmallow cream to the butter and mix until well combined. This will create a deliciously sweet and airy frosting.
-
Gradually add the 1 cup of powdered sugar to the butter and marshmallow cream mixture, mixing on low speed until fully incorporated and smooth. Be sure to scrape down the sides of the bowl periodically to ensure everything is evenly mixed.
-
Place the larger cake upside down on a cake stand. This will be the bottom base of the snowman, and flipping it provides a flatter surface for decorating.
-
Generously cover the larger cake with the marshmallow frosting. Use a spatula or knife to create a smooth and even layer of frosting all over the cake.
-
Cover the smaller cake (the snowman’s head) with the marshmallow frosting.
-
Carefully set the smaller cake (the snowman’s head) on top of the larger cake. To prevent the head from sliding off, you may need to use a small round cardboard as a base between the two cakes. Cut a piece of cardboard slightly smaller than the diameter of the smaller cake and place it on top of the larger cake before adding the head.
-
Completely cover the entire snowman (both the head and the body) with coconut flakes. Gently press the coconut flakes into the frosting to ensure they adhere well. This creates the “snow” effect.
-
To make the eyes, pipe small pupils onto the 2 candy-coated chocolates using the white icing. You can use a piping bag or a small plastic bag with the corner snipped off.
-
Place the candy-coated chocolates onto the snowman’s head to form the eyes.
-
Add the orange chewy candy to the face to form the nose. You may need to cut it into a triangular shape to resemble a carrot.
-
Place the 5-6 mini chocolate balls below the nose to form the mouth.
-
Arrange the 3-4 yellow sweet tart chews down the body of the snowman to create the buttons.
-
Wrap the 2 strawberry sour belts around the neck to create the scarf. You can trim the belts to the desired length and arrange them to look like a cozy scarf.
Expert Tips & Tricks
- For an even more intense chocolate flavor, add a tablespoon of cocoa powder to the cake batter.
- If the marshmallow frosting is too thick, add a tablespoon of milk or cream to thin it out.
- To make the coconut flakes stick better, lightly dampen the frosting with a spray of water before applying the coconut.
- Prepare the cakes a day in advance and store them, well-wrapped, at room temperature. Frost and decorate just before serving.
- To avoid a lopsided snowman, ensure the cakes are level after baking by trimming the tops with a serrated knife if necessary.
Serving & Storage Suggestions
Serve the Snowman Snowball Cake as a delightful centerpiece for your holiday dessert table. Cut into slices to reveal the moist chocolate cake and creamy marshmallow filling.
Store leftover cake in an airtight container in the refrigerator for up to 3 days. Due to the marshmallow frosting, freezing is not recommended as it can alter the texture.
Nutritional Information
| Nutrient | Amount per Serving | % Daily Value |
|---|---|---|
| Calories | 640.5 kcal | N/A |
| Calories from Fat | 384 g | 60% |
| Total Fat | 42.7 g | 65% |
| Saturated Fat | 18.7 g | 93% |
| Cholesterol | 164.7 mg | 54% |
| Sodium | 275.4 mg | 11% |
| Total Carbohydrate | 61.1 g | 20% |
| Dietary Fiber | 2.1 g | 8% |
| Sugars | 45.2 g | 180% |
| Protein | 5.3 g | 10% |
Note: Nutritional information is an estimate and may vary based on specific ingredients and portion sizes.
Variations & Substitutions
- Gluten-Free Snowman: Use a gluten-free chocolate cake mix and ensure all decorations are gluten-free as well.
- Dairy-Free Snowman: Substitute the butter in the frosting with a dairy-free butter alternative. Be sure to check the marshmallow cream for dairy ingredients or make your own vegan marshmallow cream.
- Flavor Variations: Add a teaspoon of peppermint extract to the cake batter or frosting for a festive peppermint flavor.
- Frosting Alternatives: Instead of marshmallow frosting, use a classic buttercream or chocolate ganache for a different flavor profile.
FAQs (Frequently Asked Questions)
Q: Can I use pre-made frosting instead of making my own marshmallow frosting?
A: Yes, you can use a store-bought marshmallow frosting to save time. Just make sure you have enough to cover both cakes generously.
Q: What if I don’t have baking bowls? Can I use cake pans?
A: Absolutely! You can use round cake pans. An 8-inch and a 5-inch cake pan will work perfectly.
Q: How do I prevent the coconut flakes from falling off the snowman?
A: Ensure the frosting is slightly tacky when applying the coconut flakes, and gently press them into the frosting for better adhesion. You can also lightly mist the finished snowman with water and sprinkle on more coconut if needed.
Q: Can I make the snowman ahead of time?
A: You can bake the cakes a day ahead and store them, well-wrapped, at room temperature. Frost and decorate just before serving for the best results. The fully decorated snowman is best enjoyed within a day or two.
Q: What can I use if I don’t have strawberry sour belts for the scarf?
A: Red fruit leather or even strips of red fondant can be used as a substitute for the strawberry sour belts. You can also use a ribbon if you prefer a non-edible option.
Final Thoughts
This Snowman Snowball Cake is more than just a dessert; it’s a fun and creative project that brings the joy of the holiday season into your kitchen. Don’t be afraid to get creative with the decorations and involve the whole family in the process. Whether you’re a seasoned baker or just starting out, this recipe is sure to impress and create lasting memories. So, gather your ingredients, preheat your oven, and get ready to build a delicious snowman that will light up your home with sweetness and smiles! Share your creations and feedback – I’d love to see your snowman masterpieces! Perhaps pair it with a warm mug of hot cocoa for the perfect winter treat.