
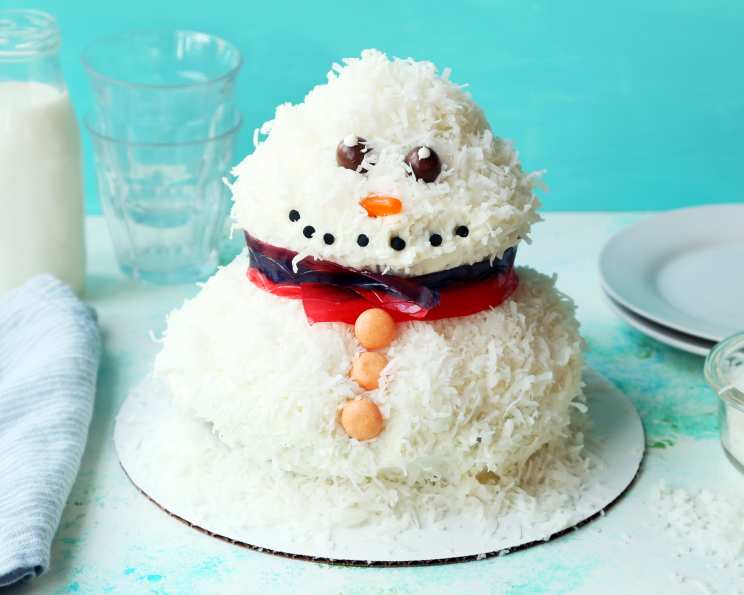
Snowman Snowball Cake: A Winter Wonderland Treat
I remember one particularly magical Christmas morning, not because of the presents under the tree, but because of the surprise my grandmother had baked. It wasn’t the traditional gingerbread house, but a whimsical snowman cake, covered in a flurry of coconut “snow.” The marshmallow frosting was impossibly fluffy, and the candy decorations seemed to twinkle like Christmas lights. It wasn’t just a dessert; it was a centerpiece of joy, a sweet reminder of the childlike wonder that Christmas evokes. Now, I share this recipe with you, hoping it brings a similar spark of magic to your home.
Recipe Overview
- Prep Time: 30 minutes
- Cook Time: 60 minutes (large cake) / 30 minutes (small cake)
- Total Time: 2 hours (including cooling)
- Servings: 6-8
- Yield: 1 Snowman Cake
- Dietary Type: Not specified
Ingredients
Cake
- 1 1⁄2 chocolate cake mix (plus ingredients called for on the box)
- 4 eggs
- 1 1⁄2 cups water
- 1⁄2 cup oil
Frosting
- 1⁄2 cup butter, softened
- 1 (8 ounce) jar marshmallow cream
- 1 cup powdered sugar
Decoration and Assembly
- 1 1⁄2 cups coconut flakes
- 2 candy-coated chocolates (for eyes)
- 2 drops white icing (for eyes)
- 1 orange chewy candy (for nose)
- 5-6 candies (mini chocolate balls, for mouth)
- 3-4 candies (yellow sweet tart chews, for buttons)
- 2 candies (strawberry sour belts, for scarf)
Equipment Needed
- Large (8-inch) baking bowl
- Medium (5-inch) baking bowl
- Mixing bowls
- Stand mixer or hand mixer
- Cake stand
- Small round cardboard (optional, for head support)
- Piping bag or small Ziploc bag
- Measuring cups and spoons
- Oven
Instructions
-
Preheat your oven to 350°F (175°C). Prepare your baking bowls by greasing and flouring them. This will ensure the cakes release easily after baking.
-
In a large mixing bowl, combine the chocolate cake mix, eggs, water, and oil. Mix according to the cake mix instructions. Avoid overmixing; just blend until the ingredients are incorporated. A hand mixer works well for this step, but you can also mix by hand.
-
Divide the batter: Pour a larger portion of the batter into the 8-inch baking bowl, and the remaining batter into the 5-inch baking bowl. This will create the body and head of the snowman.
-
Bake the cakes: Bake the larger cake (8-inch bowl) for 60 minutes and the smaller cake (5-inch bowl) for 30 minutes. To check for doneness, insert a toothpick into the center of the cake. If it comes out clean or with a few moist crumbs, the cake is done.
-
Cool the cakes: Once baked, let the cakes cool in the bowls for about 10-15 minutes before inverting them onto a wire rack to cool completely. This prevents the cakes from sticking and breaking.
-
Prepare the marshmallow cream frosting: In a stand mixer fitted with the paddle attachment (or using a hand mixer), cream the softened butter until it is light and fluffy.
-
Add the marshmallow cream to the butter and mix until well combined. Scrape down the sides of the bowl to ensure everything is evenly mixed.
-
Gradually add the powdered sugar to the butter and marshmallow cream mixture, mixing on low speed until fully incorporated and smooth. Be careful not to add the powdered sugar too quickly, as it can create a cloud of dust. If the frosting is too thick, add a tiny splash of milk or cream to reach desired consistency.
-
Level the larger cake: Once the cakes are completely cooled, use a serrated knife to level the top of the larger cake, creating a flat surface. This will help the snowman stand more stably.
-
Cut a hole in the larger cake: Cut a shallow hole in the center of the leveled large cake. Fill this hole with some of the marshmallow cream frosting. This adds extra flavor and moisture to the base of the snowman.
-
Assemble the snowman’s base: Place the larger cake upside down on a cake stand. This will be the bottom base of the snowman.
-
Frost the base: Cover the larger cake completely with the marshmallow frosting. Use an offset spatula to create a smooth, even layer.
-
Prepare the snowman’s head: Cover the smaller cake (the snowman’s head) with the marshmallow frosting.
-
Attach the head: Carefully set the smaller cake on top of the bottom/larger cake. You may need to use a small round cardboard as a base for the head to prevent it from sliding off, especially if your frosting is very soft.
-
Create the “snow”: Cover the entire snowman with coconut flakes. Gently press the coconut flakes into the frosting to ensure they adhere well.
-
Add the eyes: Pipe tiny dots of white icing onto the candy-coated chocolates. Then, place the chocolates on the snowman’s head to form the eyes.
-
Create the nose: Attach the orange chewy candy to the snowman’s face, forming the nose. Use a small dab of frosting to secure it if needed.
-
Form the mouth: Arrange the mini chocolate balls in a curved line below the nose to form the snowman’s mouth. Press them gently into the frosting.
-
Make the buttons: Place the sweet & tart chews down the body of the snowman, forming the buttons.
-
Design the scarf: Wrap the strawberry sour belts around the snowman’s neck, forming the scarf. Trim the ends if necessary.
Expert Tips & Tricks
- Cake Mix Variations: Feel free to use your favorite chocolate cake mix, or even substitute with a different flavor like vanilla or red velvet for a festive twist.
- Frosting Consistency: If your frosting is too stiff, add a teaspoon of milk or cream at a time until it reaches a spreadable consistency. If it’s too thin, add a tablespoon of powdered sugar.
- Coconut Flake Adhesion: Toasting the coconut flakes lightly before applying them to the snowman can enhance their flavor and give the “snow” a subtle golden hue.
- Candy Alternatives: Get creative with your candy decorations! Use licorice strings for the scarf, M&Ms for the buttons, or pretzel sticks for arms.
- Make-Ahead Tip: Bake the cakes a day in advance and store them tightly wrapped at room temperature. Frost them the next day for a stress-free decorating experience.
Serving & Storage Suggestions
Serve the Snowman Snowball Cake chilled or at room temperature. It’s best enjoyed the day it’s assembled, but leftovers can be stored in an airtight container in the refrigerator for up to 3 days. The coconut flakes may soften slightly in the fridge. The cake is best served at room temperature, so allow it to sit out for about 30 minutes before serving. Freezing is not recommended due to the frosting and decorations.
Nutritional Information
| Nutrient | Amount per Serving | % Daily Value |
|---|---|---|
| Calories | 640.5 kcal | N/A |
| Calories from Fat | 384 g | 60% |
| Total Fat | 42.7 g | 65% |
| Saturated Fat | 18.7 g | 93% |
| Cholesterol | 164.7 mg | 54% |
| Sodium | 275.4 mg | 11% |
| Total Carbohydrate | 61.1 g | 20% |
| Dietary Fiber | 2.1 g | 8% |
| Sugars | 45.2 g | 180% |
| Protein | 5.3 g | 10% |
Note: Nutritional information is an estimate and may vary based on specific ingredients used.
Variations & Substitutions
- Gluten-Free: Use a gluten-free chocolate cake mix.
- Dairy-Free Frosting: Substitute the butter in the frosting with a dairy-free butter alternative.
- Flavor Boost: Add a teaspoon of peppermint extract to the frosting for a festive holiday flavor.
- Coconut Cream: Use coconut cream instead of marshmallow frosting.
- Drip Effect: You can make it drip effect with white chocolate.
FAQs (Frequently Asked Questions)
Q: Can I use different sized bowls for the cake?
A: Yes, but adjust the baking times accordingly. The key is to have one cake significantly larger than the other to create the snowman shape.
Q: My frosting is too sweet. What can I do?
A: Add a pinch of salt to the frosting to balance the sweetness. You can also add a tablespoon of unsweetened cocoa powder to the chocolate frosting for a less sweet, more intense chocolate flavor.
Q: Can I make the cakes ahead of time?
A: Absolutely! Bake the cakes a day or two in advance, wrap them tightly in plastic wrap, and store them at room temperature until you’re ready to assemble the snowman.
Q: The coconut flakes are falling off. How can I prevent this?
A: Make sure the frosting is still slightly tacky when you add the coconut flakes. Gently press the flakes into the frosting to help them adhere better.
Q: What other decorations can I use besides candy?
A: Get creative! You can use sprinkles, edible glitter, chocolate shavings, or even fondant to decorate your snowman.
Final Thoughts
Embrace the spirit of the season and create your own Snowman Snowball Cake! This delightful treat is sure to bring smiles to faces of all ages. Don’t be afraid to get creative with the decorations and make it your own. Share your snowman creations with friends and family, and let the joy of baking bring you closer together. And if you try this recipe, I’d love to hear about your experience – share your photos and feedback! Happy baking!